Showing posts with label Spellbinder Hemstitch Rectangles Dies. Show all posts

Friday, July 28, 2023

Coloured Dry Embossing

July Coloured Dry Embossing Technique by Group of Seven Cardmakers!
Click on the link to get all the details for ways to color your dry embossed
images on your cards and to see all the girls beautiful card samples😄


The videos were very helpful:-)

My 1st card using the Sizzix Poinsettia 3D EB Folder and 
Water Coloring on Mixed Media paper.
  
I dry embossed the Sizzix Poinsettia 3D EB Folder on Strathmore Mixed Media
cardstock because I was using Kuretake Gansai Tambi "Gem Colors"  
Water-based Pigment Inks: Gem Red, Gem Green and Yellow Gold.
It has a beautiful subtle shine in the light.
I tried,  but my camera was not able to pick up the shine..

Next I trimmed the A2 image and cut into quarters.
Attached to Hero Arts Gold Metallic Paper from my stash using
Connect Glue.

Added the Altenew Gold Sequins and then stamped with Archival Jet
Jet Black ink the sentiment from Colorado Craft Co. Slimline Poinsettias set.

Attached card front to Neenah 115# Solar White cardstock and Done.

I LOVED the results and the tactile feel of watercoloring the raised
3D Embossed poinsettias:-) I got better with each card!  The small aqua pen
was very helpful in staying inside the images.

 *******************

My 2nd card using the same Sizzix Poinsettia 3D EB Folder on SU Real Red CS.

I dry embossed the 3D Poinsettia EB Folder on an A2 size SU Real Red Cardstock. 
I got a nice deep embossed image.

I tried swiping my SSS white pigment ink pad over the image,  but did not 
like how it was turning out...not enough control.

So used my Altenew mini blending brushes (3 in a set) using the smallest
brush for a Soft Looking Card with White Pigment Ink.   When done I used 
SU Real Red Blending Marker to outline the leaf veins.

I trimmed the 3D EB image with Spellbinder Rectangular Hemstitch Dies for the framing.
Added silver gel pen for the center of the flowers.
Stamped with MISTI the CCC Slimline Poinsettias sentiment
using Archival Black Ink.

Attached main image with Connect Glue to Neenah 115# White cardstock
base and Done!  It looks like I swiped the ink even though I used my way:-)
Very happy with the results!

**********************

 Dry Embossed, Green CS watercolored with Distress Ink card.

My 3rd poinsettia themed card using the same 3D Embossing folder.

The other day I Dry Embossed 4 red, 4 green, 4 white and 4 mixed media 
A2 card fronts using the Sizzix 3D Poinsettia Folder.  That will eventually 
give me 16 Christmas cards to add to my stash:-)

I dry embossed my poinsettias on SU Pear Pizzazz A2 sized cardstock.
I used Distress Ink "Mowed Lawn" to watercolor the poinsettias using
a damp Altenew Detail Blending Brush and #2 WC paint brush.
The cardstock handled the DI because I used very little water.

I let the image dry completely and then die cut with SPL Square Hemstitch
Dies for the framing.  Stamped the SSS "Jolly Snippets" sentiment using
Archival Jet Black ink.  

Attached to a 4" x 4" Neenah 110# Solar White Crest card base with Connect Glue.
Added silver gel pen to the centers of the flowers and Done!

Tip: On the 2nd and 3rd cards I carefully replaced the images into the 
3D Poinsettia EB Folder and ran thru my Big Shot...whew...
a perfect match!

2nd Tip...I have a set of 3 different sized Aqua pens and I used the smallest sized pen 
for painting on the 1st card.  
Then used a #2 WC paint brush for the 3rd card. 
 Much easier to stay inside the images using small Aqua pen and paint brush.
I used the Altenew Detail Blending Brush (ordered SSS). I used the smallest brush.
********************

I am so pleased with all 3 of my cards and look forward to using the techniques
again.  All the girls at Group of Seven Cardmakers would love to see
you add your cards to our Linky,  which is active until the 25th of August.

Thank you for visiting and hope you are staying cool and creative indoors!
Love and Hugs, 


*****************************

Supplies:
Card #1
Stamps: Colorado Craft Co Slimline Poinsettias sentiment.
Paper: Strathmore Mixed Media. Hero Arts Gold Metallic. Neenah 110# Solar White Crest.
Inks: Kuretake Gansai Tambi "Gem Colors"  Water-based Pigment Inks: Gem Red, Gem Green and Yellow Gold.  Archival Jet Black Ink.
Accessories: Sizzix 3D Dry Embossing Poinsettia.  Smallest Aqua Painter. Altenew Gold Sequins. Connect Glue, Fine Tip Bottle. Gold gel pen. 

Card #2
Stamps: Colorado Craft Co Slimline Poinsettias sentiment.
Paper: SU Real Red CS.  Neenah 110# Solar White Crest.
Inks: SSS White Pigment Ink. Archival Jet Black ink. SU Real Red Blending Marker.
Accessories:  Sizzix 3D Dry Embossing Poinsettia.  Altenew Mini Blending Brush.  Silver Gel Pen.
SPL Rectangle Hemstitch Dies, MISTI. Connect Glue.

Card #3
Stamps: SSS Jolly Snippets sentiment.
Paper: SU Pear Pizzazz CS.  Neenah 110# Solar White Crest.  
Inks: Distress Ink: "Mowed Lawn".  Archival Jet Black ink.
Accessories: Sizzix 3D Dry Embossing Poinsettia.   Altenew Detail Blending Brush.  #2 Watercolor Brush. Silver Gel Pen.  SPL Square Hemstitch Dies, Connect Glue.

***********************


Thursday, September 1, 2022

CAS Mix Up Stencil Gesso Challenge

Time for the CAS Mix Up September Stencil Gesso Challenge hosted by the very
talented, Hilary (fiddling about).  You are going to be inspired by our awesome
 Design Team and our very talented Guest Designer Sue (Cards by Q)


Hilary's Message and links to Gesso Stencil Techniques!

Hilary's Message
Gesso is primarily a surface primer that gives a uniform surface and is often used in mixed media projects, but in reality it can be much more than that. This month we would love to see you use gesso on your card along with your stencils. I have included some 
video links below to help inspire you.

Video Tutorials:
Creative Ways to Use Gesso by Tiffany Sorlario (7:04)
Distress Oxide Gesso Resist with a Twist by Gerry van der Velden (11:35)
Gesso Resist by Kim Schofield (6:11)
Gesso Resist Background by Eileen Godwin (31:02)
Lavinia Stamps and A Gesso Resist by Eileen Godwin (first 12 minutes)

           I used stenciling, Gesso, stamping, die cutting and heat embossing. 

I was inspired to use Gesso with a stencil by watching the 
 by Eileen Godwin (first 12 minutes)!  Such a fun and easy technique:-)

I attached my Altenew "Watercolor Stripes Stencil" with Masking Tape over
Fabriano 140# Watercolor Cold Press Paper.

Added a little Golden's Gesso white acrylic paint onto my glass mat.
Then used TH sponge to add a thin amount of the Gesso thru the stencil,
 using Eileen's technique.  That gave me thin smooth stripes.
Dries quickly.  Removed stencil.  Wash immediately in warm soapy water.

Replaced stencil and used Altenew Mini Blending brushes to sponge on
 Distress Oxide Inks: Squeezed Lemonade, Picked 
Raspberry, and Tumbled Glass. Let Dry and removed stencil.
Then used a slightly damp paper towel to wipe off DOX on the Gesso stripes.

Then die cut background with Spellbinders Square Hemstitch Die.

Placed background in MISTI and stamped STAMPlorations French Marigold Large 
image with Versafine Black ink and heat embossed with SSS Clear EB Powder. 
Popped up with craft foam onto SU Basic White card base.

Next die cut Rectangle Hemstitch for the STAMPlorations stamped and 
heat embossed "Heartfelt Thanks" and attached with Connect Glue 
to card base and Done!

I loved the shine on the heat embossed flower and sentiment and the pretty
soft pastel colors for the backgrounds. 
Thank you Hilary for a fun and easy CAS Mix Up Gesso Challenge.
I look forward to using Gesso more often:-) 

Love and Hugs,

Supplies:
Stamps: STAMPlorations French Marigold Large (available in Digi stamp also) and Heartfelt Thanks.
Paper: Fabriano 140# Cold Press.  SU Basic White 110#.
Inks: DOX inks: Squeezed Lemonade, Picked Raspberry, and Tumbled Glass. Versamark Fine Black.
Accessories: Altenew Mini Blending Brushes. Tim Holtz sponge. Altenew Watercolor Stripes Stencil. Golden's White Gesso Acrylic paint.  Spellbinders Hemstitch Rectangle Dies. SSS Clear Embossing Powder.  Heat Tool. White Craft Foam..Amazon.


Monday, August 1, 2022

CAS Mix Up Mixed Media August Emboss Resist Challenge

Time for our August CAS Mix Up Mixed Media Emboss Resist Challenge hosted by 
Nancy (me) (scandinancycreates).  We have awesome inspiration cards by 
our very talented DT and our talented GD Brenda (inkinspired to stamp)


Please remember to keep your cards Clean and Simple...Thank You!

Emboss Resist is an old technique using different Heat Embossing techniques.
I highly recommend you watch one or more of the videos that have been 
provided by our design team.  I guarantee that you will be inspired to play along!
We can't wait to see your Clean and Simple Mixed Media cards:-)


I Used Stamping, Heat Embossing, Watercolor Wash EB Resist and Die Cutting.

I began by stamping my Essentials by Ellen "Mondo Hydrangea" stamp onto
Canson Cold Press 140# Watercolor Paper using MISTI and SSS White Pigment Ink.
Then heat embossed with Wow White EB Powder for the
 Watercolor Wash Emboss Resist Technique by Debbie Hughes

Then the fun began using Gansai Tambi "Gem" Watercolors with #6 and #2 Princeton
paint brushes.  I let the paint dry between layers until I got the final effect I wanted.

The colors are beautiful and very shiny in the natural light.
I used Gem Colors: Blue, Green and Yellow Gold.

I finished my card using Spellbinders Hemstitch Rectangle Dies to die cut
the main image.  Next stamped in MISTI
the Altenew "Leaf Canopy" sentiment and added a punched Yellow Gold heart.

My sympathy card went to a very dear friend.

We would love to have you join us at CAS Mix Up Emboss Resist Challenge.
You have until the 24th to play along.  You are going to Love this Challenge💕

Love and Hugs,


Supplies:
Stamps: Essentials by Ellen "Mondo Hydrangea" and Altenew "Leaf Canopy" sentiment. 
Paper: Canson Cold Press 140# Watercolor paper.  SU Basic White 140# card base.
Inks: SSS White Pigment Ink.  Archival Jet Black for sentiment.  Gansai Tambi Gem WC Paints: Blue, Green and Yellow Gold.
Accessories: Spellbinders Rectangles Hemstitch Dies.  MISTI. WOW White EB Powder.  SU Heat Tool.  #6 and #2 round Princeton paint brushes.  


Wednesday, September 22, 2021

Just Us Girls #602 Color Week

Yellow, Red and Orange.

I was so inspired by the Guest Designer,  Loll Thompson and Design Teams beautiful
and very creative cards.  I also LOVE this color combination:-)

Here is my #602 color combo card...enjoy!


I began by using make up brushes to blend Distress Oxide Inks: 
Squeezed Lemonade, Carved Pumpkin and Candied Apple
onto Strathmore Mixed Media paper.

I should have taken a photo of the background...it was so pretty.
Then I decided to die cut a Simon Says Stamp Luminary Circles Die
and SSS Winter Trees Die images out of the background.

Originally I planned to use only one image,  but after arranging them on 
Strathmore Black 184# Mixed Media paper I used both dies:-)
Loved the Autumn scene!

Before attaching the images I die cut a frame using Spellbinders Hemstitch 
Rectangle Dies.  Attached dies with Connect Glue and popped up the
large circle aka Moon?!? with craft foam.

Added a STAMPlorations It's a New Day Clear Sticker to a piece of scrap.
Attached the card front to SU Pumpkin Pie cardstock and Done!
I love how the color showed through the frame.

Thank you for sharing a challenge that is perfect for the Autumn Season!
Love and Hugs,  Nancy

Supplies:
Stamps: None
Paper: Strathmore 184# Mixed Media White and Black paper.  SU Pumpkin Pie CS.
Inks: Distress Oxide Inks: Squeezed Lemonade, Carved Pumpkin and Candied Apple.
Accessories: Simon Says Stamp Luminary Circles Die and SSS Winter Trees Die.  Spellbinders Hemstitch Rectangle Dies. STAMPlorations  It's a New Day Clear Sticker. Connect Glue. Craft foam.


Monday, September 20, 2021

CAS Christmas Card Challenge: Plaid

So happy to be playing in the September CAS Christmas Card Challenge: Plaid
 hosted by Colleen!
I was so inspired by all the DT and GD beautiful card samples:-)

Dolly..you will be proud of me...I even have a Twofer post:-)
A great way to use up scraps from my 1st card!


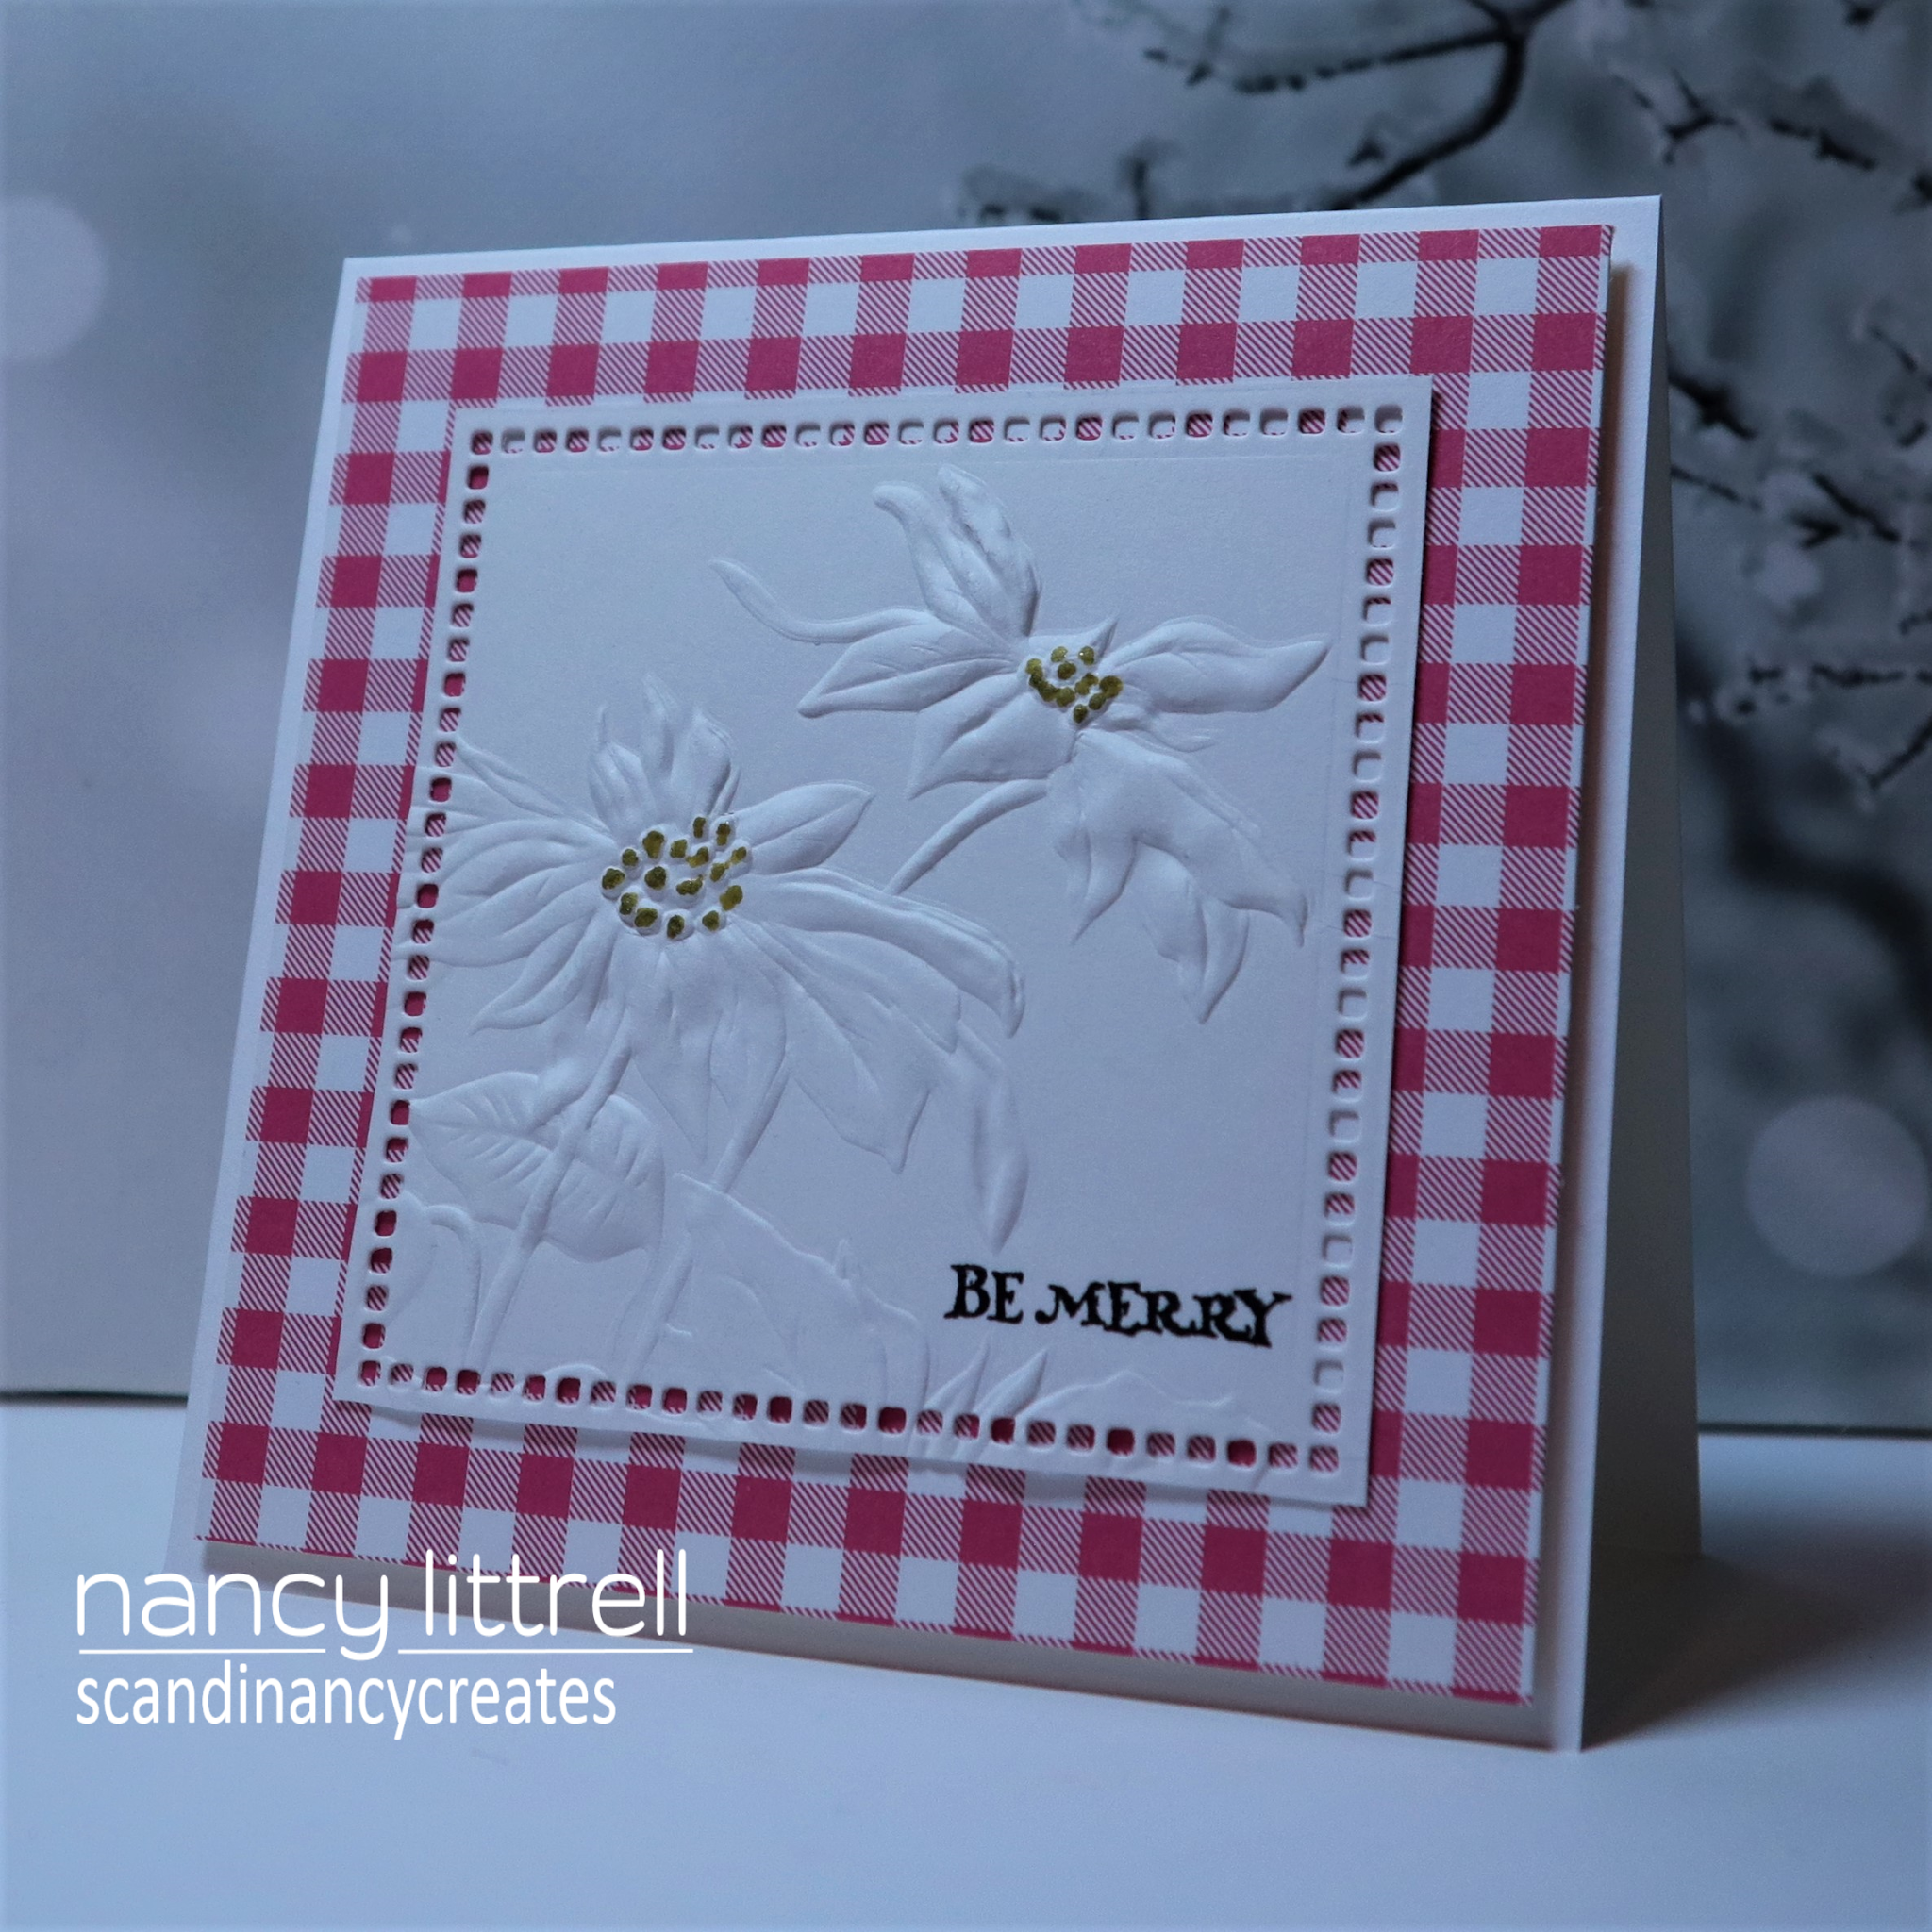
My 4 1/4 " x 4 1/4"  Plaid  Be Merry Christmas Card

I found this basic red and white plaid Old SU Designer Paper in my stash:-)
I used a new to me NBUS Sizzix Tim Holtz 3D Texture Fades Poinsettia
Embossing Folder on Strathmore MM paper.  I got a beautifully detailed A6 image by 
using the 184# mixed media paper:-)

I cut the image just below the 2 top poinsettia blooms.
Then used the Square Hemstitch Die to frame the flowers.

Used another larger square die from the same set to die cut the plaid paper.
Stamped the sentiment from Penny Black Happy Snippets.
 
Attached layers and popped up onto SU Basic White 100# CS using craft foam and Done!
Almost done...added the SU Dazzle Gold Marker,  then done:-)

I thought I was done,  but kept looking at my leftover Poinsettia and plaid paper
 and the rest of the supplies on my desk. 
 You guessed it...a Twofer was quickly in the making!

Thank you Dolly for reminding us how Twofers can pop out of a messy desk:-)

*****************

A2 Holiday Cheer card to add to my Christmas Card Stash😀

I loved how this Quick Clean and Simple A2 card turned out!
I used ALL the same products as my Be Merry card.  I just created a rectangle 
design card instead of square card.

Enjoy my cards and thank you Colleen for a fun and easy Christmas Challenge.
Love and Hugs, 


Supplies:
Stamps: Penny Black Happy Snippets for the sentiments.
Inks: Archival Jet Black for sentiments.  SU Dazzle Gold Marker.
Paper: SU Basic White 100# CS.  Strathmore 184# Mixed Media Paper.  SU retired Designer Paper.
Accessories: Sizzix Tim Holtz 3-D Texture Fades Poinsettia.  I ordered mine on Amazon Prime. Sizzix Square and Rectangle Dies. Craft Foam.

*************

NBUS #30 Challenge..I used my Sizzix 3-D Texture Fades Poinsettia for the 1st time..Love it!


Wednesday, September 15, 2021

CAS Mix Up (W) Autumn Colours Reminder Card

Time for our CAS Mix Up (W) Autumn Colours Reminder CAS cards by our very talented CAS Mix Up Girls and hosted by our amazing talented CAS Girl,  Leslie.

As you all know....Leslie is a master at watercoloring.  You will be inspired by the DT and our talented followers too.  You still have until the 24th to play along.


I used Watercolour Stamping, Heat Embossing and Die Cut Frame.

Close up of the heat embossed sentiment and sequins shine!

*************************

My 1st time to use this beautiful Penny Black "Fresh Ferns" stamp, 
 that I recently received from a dear friend!  
I placed stamp in MISTI and stamped off the edge of Strathmore Mixed Media paper
 using a Watercolour Technique.

I used Ranger Distress Oxide Inks in this order: Fossilized Amber, Carved Pumpkin, 
and Fired Brick.
  I stamped the DOX inks one layer at a time directly onto Fern stamp.  Then spritzed each layer 
with water using Tim Holtz Distress Sprayer and stamped with MISTI. 
This gave the ferns a Watercolour look!  I did not dry between layers. 

Next stamped just the tips of ferns with DOX Rustic Wilderness.  Loved the results.  

Then stamped the Visible Image "Where Flowers Bloom" sentiment 
with  DOX Aged Mahogany 
and heat embossed with SU Clear EB Powder for a nice shine.
This was my 1st time to use this new stamp set.

Next added STAMPlorations Shaker Blends "Color Confetti" flat sequins.
Used Spellbinder 'Hemstitch Frames Die" and mounted card front
 onto SU Tangerine Tango card base for a bit of extra color.

Thank you Leslie for a fun Autumn Colours Challenge!
The DT cards and cards in our followers Gallery are so inspiring!

Love and Hugs..
  
Supplies:
Stamps: Penny Black "Fresh Ferns".  Visible Image "Where Flowers Bloom".
Paper: Strathmore Mixed Media.  SU Tangerine Tango.
Inks: Ranger Distress Oxides: Fossilized Amber, Carved Pumpkin, Fired Brick, Rustic Wilderness.
and Aged Mahogany.
Accessories: MISTI. Ranger Tim Holtz Distress Sprayer.  Spellbinder Hemstitch Frames Die. 
SU Clear EB Powder.  STAMPlorations Shaker Blends "Color Confetti" flat sequins.

**************
Adding to these Challenges!

NBUS # 30 Challenge: never before used PB "Fresh Ferns" Stamp and Visible Image "Where Flowers Bloom".    


Tuesday, June 15, 2021

CAS (W) Mix Up June Reminder Flight

Our CAS (W) Mix Up Reminder Flight Cards for more Inspiration Hosted by Viv.
Be sure to check out the beautiful and clever CAS cards by our DT!
You still have until the 24th to play along.  We Love it when you join us😀


My card using Watercoloring, Stamping, Heat Embossing and Die Cut.

I love this beautiful Penny Black Nature Allure stamp set, which is a Christmas set, but I paired it with  STAMPlorations Trendy Butterflies 2 stamp set sentiment for CAS (W) Mix Up Flight Challenge.

The bird on the pine branch looks like a baby bird to me getting brave enough to fly😀

I stamped the bird image with Versafine Black ink onto Strathmore Mixed Media paper, then heat embossed with SU Clear EB Powder.  Then the fun watercoloring with Zigs.  Next die cut the frame with Spellbinder Rectangle Hemstitch Die then stamped and added the stamped sentiment.

Then attached card front to SU Garden Green cardstock,  added Wink of Stella to the entire image and Done!  I was pleased with the results.  Hope you like it too.

We would love to have you join us if you have not already.  Love and Hugs..


Supplies: 
Stamps: Penny Black Nature's Allure, STAMPlorations Trendy Butterflies 2.
Paper: Strathmore Mixed Media.  SU Garden Green.
Inks: Versafine Black ink.  Zigs.  Archival Jet Black.
Accessories: Spellbinders Hemstitch Die. MISTI. Heat Tool. Wink of Stella.


Saturday, May 22, 2021

CAS Christmas Card Challenge Foliage and Berries

Joining in the May CAS Christmas Card Challenge using Foliage and Berries.  My friend Christine is hosting this fun and festive Christmas Challenge😊 Robyn is the Guest Designer.  Be sure and check out all the Gorgeous CAS Christmas Card designs by the talented DT and GD.


Rules

Here is my Foliage and Berries card😀

I have been seeing more Clean and Simple backgrounds using colored cardstock and really liked the effect,  so tried my card design using SU Real Red card that I die cut with Spellbinders Hemstitch Rectangle Die.  Loved how it made the main image pop!

I have been enjoying working on my watercoloring techniques recently with different products.  
I stamped the Penny Black "Cheerful Christmas" image with Versafine black ink onto Strathmore Mixed Media paper using MISTI.  Then heat embossed with SU Clear Embossing Powder.  

Next watercolored the beautiful bird and holly image with Zig markers and aqua painter.  Adding layers of color until I was happy with the results.  Popped up image with white foam and attached to die cut red cardstock.

When dry I die cut with Memory Box Stitched Circle Die.  Then stamped STAMPlorations "Christmas Joy" sentiment with Archival Jet Black ink onto  SU Basic White cardstock and die cut with MB Hemstitch Die and attached to red cardstock.  Attached to A2 SU Basic White 100# cardbase, which left a narrow white frame,  which I liked.  I really like the colored "white" CAS design:-)  How about you?

I am so pleased to be able to add another Christmas card to my stash.
You still have until the 24th to play along.  Love and Hugs..


Supplies:
Stamps: Penny Black "Cheerful Christmas".  STAMPlorations "Christmas Joy".
Paper: SU Basic White 100#.  SU Real Red.  Strathmore Mixed Media.
Inks: Versafine Black.  Zigs Watercolor Markers. Archival Jet Black.
Accessories: Spellbinder Hemstitch Rectangle Dies.  Memory Box Stitched Circle Die.  White Craft Foam. Aqua Painter.  MISTI.


I am adding my card to Penny Black Saturday Challenge ATG or optional Clean & Simple.


Monday, January 18, 2021

Twofer January 2021 Flowers Challenge

I am so happy to be joining Dolly's January Twofer Challenge😄

Who could resist the "Flower" Challenge...not me!

The Rules

I made my 1st card,  which helped me decide how to design a 2nd card using a different occasion and the same die😀

Here is photo of my Twofer Cards.  I Loved the results!

My 1st card is a Die Cut Valentine for my 91 year old girlfriend!
You can see the SSS heart die at the bottom of the photo.

I chose an Alcohol Inks (reds and pinks) with tissue background from my stash.
Here is the link to a card I made using the Alcohol Ink with Tissue Paper Background, which includes the technique description.  A bit involved,  but if you make several you will have a nice stash for later use😀

I cut an A2 card front (4 1/4" x 5 1/2") out of SU Whisper White 100# CS.
Then I used my new SSS"Heart of Flowers" Die to die cut the image.  

Punched out pieces with toothpick.  Then attached alcohol ink background to the back of the die cut heart with scotch tape.

Added STAMPlorations Clear Sticker "Just Everyday Greetings" to a piece of SU 100# cards and attached to card front.  Stamped hearts from STAMPlorations "Big Dreamer" and outlined the hearts with Wink of Stella.
Added SU Rhinestones and Done!  So pretty when the light hits the die cut heart.

*********************

My 2nd card using a stencil I die cut out of an acrylic sheet using the Heart Die.
You can see the stencil at bottom of the photo.

I placed the stencil over a SU 100# card front and secured with masking tape. 
Then used make up brushes to add the Distress Oxide colors.  I used my brushes without adding more inks.  I wanted a soft look.  It was a fun way to use the ink that is always leftover on the brushes.

Next Removed stencil and placed piece in MISTI.  Stamped STAMPlorations "Brave One" using Versafine black ink and Heat EB with SU Clear EB Powder.

Then die cut image with Spellbinders "Rectangle Hemstitch" Die.
Popped up with craft foam and attached to SU Whisper White 100# card base.

Then attached SU Candy Dots to center of flowers and Done!
Loved the CAS stencil designed card!

So pleased with both cards for different occasions,  using the same die cut and very different designs.  Thank you Dolly for such a fun Twofer Challenge.

Love and Hugs and stay creative and safe!
You still have until the 24th to play along.


Sharing my cards with NBUS Challenge #22.  This was my 1st time to use the beautiful SSS Heart of Flowers Die and my stencil made from the die!


Supplies:
1st Card:
Stamps: STAMPlorations "Big Dreamer" hearts.
Paper: SU Whisper White 100# CS.  
Inks: Ranger Alcohol Inks: pinks and reds.  
Accessories: Simon Says Stamp " Heart of Flowers" Die.  STAMPlorations Clear Sticker "Just Everyday Greetings".  Scotch tape.  SU Rhinestones.

2nd Card: 
Stamps: STAMPlorations "Brave One".
Paper: SU Whisper White 100#
Inks: Distress Oxides.  Versafine Black.
Accessories: SSS "Hearts of Flowers" Die used to die cut acrylic sheet stencil.  Spellbinders Hemstitch Rectangle Die.  Make up Brushes. SU Clear EB Powder.

So excited to be Dolly's Conventional Twofer Winner😀
Thank you Dolly for hosting a fun Flowers Challenge.


Wednesday, July 15, 2020

CAS Mix Up July (S): Stencil Tracing Reminder

I am hosting the CAS Mix Up July (S): Stencil Tracing  Reminder Challenge.
Be sure and check out all the awesome Reminder cards by our talented Design Team.

We also have "Three" very talented Guest Designers this month as they all were
Top Picks for the
May CAS Mix Up, CAS Stencil and CAS Watercolour Challenges:-)

Be sure and check out Greta (GG Creations), Sandie (London Days) and Kia's (Kia's Place)
Gorgeous CAS Creative Stencil Tracing cards:-)


You still have until the 24th to play along.  
We would love to have you join our creative fun using your stencils.
 

My stencil traced card!

I began by using a #4 paint brush to add Gansai Tambi Pearl Watercolors on Yupo paper.
The Pearl colors give a beautiful subtle sheen to the background.
Used: Lemon Yellow, May Green, Pink, Scarlet Red, and Cobalt Blue for a soft 
rainbow effect.

Then sprayed ARTplorations Prim Pattern Stencil with Pixie Spray,  a light tacky
adhesive.  Placed stencil over Yupo paper and traced with Ultra Fine Point Black Sharpie.

Die Cut background and SU Whisper White 100# CS frame with 
Spellbinders Hemstitch Rectangles Dies. Popped up background with white craft foam.

Added die cut Alexandra Renke Spring Flowers Die using Gina K Connect Glue.
I received several A. Renke die cut flowers from my dear friend Bonnie 
a couple of years ago.  I still have more for future cards:-)


Added CRAFTplorations "Shine Bright" Clear Sticker to a scrap of 100# CS
and trimmed,  then attached to background and Done!
Stencil tracing is such a fun and easy technique to make your stencil image pop!

We would love to have you join us.  Stay safe and Hugs..


Supplies: 
Stamps: None
Paper: SU Whisper White 100#.  Yupo paper.
Inks: Gansai Tambi Pearl Watercolors: Lemon Yellow, May Green, Pink, Scarlet Red, and Cobalt Blue.  Ultra fine Point Black Sharpie pen.
Accessories: ARTplorations Prim Pattern Stencil.  Spellbinders Hemstitch Rectangles Dies.  Pixie Spray.  #4 flat paint brush. White Craft foam.  Gina K Connect Glue. Alesandra Renke Spring Flowers Die.  CRAFTplorations Clear Stickers "Shine Bright".