Showing posts with label Adirondack alcohol ink. Show all posts

Tuesday, August 9, 2016

Stenciling with Alcohol Ink


I was so happy to receive The Crafters Workshop (TCW) "Joyful Sunflower" from my girlfriend Bonnie and knew immediately I wanted to try it with Alcohol Inks.  I was blown away by the results and ended up making 3 pieces with Yupo paper!  All using the same technique,  but different results.

You will never end up with 2 Alcohol Blended Samples alike.  The trick..let the ink create its own "flow"!  A very simple technique actually.

Step 1: I put on disposable gloves then laid a piece of scratch copy paper down onto my craft mat. Remember Alcohol inks Stain!  Placed my 4 1/4" x 5 1/2" piece of Yupo paper on top of scratch paper and covered with my stencil. I then taped down stencil using 3M post-it-note masking tape.

Step 2: I chose my Adirondack Alcohol Inks: Lemonade, Sunset Orange, Pebble, Teakwood, Citrus and Pesto.  Also Jacquard Pinata "Rich Gold" Metallic alcohol ink.

Step 3: Started with the center of flower.  Adding light (Pebble) and then dark (Teakwood) browns.  Leaving some seeds uncolored.  Then added Metallic Rich Gold on a few of seeds.

Step 4:  I colored my leaves with Citrus and then Pesto greens.  Then petals with Lemonade and tips of petals with Sunset Orange.  I did go back and add a bit more color to petals and leaves until I got the look I wanted.

My technique for adding the inks: Place tip of bottle thru stencil onto area inking and add a little bit of ink moving onto next area letting ink do its own flow.  DON'T tip bottle up or squeeze bottle or you will have ink EVERY...where!  You can always add ink again if you want more while stencil is still taped down.  The ink does flow under the stencil,  but gives an interesting background.

Step 5: Remove Stencil carefully and wash in warm soapy water...your stencil will be permanently stained and look well loved!

Step 6:  Let piece dry..can use heat tool, but not too close.  I turn over and blot on scratch paper to make sure completely dry.  Then burnish with paper towel to increase shine.

Step 7: You MUST use Archival Ink if you want to stamp a sentiment...MISTI is a must if you want good coverage or you can add sentiment by stamping on a piece of cardstock and adding to piece.

Sorry about long description..it is a really quick process once you know the steps. You get a gold star if you read every step,  I would love if you shared with me your samples and/or cards :-)

Enjoy and Happy "Alcohol Ink Blending Stenciling" my friends.  Hugs,  Nancy

Card Recipe

Stamps: STAMPloratons Bold Sentiments.."ART Is"
Paper: Yupo paper, SU Whisper White Card Base
Inks: Adirondack Alcohol inks..listed in description.  Archival Jet Black
Accessories: TCW "Joyful Sunflower" Stencil, paper towels, 3M post-it-note masking tape, disposable gloves,,,I did restamp INSTINCT on WW Cardstock in black ink to cover smudged stamped word.
Techniques: Alcohol Ink Blended Stenciling

Thank you for Looking and especially for Commenting.  Your comments are so appreciated.


Monday, June 13, 2016

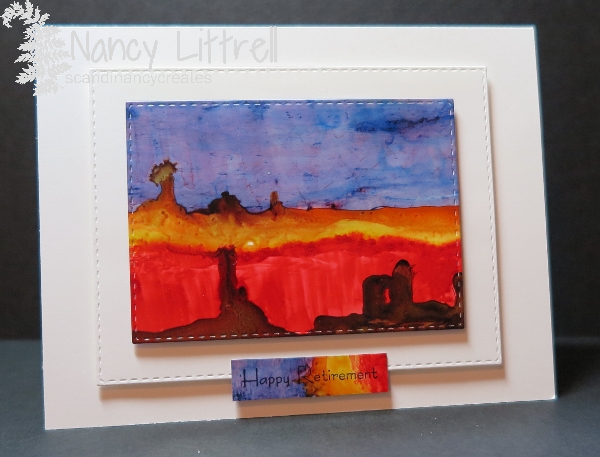
Alcohol Ink Landscape Retirement


My first attempt at Alcohol Ink Landscape Painting!  I am very pleased with the results all because of 2 DVD's by June Rollins that a friend let me borrow.  They were Dreamscape Landscape 1 and Landscape 2 DVD's by June Rollins.  I could never have had such good results without June's expert instructions.  I made 4 samples so you will be seeing more...at least pieces :-) Two more items to add to my art wishlist !

This landscape reminded me of the Utah Redrock Country where we have spent many backpacking and trailer camping trips.  I thought it was perfect for a  Happy Retirement card.

Yupo paper is a must I think for any alcohol ink creations.  The ink moves much more on the Yupo compared to Glossy paper.  Also you need plain alcohol for moving the inks.  91% is recommended.  I used 70%, but will be getting 91% to see the difference.  There are plenty of You Tube videos online for different techniques.  Lots of inky fun ideas.  Enjoy....

My card is also for this months CAS Mix Up June Challenge: Die Cuts + Stamping + Your choice..my choice..Alcohol Ink Landscape.


CAS Mix Up June Challenge ends on June 24th.  Don't forget to make your card a Clean and Simple Mixed Media creation.  Have fun!

I used Snippets of Alcohol Landscape for my Happy Retirement Label so adding to Snippets Playground. My 1st time to play.  Thanks Pixie for a fun blog and wonderful prizes :-)

Card Recipe
Stamps: SU Teeny Tiny Wishes
Paper: Whisper White Thick and regular, Yupo Paper (available online and at art supply and craft stores.
Inks: Ranger Adriondack Alcohol Inks: Stonewashed, Lemonade, Sunset Orange and Poppyfield. You get different colors as they blend into each other.  Very cool effect. Archival Black for sentiment.
Must use Archival or Stazon on Alcohol Ink projects.
Accessories: Gloves, Alcohol in mini mister, coffee stirrer, plastic gift card, Big Shot, Memory Box Stitched Rectangles Dies, Foam Tape dimensionals
Techniques: CAS, Die Cuts, Stamping, Alcohol Ink Landscape painting (no brushes)

Thank you for Looking and especially for your wonderful comments.  So appreciated !


Wednesday, June 1, 2016

CAS Mix Up June Challenge


The CAS Mix Up May Challenge was filled with Gorgeous Samples of Heat Embossed Mixed media Cards.  Thank you for joining our challenge.  Here is this months  CAS Mix Up June Challenge. 


 I can hardly wait to see all the Gorgeous and Creative Die-cut cards this month.  Die-cuts have become so popular the last few years and work so well on CAS designs.  I used my new Penny Black "Trio of Trees" Die-cut set using 2 of my trees on my card.  The really fun part was using "Juniper" and "Pesto" Ranger Adirondack Alcohol Ink refills on a 5" x 7" piece of "Yupo" synthetic paper and watch the magic begin.  The way the alcohol ink spreads is so cool.  I used the lighter "Juniper" color 1st and when dry added the "Pesto".  Let dry and then Die-cut my 3 tree dies twice.  Now I have 4 extra trees for a future project :-)

I decided next to try for a sky background using "Stone Washed" Alcohol Ink.  This time I lightly touched the blue shade to my sponge blending tool and dabbed the ink onto a scrap piece of Yupo until I got the look I liked.  I then Die-cut the background with my Memory Box "Stitched Rectangles Dies" and my card front to make an "Inlayed Die-cut" frame.

I loved the results.  I attached the fir tree to the background with my SU Thin Tip Pen.  Then Die-cut the oak tree again using canvas paper and attached the inked tree for extra thickness and popped up with dimensionals.  To finish my card I stamped the SU "Too Kind" sentiment onto my Arches WC paper using my MISTI and Memento London Fog (grey) ink.  Popped up my card front and done.

I did not need to use WC paper,  but liked the textured thicker look.  I bought my Yupo paper at our local craft shop.  You can find at Art Stores or just google online.  You can also use glossy paper with alcohol inks.  I was very pleased with the Yupo paper.  It is a synthetic paper and does not tear,  but cuts beautifully with dies and cutting tools.

Here is a Close-Up......


Here is the link to video of  Tim Holtz Demo's Alcohol Inks on Yupo at CHA 2016 The video was invaluable I thought.


Card Recipe: 
Stamps: SU Too Kind (ret) sentiment
Paper: SU Very Vanilla, Arches 140# Cold Press WC paper, Yupo 5" x 7" pad of synthetic paper, Canvas
Inks: Ranger Alcohol inks, Memento London Fog ink
Accessories: Big Shot, Penny Black "Trio of Trees" Die-Cuts, Memory of Time "Stitched Rectangles" Die Cuts, sponge blending tool, dimensionals, SU Thin Tip Glue Pen, MISTI
Techniques: Die Cuts, Inlaid Die Cuts, CAS, Mixed Media, Stamping, Alcohol Ink Blending,

I do hope you get to join us at CAS Mix Up June "Die Cuts" Challenge.   There will be so much inspiration and fun!


Friday, April 8, 2016

CAS Alcohol Stenciling Inlaid Hello !


I had so much fun trying out a new "Alcohol Ink Background" using Adriondack Alcohol Ink Refills and a Ranger "Dylusions" Stencil.  My girlfriends Loll, Bonnie and Susan were playing with alcohol inks too.  I went to SCS Tutorials Alcohol Ink Backgrounds for a starting point.  This was my 1st time to use Tim Holtz Adironndack Alcohol ink refills and "Yupo"polypropylene paper.  I was able to get both at my local stamping and craft store :-)

Even though I ended up doing my own thing with the inks,  the tutorial was very helpful.  I wanted to incorporate a stencil so I placed my stencil over the Yopo paper and dropped 3 colors of ink over the stencil then blotted with paper towels without removing stencil until ink dried .  I kept the colors light.  Then when dry I replaced the stencil and painted very loosely with a paint brush Christmas Green Acrylic paint over the background.  I loved the effect so stopped there !  I used my entire 2 1/2" x 2 1/2" piece for my finished card.

I die cut 2 layers with my MB Stitched Rectangles dies and then die cut and inlaid my SU Hello "Greetings" Thinlits Die after die cutting and painting with the acrylic paint.

I added a Dream brad from my embellishment sewing box and a rhinestone.  Really fun and creative card and yet CAS with Mixed Media.  My only stamping was inside my card.  My card is for two favorite  Challenges.


 The current STAMPlorations CAS April 2016 Anything Goes Challenge with the twist "Spring Green"


My card is also for the Addicted to CAS Challenge #85 Code Word Inlaid Die(s)


Card Recipe

Stamps: STAMPlorations Bold Sentiments hashtag authentic: You Are So CREATIVE
Paper: SU Whisper White Thick and Basic Black.  Yupo Mixed Media Paper by Legionpaper.com.  Ranger carries the same paper.
Inks: Tim Holtz Adirondack Alcohol Ink refills: Juniper, Stonewashed and Lemonade.  Acrylic paint by Ceramcoat..Christmas Green.
Other: Big Shot, Ranger Dylusions Stencil, MB Stitched Rectangles Dies, SU Greetings Die, paper towels, Cropadile, Brad, rhinestone, Thin Tip Glue Pen, dimensionals
Techniques: CAS, Die Cuts, Alcohol Ink BG, Die Inlay, Stenciling, Mixed Media


Thank you for Looking.  Your comments are so appreciated.  Hugs,  Nancy