Showing posts with label Spellbinder Hemstitch Square Dies. Show all posts

Friday, July 28, 2023

Coloured Dry Embossing

July Coloured Dry Embossing Technique by Group of Seven Cardmakers!
Click on the link to get all the details for ways to color your dry embossed
images on your cards and to see all the girls beautiful card samples😄


The videos were very helpful:-)

My 1st card using the Sizzix Poinsettia 3D EB Folder and 
Water Coloring on Mixed Media paper.
  
I dry embossed the Sizzix Poinsettia 3D EB Folder on Strathmore Mixed Media
cardstock because I was using Kuretake Gansai Tambi "Gem Colors"  
Water-based Pigment Inks: Gem Red, Gem Green and Yellow Gold.
It has a beautiful subtle shine in the light.
I tried,  but my camera was not able to pick up the shine..

Next I trimmed the A2 image and cut into quarters.
Attached to Hero Arts Gold Metallic Paper from my stash using
Connect Glue.

Added the Altenew Gold Sequins and then stamped with Archival Jet
Jet Black ink the sentiment from Colorado Craft Co. Slimline Poinsettias set.

Attached card front to Neenah 115# Solar White cardstock and Done.

I LOVED the results and the tactile feel of watercoloring the raised
3D Embossed poinsettias:-) I got better with each card!  The small aqua pen
was very helpful in staying inside the images.

 *******************

My 2nd card using the same Sizzix Poinsettia 3D EB Folder on SU Real Red CS.

I dry embossed the 3D Poinsettia EB Folder on an A2 size SU Real Red Cardstock. 
I got a nice deep embossed image.

I tried swiping my SSS white pigment ink pad over the image,  but did not 
like how it was turning out...not enough control.

So used my Altenew mini blending brushes (3 in a set) using the smallest
brush for a Soft Looking Card with White Pigment Ink.   When done I used 
SU Real Red Blending Marker to outline the leaf veins.

I trimmed the 3D EB image with Spellbinder Rectangular Hemstitch Dies for the framing.
Added silver gel pen for the center of the flowers.
Stamped with MISTI the CCC Slimline Poinsettias sentiment
using Archival Black Ink.

Attached main image with Connect Glue to Neenah 115# White cardstock
base and Done!  It looks like I swiped the ink even though I used my way:-)
Very happy with the results!

**********************

 Dry Embossed, Green CS watercolored with Distress Ink card.

My 3rd poinsettia themed card using the same 3D Embossing folder.

The other day I Dry Embossed 4 red, 4 green, 4 white and 4 mixed media 
A2 card fronts using the Sizzix 3D Poinsettia Folder.  That will eventually 
give me 16 Christmas cards to add to my stash:-)

I dry embossed my poinsettias on SU Pear Pizzazz A2 sized cardstock.
I used Distress Ink "Mowed Lawn" to watercolor the poinsettias using
a damp Altenew Detail Blending Brush and #2 WC paint brush.
The cardstock handled the DI because I used very little water.

I let the image dry completely and then die cut with SPL Square Hemstitch
Dies for the framing.  Stamped the SSS "Jolly Snippets" sentiment using
Archival Jet Black ink.  

Attached to a 4" x 4" Neenah 110# Solar White Crest card base with Connect Glue.
Added silver gel pen to the centers of the flowers and Done!

Tip: On the 2nd and 3rd cards I carefully replaced the images into the 
3D Poinsettia EB Folder and ran thru my Big Shot...whew...
a perfect match!

2nd Tip...I have a set of 3 different sized Aqua pens and I used the smallest sized pen 
for painting on the 1st card.  
Then used a #2 WC paint brush for the 3rd card. 
 Much easier to stay inside the images using small Aqua pen and paint brush.
I used the Altenew Detail Blending Brush (ordered SSS). I used the smallest brush.
********************

I am so pleased with all 3 of my cards and look forward to using the techniques
again.  All the girls at Group of Seven Cardmakers would love to see
you add your cards to our Linky,  which is active until the 25th of August.

Thank you for visiting and hope you are staying cool and creative indoors!
Love and Hugs, 


*****************************

Supplies:
Card #1
Stamps: Colorado Craft Co Slimline Poinsettias sentiment.
Paper: Strathmore Mixed Media. Hero Arts Gold Metallic. Neenah 110# Solar White Crest.
Inks: Kuretake Gansai Tambi "Gem Colors"  Water-based Pigment Inks: Gem Red, Gem Green and Yellow Gold.  Archival Jet Black Ink.
Accessories: Sizzix 3D Dry Embossing Poinsettia.  Smallest Aqua Painter. Altenew Gold Sequins. Connect Glue, Fine Tip Bottle. Gold gel pen. 

Card #2
Stamps: Colorado Craft Co Slimline Poinsettias sentiment.
Paper: SU Real Red CS.  Neenah 110# Solar White Crest.
Inks: SSS White Pigment Ink. Archival Jet Black ink. SU Real Red Blending Marker.
Accessories:  Sizzix 3D Dry Embossing Poinsettia.  Altenew Mini Blending Brush.  Silver Gel Pen.
SPL Rectangle Hemstitch Dies, MISTI. Connect Glue.

Card #3
Stamps: SSS Jolly Snippets sentiment.
Paper: SU Pear Pizzazz CS.  Neenah 110# Solar White Crest.  
Inks: Distress Ink: "Mowed Lawn".  Archival Jet Black ink.
Accessories: Sizzix 3D Dry Embossing Poinsettia.   Altenew Detail Blending Brush.  #2 Watercolor Brush. Silver Gel Pen.  SPL Square Hemstitch Dies, Connect Glue.

***********************


Monday, February 20, 2023

I am here for you!

I am joining a few challenges using a never before used 
Simon Says Stamp "Layered Chickadee Die".

I die cut my cute chickadee bird out of The Essential Craft Papers by
Craft Consortium "Ink Drops-Ocean" 6" x 6" paper pad.

After die cutting the bird pieces I used Connect Glue with Fine Tip Bottle to add
the 4 bird pieces and then die cut the bird with Basic Black CS to add more
dimension.  So fun and so cute:-)

I set the bird aside and then die cut the backgrounds using 
SSS Postage Stamp Edge Frames,
and Spellbinders Hemstitch Squares using same craft paper.
Then die cut Postage Stamp Edge Frames that I cut out of white 100#
 Basic White CS and added to back of frames.  

 I attached the bird and then created a 2nd square in different color tones from
the same craft paper.  I added the die cut bird and attached the squares to
SU Basic White CS.  Then added the stamped SSS "Messages for Everyday"
sentiment using Archival Jet Black ink and Done!

I am loving the sweet bird and will be using more often:-)

Enjoy and Happy Stamping

Supplies:
Stamps: SSS Messages for Everyday sentiment.
Paper: Craft Consortium Craft Papers "Ink Drops-Oceans".  SU Basic White 100# and Basic Black.
Inks: Archival Jet Black sentiment.
Accessories: SSS "Layered Chickadee" die.  SSS Postage Stamp Edge Frames dies.  Spellbinders "Hemstitch Squares" dies. Connect Glue. Fine Tip Bottle for glue.

************************

I am sending my card over to these challenges:

NBUS Never Before Used Stuff Challenge #47  SSS Layered Chickadee Die.

Double D Challenge Birds  
                                                       

Allsorts Challenge 

Week 716 🦋Anything Goes with Option of Wings!


Wednesday, February 23, 2022

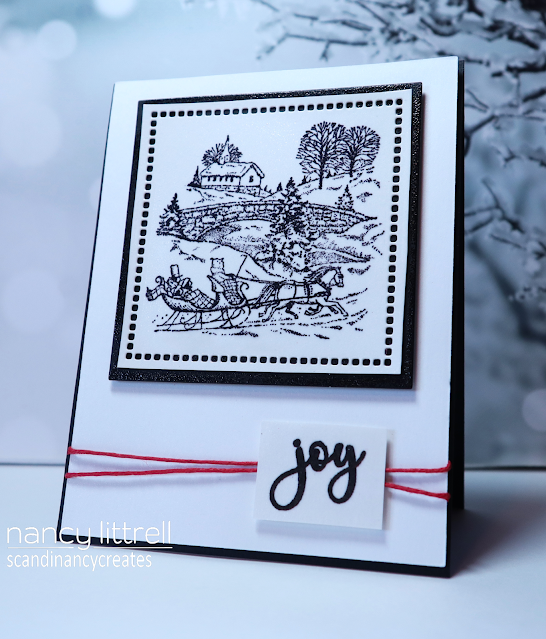
CAS Christmas Card Challenge: Winter Scene

I am posting my CAS Christmas Card Challenge: Winter Scene card.
Hosted by the very talented, Christine.
I Love this challenge for adding to my CAS Christmas Card Stash:-)


Stamping, Heat Embossing and Die Cutting.

I stamped my SU "Sleigh Bells Ring" image using Archival Jet Black Ink onto
SU Shimmery white cardstock.  This is a stamp set from 2007 and Retired.

I think I gave it a bit more modern CAS design,  which was fun.
After stamping the image I die cut with Spellbinders Square Hemstitch Dies.
Covered with Versamark and heat embossed with SU Clear EB Powder.
It has a beautiful shine.

Then attached to a square die cut SU Basic Black Cardstock.
Popped up with craft foam and attached to Shimmery White cardbase.

Next added Red Hemp and then stamped STAMPlorations Christmas Joy sentiment 
with Archival Jet Black onto scrap of Shimmery White CS, 
 Trimmed and added Versamark and Heat EB with clear EB powder. 
  
Next popped up sentiment with foam.
Then attached card front to SU Basic Black Card Base and Done!

This would be a QCAS card design for making a few multiples for my stash:-)

Thank you Christine for a fun CAS Christmas Card Challenge💕


Supplies:
Stamps: SU Sleigh Bells Ring.  STAMPlorations Christmas Joy.
Paper: SU Shimmery White CS and Basic Black.
Inks: Versamark. Archival Jet Black.
Accessories: Spellbinders Square Stitched Hemstitch Dies.  Red Hemp a gift from my DD plus more colors:-)  Craft foam.  SU Clear EB Powder.

Adding also to Peace on Earth  Christmas #10 Anything Goes Challenge


Tuesday, February 1, 2022

CAS Mix Up February 2022 Challenge Faux Cloisonne

CAS Mix Up has a Fabulous Challenge this month hosted by our very talented Susan.
You will be inspired by our awesome DT.  No Guest Designer this month.


Susan's Message
For my challenge I would like you to recycle glossy Magazines, Advertising material or you could use Designer Paper that has been hiding in your stash.  Most cards I have seen are embossed with Gold embossing powder but you could use other colours too.  


Video Tutorials: 

                                                                                  
My CAS Mixed Media Card using Faux Cloisonne Technique, die cuts, stamping and 
heat embossing.

OMG...I am loving the Faux Cloisonne technique...thank you Susan for the awesome challenge!
Susan's tutorials were very helpful...although I did my own twist on the technique.

I chose a plant and seeds catalog with beautiful photos on glossy paper.
I chose several photos and ended up using a photo of herbs, which I die cut with
the smaller Altenew Leaf Canopy Die and set aside.

 I also saved a photo of sunflowers,  which I cut with scissors and attached  
under a die cut Spellbinder Hemstitch Square and die cut the square with SSS
Postage Stamp Edge Frames.

Next die cut a rectangle from the Postage Stamp Edge Frames.
Die cut the square frame into the rectangle and inlayed the square die cut piece.
I love how the Sunflower photo colors showed through.

Next die cut 2 layers of the leaves using black cardstock and stacked
using Connect Glue.  Next added the glue to the top layer of the black stacked leaves.
Then carefully attached the die cut glossy leaves and let dry.

I then stamped the Altenew Leaf Canopy sentiment 
using Archival Jet Black Ink and MISTI.
Next used Connect Glue to attached leaf image and layered main image to 
SU Basic White 100# cardbase .

After creating my CAS Mix Up card
I realized I missed one very important step on my card...Oh dear!

I forgot the heat embossing with Gold!!!
The next day after putting on my "thinking cap"...I realized I could finish my card
correctly:-)

I very carefully used my Versamark Pen and drew around the leaves
and heat embossed with Ranger Princess Gold EB Powder. 
Hurray...It worked Great!  

So we can now add die cutting glossy paper and heat embossing with a Versamark Pen
and Embossing Powder as another Faux Cloisonne Technique:-)

We would love to have you join our fun at CAS Mix UP this month. 
You have until the 24th to play along.
Remember to keep your design Clean and Simple!
Love and Hugs, 

If you would like to subscribe by email,
please fill out the subscription form in the upper right sidebar.
It is also important to add sw1subscribers@gmail.com to your contact list
so Google recognizes the address and delivers the updates.


Supplies:
Stamps: Altenew Leaf Canopy (sentiment)
Paper: SU Basic White 100#.  Glossy Catalog Paper. SU Basic Black CS.
Inks: Archival Jet Black.  Versamark Pen ink.
Accessories: Altenew Canopy Die Cut.  Spellbinders Square Hemstitch Die Cut. SSS Postage
Stamp Edge Frames.  Connect Glue..my favorite glue for die cuts!  


Friday, October 15, 2021

CAS Mix Up (MM) Reminder Botanical Prints

Time for our CAS Mix Up (MM) Reminder Botanical Prints CAS cards by our talented DT girls!
Bonnie is our host and she has chosen an awesome challenge: Botanical Prints😀
The DT girls CAS cards and our followers gallery are filled with Stunning and Inspiring cards!


Bonnie's Message
This month I'd like to find leaves, flowers, ferns, etc. from the yard and bring them into the craft room to use on a card.  You can put them between 2 pieces of watercolor paper and run them through the Big Shot, or use them on a gel plate, or even paint a leaf and press it onto cardstock.
I can't wait to see what you do with what grows in your space!


Video Tutorials:

I was inspired by Gina K's Stamping Real Leaves with Distress Oxide Video.

Thank you Bonnie for hosting such a fun and creative Botanical Prints CAS Mix Up Challenge! 
It is a wonderful technique using leaves that are all over the ground during our
Autumn Season:-)

I pressed a flowering Cherry Tree leaf directly onto Distress Oxide ink pads: Carved Pumpkin, Fired Brick and Aged Mahogany. Spritzed with water then placed leaf onto 
Strathmore Mixed Media paper and placed acrylic block over leaf and pressed down
with my hand.  I did this twice to get prints of 2 leaves.

Let dry and die cut with Spellbinders Square Hemstitch 4 1/4" x 4 1/4"  for the card front.  
Then used the smaller square Hemstitch Die for the hemstitch holes.

Found this STAMPlorations Skinny Sentiment Dies Hello in my stash using Bisters
Mahogany and Brushos Dark Brown.  Matched the leaves perfectly:-)

Attached card front to SU Pumpkin Pie for a wonderful organic 
Autumn Hello😀

You still have until the 24th to play along with us at CAS Mix Up (MM) 
Botanical Prints.  Happy leaf hunting, dear friends.
Love and Hugs, 


Supplies:
Stamps: Real Leaves for stamps.
Paper: Strathmore Mixed Media and SU Pumpkin Pie.
Inks: Distress Oxide: Carved Pumpkin, Fired Brick and Aged Mahogany. Bisters Mahogany,  Brushos Dark Brown. 
Accessories: Spellbinders Square Hemstitch Dies.  Clear Acrylic Block. Real Flowering Cherry Tree Leaf.  STAMPlorations Skinny Sentiment Dies.