Wednesday, May 27, 2020

Spring Fling May 27th Encore

Our final STAMPlorations May Spring Fling Encore with more inspiring projects 
by our talented STAMP GIRLS Design Team!

You still have until May 31st to play along.
Thank you for all your comments and Linky projects.  So appreciated!


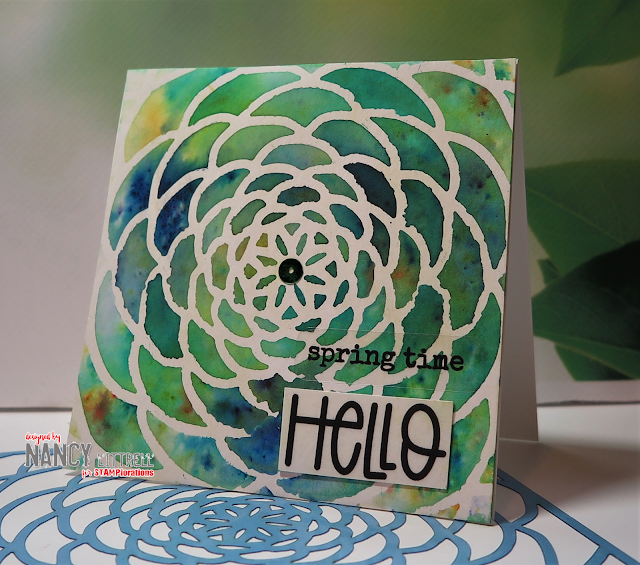
I used these STAMPloration products for my 3rd card.


Another Brushos stenciled card using the same technique as my May 20th Encore card.

I sprayed back of Petals 1 stencil with Pixie Spray,  a light tacky adhesive spray.
Placed stencil over 4 1/4" square cut Strathmore Mixed Media paper and secured edges
with masking tape.

Sprinkled with Brushos: Leaf Green, Yellow and Ultra Marine and then
spritzed liberally with water using TH Distress Sprayer.
Blotted lightly the excess water and let dry.

Trimmed circle image to fit an A2 size 100# cardstock and attached.
Then buffed image with a paper towel to get a smooth image.

Attached "Hello Spring" clear sticker to scrap of 100# CS  and trimmed,
then attached to image and Done! 

I am  loving all my new STAMPloration stencils and clear stickers:-)
Hope you get to join our blog hop and linky party before it
ends on May 31st.  

Wishing you all are staying safe and creative.  Hugs..


If you use my discount code STAMPGIRLNANCY when you check out at the 

STAMPlorations Store you can get a 20% additional discount:-)


Prizes:
- THREE (3) winners of $10 gift code drawn from comments left on the main blog and designers' blogs
- TWO (2) winners of her choice of STAMPlorations product with a value of up to $10 drawn from comments left on the main blog and designers' blogs
- TWO (2) winners of her choice of STAMPlorations product with a value of up to $15 drawn from entries in the linky party
- ONE (1) winner of $25 gift code drawn from entries in the linky party

Commenting and linking up end on Sunday, May 31, with winners announced on June 10 in the May winners post.

May store promotion: All throughout May, products in the SPRING FLING section are 15% off instantly + with your DT code, customers can get up to 35% off.


Wednesday, May 20, 2020

Spring Fling May 20th Encore Samples

Hope you are enjoying all the STAMPlorations Spring Fling Samples by our
very talented STAMP Girls.  We have more projects at our May 20th Spring Fling Encore!


You still have until May 31st to play along by commenting and/or linking your projects
for these Prizes!


I used these STAMPlorations products for my 2nd card.


I sprayed back of Petals 1 stencil with Pixie Spray,  a light tacky adhesive spray.
Placed stencil over 4 1/4" square cut Strathmore Mixed Media paper and secured edges
with masking tape.

Sprinkled with Brushos: Leaf Green, Yellow and Ultra Marine and then
spritzed liberally with water using TH Distress Sprayer.
Blotted lightly the excess water and let dry.

Attached to SU Whisper White 100# cardstock card base.
Added "Hello Spring" spring time sentiment sticker.
Cut around Hello from "Spring Magic" Sticker Say Hello To Spring sentiment,
then attached Hello to Mixed Media scrap and trimmed.

Added 1 STAMPlorations Shaker Blends sequin to the center of flower stencil and Done!

We would love to have you join us at STAMPlorations Spring Fling!
Stay safe and Creative dear friends...Hugs..


If you use my discount code STAMPGIRLNANCY when you check out at the 

STAMPlorations Store you can get a 20% additional discount:-)


Prizes:
- THREE (3) winners of $10 gift code drawn from comments left on the main blog and designers' blogs
- TWO (2) winners of her choice of STAMPlorations product with a value of up to $10 drawn from comments left on the main blog and designers' blogs
- TWO (2) winners of her choice of STAMPlorations product with a value of up to $15 drawn from entries in the linky party
- ONE (1) winner of $25 gift code drawn from entries in the linky party

Commenting and linking up end on Sunday, May 31, with winners announced on June 10 in the May winners post.

May store promotion: All throughout May, products in the SPRING FLING section are 15% off instantly + with your DT code, customers can get up to 35% off.

Friday, May 15, 2020

CAS Stencil May Reminder: Layered Stenciling

Already time for our CAS Stencil May Reminder Challenge!
You still have until the 24th to play along.

Our creative teamie, Viv is hosting this month.
Be sure and check out all the amazing cards by our Design Team.


There are video tutorials if you need more inspiration.
We would love to have you play along.  Stay safe and creative, dear friends.

Big Hugs..

I used 2 new stencils designed by Helen G for ARTlorations.  
I had so much fun layering the stencils.

I sprayed Pixie Spray on the back of the "Brick Wall" stencil.
Placed stencil over Strathmore Mixed Media paper,  secured with painters tape.

Then used a make up brush to blend Distress Oxide "Iced Spruce" thru the stencil.
It gave a light gray with a tint of spruce green soft background.  
I could not pick up the light green in the photo.

Then sprayed the "Petals 1" stencil and placed over brick wall background
securing with tape carefully so as not to tear background.

Used brush to blend Distress Oxides: Squeezed Lemonade, Fossilized Amber, 
Seedless Preserves and Wilted Violets thru stencil. 
Removed stencil and went...Wow!!  Loved the effect!

Next die cut the layer with Memory Box Stitched Rectangles Die.
Placed in MISTI and stamped Penny Black "Special Sentiments" using Memento
London Fog dye ink.

Attached layer to SU Whisper White 100# card base and Done!

Thank you again Hilary for an awesome challenge.
I need to do stencil layering more often:-)  Hugs..


Adding to NBUS Challenge #14: I used NBUS ARTplorations Brick Wall and Petals 1 Stencils.


Supplies:
Stamps: Penny Black "Special Sentiments"
Paper: SU Whisper White 100#,  Strathmore Mixed Media
Inks: Distress Oxides: Squeezed Lemonade, Fossilized Amber, Seedless Preserves, Wilted Violets
and Iced Spruce.  Memento  dye ink..London Fog.
Accessories: ARTplorations Brick Wall and Petals 1 Stencils. Pixie Spray. Memory Box Stitched Rectangles Dies.  Penny Black Special Sentiments. Make up brush. 

STAMPlorations May Stencil Reminder

STAMPlorations Stencil Reminder Challenge: Anything Goes.
You still have until the end of May to join us at our stencil challenge.
Be sure and check out the fabulous projects by our Design Team.


I spread a thin layer of Deco Foil Transfer Gel Duo with a palette knife
over a layer of SU Whisper White 100# cardstock.
Let dry.  The Gel is still sticky when dry.

Placed Deco Foil Rainbow Shattered Glass onto sticky cardstock with shiny
Rainbow side up.  Used my hand to smooth out the foil.
Trimmed the edges then rolled thru my Big Shot.  The Gel makes it possible to
attach the foil with either pressure (Big Shot, etc.) or Heat (laminator).
Attached layer to cardbase.

Next used the saved negative stenciled layer from my launch card for the 2nd layer.
Attaching the same way as the 1st layer with the gel to 100# cardstock,
but not necessary to roll thru Big Shot.
Then popped up with white craft foam and attached to 1st foil layer.

Next added more of the Rainbow Shattered Glass Foil, shiny side up after the gel on
WW 100# cardstock was dry and still sticky.
Then die cut the "ART happens" thru my Big Shot, which die cut and sealed the foil.

Attached sentiment to stenciled layer using Connect Glue and Done!
I Loved the foil frame for the stenciled layer and the die cut word phrase sentiment.
Gorgeous Shine and Rainbow Colors!

We would love to have you play along in our STAMPloration May Challenge.
You have until the last day of the month to join us. Hugs..


Don't miss out on the STAMPlorations May Spring Fling Hop and Inky!
commenting and linking up end on Sunday May 31st!

Spring Fling Section in Store


Wednesday, May 13, 2020

Time for our last Christmas in the Air Feature Projects!

My STAMPlorations teamie,  Monika and I are sharing our
May Christmas in the Air Feature Projects.

We would love to have you comment on our projects!
Hope you are inspired to add to your Christmas card stash too:-)


I used the CUTplorations Christmas Icons "Christmas Tree #2" Die.
I made a shaker card,  which I had not done in years...so fun! I took extra
photos to share my steps.

********************

The 1st step was to make a Brushos and Bisters watercolor background on
Strathmore Mixed Media watercolor paper.
Sprinkled Leaf Green and Emerald Green Brushos and Green Bisters on paper and
spritzed with water to activate the pigment crystals.

*******************

Next I used the Christmas Tree die to cut out a tree from the background.
Then used the ATC Tag Builder Die to die cut around the die cut tree.
Notice the little stack of pieces to be used later.

****************

Now for the shaker steps!
I die cut a piece of Acrylic Sheet using ATC die.
Attached sheet to back and added dimensionals.
Mixed a bit of 2 Shaker Blends: White Frost and Sparkly Greens sequins.
Carefully poured into shaker tree. Attached another ATC die cut layer.

Here is my finished shaker card again..

To finish the shaker card I
placed card front in MISTI and stamped sentiment from "Trendy Christmas Trees".
Attached shaker tree to card front.

I saved the paper towel that I used to wipe up the excess Brushos and Bisters and
spritzed liberally with water and then blotted onto card frame and Done!

*****************

For my 2nd project...
I made a card using the die cut pieces of the tree that you saw in the
3rd photo above.

First I die cut another tree out of ATC die cut Mixed Media paper 
and saved the tiny white pieces.

Added 3M double sided tape to the back of ATC for pieces to stick to.  

Turned over and carefully
placed all the tiny tree pieces using Marvy Jewel picker.  
Stamped sentiment in MISTI and attached to card front, which I blotted 
with ink soaked paper towel like my shaker card.

Could not waste the tiny white pieces so made a 3rd card:-)
 
 Since I had the method down pat I ended up with 2 more Christmas tree cards.
My stash and I are very happy:-)

*****************

 Sharing my STAMPloration Products.


Monica and I would love to have you hop along with us. 
It has been so much fun adding to our Christmas 2020 stashes:-)
Hope you are inspired to do the same!

Supplies:
Stamps: STAMPlorations Trendy Christmas Trees
Paper: Strathmore Mixed Media.  SU Whisper White 100# cardbase.
Inks: Brushos: Leaf Green and Emerald Green.   Bisters: Green.  Archival Jet Black sentiment.
Accessories: CUTplorations ATC Tag Builder Dies and Christmas Tree #2 Die.  Shaker Blends: Sparkly Green and Frost White.  Connect Glue Gina K.  3M double stick tape. MISTI. Marvy Jewel picker. SU Dimensionals. Acrylic sheet. T.H. Spritzer.


Tuesday, May 12, 2020

CAS Mix Up May Gesso Resist

I was excited to see that CAS Mix Up's May Challenge is Gesso Resist!
My Gesso has been neglected.
I used Gesso Resist, Stamping and Die Cutting.

Linda is hosting the Challenge and shared with us an inspiring list of 
Gesso Resist video techniques.

I loved Susan's DT launch card and used her credit card Gesso Resist technique.
Check out her Cat's Ink.Corporated blog for more details.

****************

I am adding my CAS Christmas Tag Cards also to the
CAS Christmas Card May Challenge: Winter Berries. Hosted by Loll.
I was inspired by Loll's gorgeous card to use my Strathmore Tan Mixed Media paper!

Here are my cards...Enjoy!


I die cut 2 Strathmore Tan Mixed Media paper tags using CUTplorations
"Stitched Tags Nesting Dies". 

Then used a palette knife to scoop out a bit of Gesso onto my glass mat and
used an old gift card to dip the narrow edge into the Gesso and
make swipes going different directions onto both tags.  Let dry.

Sponged Distress Oxide Inks: Candied Apple and Lucky Clover onto tags and sponged
Vintage Photo onto edge of tags.

Die cut Never Before Used SSS "Christmas Foliage Dies" and attached to tags with 
Fine Tip Glue Pen. 
Colored Winter berries with Zig pen. 

Added SU "Merriest Wishes" sentiments and ribbon to both tags.
Popped up tags with white craft foam and attached to SU Whisper White 100#
cardbase and Done!

I loved the Gesso Resist Technique and how the Tan MM gave more muted colors.

Sharing larger photos of each card so you can see the Gesso better...Enjoy!


You have until the 24th to play along in the challenges.
Stay safe and Creative my friends.  Hugs..


Supplies:
Stamps: SU Merriest Wishes.
Paper: Strathmore Tan Mixed Media...Thank you again Loll for the Tan and Black MM papers:-)
SU Whisper White 100# CS.
Inks: Archival Jet Black.  Distress Oxides: Candied Apple, Lucky Clover and Vintage Photo. Zigs
Pen.
Accessories: CUTplorations Stitched Tags Nesting Dies. SSS Christmas Foliage Dies. SU Fine Tip Glue Pen.  White Craft Foam. Sponge Dauber. SU Riding Hood Red ribbon (ret).


Adding to NBUS Challenge #14: I had Never Before Used SSS Christmas Foliage Dies!


Wednesday, May 6, 2020

Spring Fling Blog Hop and Linky Party-May 6

STAMPlorations Spring Fling Blog Hop & Party has begun!!!


You are going to Love all the awesome Spring Themed projects by many
of our DT STAMP girls using Spring Themed Stamps, Stencils and/or Stickers!

Here is my 1st card sample!
You will see more of my samples on the encore posts: May 20th and May 27th!


I kept with bright and colorful Spring colors and a simple design.

Sprayed back of stencil with Pixie light tacky adhesive.  Works great for stencils,
especially if you are doing any watercoloring.

Attached stencil to Strathmore Mixed Media paper and secured with masking tape.

I colored the stencil with Zigs Real Brush pens.
Removed stencil and washed with warm soapy water to remove most of 
adhesive and all the watercolors.

I did a little surgery on the Spring Magic sticker so it would fit nicely.
I Love the versatility and the fonts on Shery's stickers and I now have many sets:-)
I got hooked on Christmas Stickers last year,  which saved me so much time.

I enjoyed my relaxing time watercoloring the bright colored floral image 
and then taking minutes to finish my card using a 5 1/2"x 5 1/2" format.

You have until the 31st to comment and add your linky Spring Fling projects.
Hugs......


If you use my discount code STAMPGIRLNANCY when you check out at the 
STAMPlorations Store you can get a 20% additional discount:-)


Prizes:
- THREE (3) winners of $10 gift code drawn from comments left on the main blog and designers' blogs
- TWO (2) winners of her choice of STAMPlorations product with a value of up to $10 drawn from comments left on the main blog and designers' blogs
- TWO (2) winners of her choice of STAMPlorations product with a value of up to $15 drawn from entries in the linky party
- ONE (1) winner of $25 gift code drawn from entries in the linky party

Commenting and linking up end on Sunday, May 31, with winners announced on June 10 in the May winners post.

May store promotion: All throughout May, products in the SPRING FLING section are 15% off instantly + with your DT code, customers can get up to 35% off.


Monday, May 4, 2020

CAS May Stencil Challenge: Layered Stenciling

Time for our CAS May Stencil Challenge: Layered Stenciling hosted by Hilary  
Hilary has provided several video tutorials if you need ideas plus our 
awesome card samples by our creative Design Team and talented 
Guest Designer, Greta.


I have been looking forward to this challenge.  I need to do more layering of my
stencils.  A great way to use more awesome stencils:-)
Remember to keep your cards Clean and Simple.

 Out of Chaos Comes Creativity! 

I played with a never before used "Rubber Bands" Stencil designed by 
Helen G for ARTplorations.

I sprayed the back of the stencil with Pixie Spray and then placed the stencil over
Strathmore Mixed Media paper and secured with a couple pieces of painters tape,

Then used make up brush to blend Distress Oxide Inks: Worn Lipstick, 
Picked Raspberry, Candied Apple and Wilted Violet.
Next used TCW Tiny Circles Stencil to add tiny circles in the different colors.
Then removed Rubber Bands Stencil.

Die Cut with CUTplorations "Basic A2 Panels Nesting Dies" to get a beveled edge for my panel.

Attached panel to SU Whisper White 100# card front layer that I had die cut 
with same A2 Dies set.
Then attached layers to Whisper White card base.

Added Visible Images "Creative Chaos" popped up sentiment and Done!

I loved how my Quick Clean and Simple card turned out.
We would love to have you join our May Stencil Challenge.  Awesome challenge, Hilary!

Stay safe and creative, dear friends.  You have until the 24th to play along:-)  Hugs..

Adding to NBUS #14 challenge: new Rubber Bands Stencil.

Supplies:
Stamps: Visible Images "Creative Chaos" sentiment.
Paper: SU Whisper White 100#.  Strathmore Mixed Media.
Inks: Distress Oxide Inks: Worn Lipstick, Picked Raspberry, Candied Apple and Wilted Violet.
Archival Jet Black..sentiment.
Accessories: ARTplorations by Helen G "Rubber Bands" Stencil.  CUTplorations "Basic A2 Panels Nesting Dies.  TCW "Mini Tiny Circles" Stencil. Pixie Spray (low tack adhesive), Dimensionals