Wednesday, July 22, 2020

STAMPlorations Christmas in the Air July Feature

Monika and I are continuing the Christmas in the Air Feature Projects:-)
We hope to inspire you to add to your Christmas stash too!

We will be hosting July, September and November Feature Projects. 
Shery will randomly pick a winner for a prize if you comment
on our blog posts and the STAMPlorations July Christmas in the Air post:-)

I just discovered a new to me Split-4 Stamping Technique, which gives you 4 cards.
I changed it up a bit and used a Stencil instead of stamps.
I used the new CRAFTplorations Stencil by Sanna,  "Christmas Wreaths",
  which worked out really well! 

I will be sharing several photos showing the Split-4 Stenciling Technique using
STAMPlorations Products.

STEP 1
8 1/2" X 11" White 100# CS
Trim to 8" X 10 1/2"
Score at 4" and 5 1/4"

Step 2
Secured Sanna "Christmas Wreath" Stencil with masking tape.
Used Distress Oxide Inks and Make Up Brushes for ink blending.

Step 3
"Christmas Wreath"  Stencil after using
make up brushes and eye shadow applicators to blend inks.

Step 4
Removed Stencil and loved the beautiful Christmas Wreaths!
You can see the scored lines.

Step 5
Cut scored lines with paper cutter for 4 card fronts.
Then attached to red card stock and white card bases.
Added CRAFTplorations Clear Stickers and outlined stickers.
Traced Wreath images with black Ultra fine Sharpie and 
added Wink of Stella for Shimmer!
All Done!

Finished Cards! 


Sharing STAMPlorations Products.

Sanna Lippert Designs for ARTplorations Christmas Wreaths 
CRAFTplorations Clear Stickers Good Tidings 
Hope you are inspired by my Clean and Simple Split 4 Stenciling Technique Christmas Cards.  So fun getting 4 cards for my Christmas Stash out of one play session:-)

The new STAMPlorations Store is now fully open.  You will LOVE the new easy search feature,  the clean look and easy navigating for All the stores and All in One Place.  There are so many awesome specials going on also that you will not want to miss.  

My STAMPGIRLNANCY is still available at checkout for 20% discount on your order unless specified. 

Here is the link to the STAMPlorations Shop  with all the Moved In July Sales:-)  Happy shopping and checking out Shery's new beautiful store:-)  Love and Hugs...Nancy


Sunday, July 19, 2020

Twofer Card Challenge #29: Butterflies

There is still time to play until the 24th.  So many Gorgeous and Creative Twofer
Butterfly cards by Dolly's talented DT and Followers:-)


I was totally inspired by DT Girl,  Marcia's post to stamp and pencil color on Tan paper
and her Split-4 Technique,  which makes 4 card fronts.  

Hope you like my cards,  Marcia, Dolly and friends!

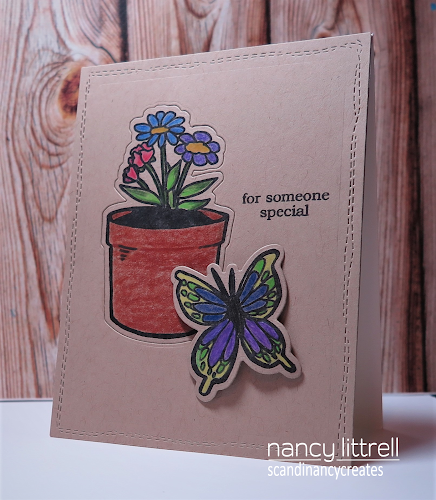
I used the same stamped and die cut butterfly from the STAMPlorations "Fluttery" 
stamp set for both cards.


I stamped with  Versafine black ink the pot of flowers and butterfly 
 onto the Tan Mixed Media paper,    Then die cut both with the "Fluttery" die cuts.

Then the fun began using Prismacolor pencils to color the images.
I loved the ease of pencil coloring over the Tan MM paper.  

Next I die cut the pot of flowers into my tan card front and inlaid my colored image.
Then die cut the card front with CUTplorations Crazy Double Running Stitch
Rectangle Nesting Dies.

Stamped the sentiment and  shaped the pencil colored butterfly with stylus
 and then popped up the butterfly with mini dimensionals and
attached to 100# white cardstock and done.

I loved the rich colors I was able to achieve with the pencils on Tan MM paper!
******************

  
Here is the Split-4 Stamping Technique Video by Creative Treehouse that 
Marcia shared on her blog .  I used the same SU "Forever Fern" stamp set.
Be sure and check out the video.  A fun and easy technique to get 4 card fronts
to finish into cards.  

To finish my card front I die cut my border with the 
Spellbinder Hemstitch die and stamped the sentiment from the same fern set.

Next stamped,  die cut and Zigs colored the butterfly,  which I shaped with a stylus.

Next I attached card front to a layer of SU Garden Green CS and 
attached to SU Whisper White 100# Card base and done!

Sharing a photo of the 4 card fronts I made using the Split 4 technique.
The top 2 card fronts are upside down so you can see how I stamped in a circle
the Forever Fern images.

Thank you again Marcia for inspiring me to try the techniques I used for my Twofer cards!
Thank you Dolly for the pencil coloring technique and your awesome Twofer Butterflies
Challenge.  Thank you for reading my long post!
Hope some of you are inspired to try these techniques.
Stay Safe and Creative,  my friends.  Love and Hugs...


Wednesday, July 15, 2020

CAS Mix Up July (S): Stencil Tracing Reminder

I am hosting the CAS Mix Up July (S): Stencil Tracing  Reminder Challenge.
Be sure and check out all the awesome Reminder cards by our talented Design Team.

We also have "Three" very talented Guest Designers this month as they all were
Top Picks for the
May CAS Mix Up, CAS Stencil and CAS Watercolour Challenges:-)

Be sure and check out Greta (GG Creations), Sandie (London Days) and Kia's (Kia's Place)
Gorgeous CAS Creative Stencil Tracing cards:-)


You still have until the 24th to play along.  
We would love to have you join our creative fun using your stencils.
 

My stencil traced card!

I began by using a #4 paint brush to add Gansai Tambi Pearl Watercolors on Yupo paper.
The Pearl colors give a beautiful subtle sheen to the background.
Used: Lemon Yellow, May Green, Pink, Scarlet Red, and Cobalt Blue for a soft 
rainbow effect.

Then sprayed ARTplorations Prim Pattern Stencil with Pixie Spray,  a light tacky
adhesive.  Placed stencil over Yupo paper and traced with Ultra Fine Point Black Sharpie.

Die Cut background and SU Whisper White 100# CS frame with 
Spellbinders Hemstitch Rectangles Dies. Popped up background with white craft foam.

Added die cut Alexandra Renke Spring Flowers Die using Gina K Connect Glue.
I received several A. Renke die cut flowers from my dear friend Bonnie 
a couple of years ago.  I still have more for future cards:-)


Added CRAFTplorations "Shine Bright" Clear Sticker to a scrap of 100# CS
and trimmed,  then attached to background and Done!
Stencil tracing is such a fun and easy technique to make your stencil image pop!

We would love to have you join us.  Stay safe and Hugs..


Supplies: 
Stamps: None
Paper: SU Whisper White 100#.  Yupo paper.
Inks: Gansai Tambi Pearl Watercolors: Lemon Yellow, May Green, Pink, Scarlet Red, and Cobalt Blue.  Ultra fine Point Black Sharpie pen.
Accessories: ARTplorations Prim Pattern Stencil.  Spellbinders Hemstitch Rectangles Dies.  Pixie Spray.  #4 flat paint brush. White Craft foam.  Gina K Connect Glue. Alesandra Renke Spring Flowers Die.  CRAFTplorations Clear Stickers "Shine Bright".

Wednesday, July 8, 2020

CAS Christmas Challenge: July Nativity

July CAS Christmas July Challenge: Nativity hosted by the very talented, Marcia.

You will be inspired by the CAS Card samples by the Design Team and
wonderful Guest Designer..Jane.


I was so inspired by Hideko's beautiful Wise Men CAS card design.

Hideko just sent me a surprise packet, which included a beautiful CAS Nativity scene
cut out and Penny Black die cut frame that I included on my card.
Thank you again, my friend:-)

My Quick CAS Nativity Christmas Card!
I blended Distress Oxides: Faded Jeans and Blueprint Sketch using a make up brush
onto Strathmore Mixed Media paper.

Stacked two Nativity images and attatched with Connect Glue.  Next Heat embossed 
STAMPlorations "Homespun Christmas" sentiment with WOW white EB powder.

Added silver halogen star stickers to background then popped up
image on White Craft Foam and attached to PB die cut Simple Stackers frame.

Attached to SU Whisper White 100# card base and Done!
Unfortunately the Nativity scene is not a die,  but cut from a machine.
Hideko found the die cut out images on this Etsy Shop.

You still have until the 24th to play along at CAS Christmas Card Challenge:-)

Wednesday, July 1, 2020

CAS Mix Up July (S) Stencil Tracing

Time for our July CAS Mix Up Stencil Tracing Challenge.

I am looking forward to hosting our 1st CAS Mix Up Stencil Challenge.
Be sure and check out our CAS Cards by our talented Design Team.

We also have "Three" very talented Guest Designers this month as they all were
Top Picks for the
May CAS Mix Up, CAS Stencil and CAS Watercolour Challenges:-)

Be sure and check out Greta (GG Creations), Sandie (London Days) and Kia (Kia's Place)
Gorgeous CAS Creative Stencil Tracing cards:-)


This is the 2nd CAS Mix Up Challenge after Loll did some reorganizing to make
her life simpler and the DT girls too.  We are rotating CAS Mix Up, CAS Stenciling and 
CAS Watercolour Challenges in that order and repeating every 3 months.

I did not find any video's for Stencil Tracing online.
Basically you can outline with the stencil left on your image or outline
with the stencil removed.

Just add Stencil Tracing to my blog search to find many card examples in my blog.

Here is my Stencil Traced card.

I found this monoprint stenciled with Brushos Orange, Brilliant Red and Purple
crystal powders image in my Brushos stash.

I had laid the Dina Wakley "Leafy" stencil over Strathmore Mixed Media paper.
Secured with masking tape.  Then sprinkled the Brusho powders onto the paper and spritzed
liberally with water using T.H. Distress Sprayer to make a positive image layer. 

Did not want to waste all the ink on the stencil,  so removed stencil carefully
 and flipped over inky side of stencil onto another piece of MM paper.
Placed paper towel onto the stencil to transfer the ink onto MM paper
to get a monoprint image!

That was the negative monoprint image I found in my stash.
I die cut the piece with Memory Box Stitched Rectangle Die.
I could not line up the "Leafy" stencil,  so used an Ultra Fine Point Black Sharpie
to hand draw around the leaves and frame.

Popped up image with white craft foam and added to die cut SU Very Vanilla CS.
Added layers to Very Vanilla Thick cardbase.
Attached STAMPlorations Clear Sticker "Shine Bright" onto very vanilla scrap and Done!

I was pleased with the CAS artsy look of my card.
Hope you like it too and join us at our 1st CAS Mix Up Stencil Challenge.
You have until the 24th to play along! Hugs..


Supplies:
Stamps: None
Paper: Strathmore Mixed Media.  SU Very Vanilla Thick.
Inks: Brushos: Orange, Brilliant Red and Purple. 
Accessories: Dina Wakley "Leafy" Stencil.  MB Stitched Rectangles Dies.  Ultra Fine Point Black Sharpie. T.H.Distress Sprayer. STAMPlorations Clear Stickers-"Shine Bright".