Wednesday, February 23, 2022

CAS Christmas Card Challenge: Winter Scene

I am posting my CAS Christmas Card Challenge: Winter Scene card.
Hosted by the very talented, Christine.
I Love this challenge for adding to my CAS Christmas Card Stash:-)


Stamping, Heat Embossing and Die Cutting.

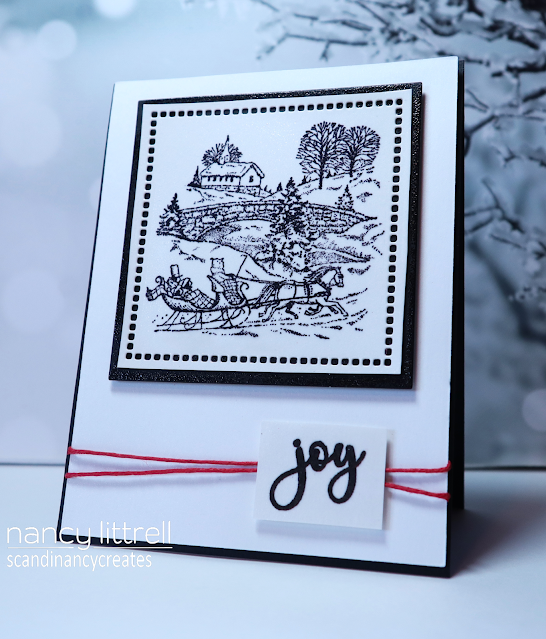
I stamped my SU "Sleigh Bells Ring" image using Archival Jet Black Ink onto
SU Shimmery white cardstock.  This is a stamp set from 2007 and Retired.

I think I gave it a bit more modern CAS design,  which was fun.
After stamping the image I die cut with Spellbinders Square Hemstitch Dies.
Covered with Versamark and heat embossed with SU Clear EB Powder.
It has a beautiful shine.

Then attached to a square die cut SU Basic Black Cardstock.
Popped up with craft foam and attached to Shimmery White cardbase.

Next added Red Hemp and then stamped STAMPlorations Christmas Joy sentiment 
with Archival Jet Black onto scrap of Shimmery White CS, 
 Trimmed and added Versamark and Heat EB with clear EB powder. 
  
Next popped up sentiment with foam.
Then attached card front to SU Basic Black Card Base and Done!

This would be a QCAS card design for making a few multiples for my stash:-)

Thank you Christine for a fun CAS Christmas Card Challengeđź’•


Supplies:
Stamps: SU Sleigh Bells Ring.  STAMPlorations Christmas Joy.
Paper: SU Shimmery White CS and Basic Black.
Inks: Versamark. Archival Jet Black.
Accessories: Spellbinders Square Stitched Hemstitch Dies.  Red Hemp a gift from my DD plus more colors:-)  Craft foam.  SU Clear EB Powder.

Adding also to Peace on Earth  Christmas #10 Anything Goes Challenge


Tuesday, February 15, 2022

CAS Mix Up (MM) February Reminder Faux Cloisonne

Time for our CAS Mix Up Mixed Media Faux Cloisonne Reminder Challenge!
Hosted by the very talented Susan.
All the CAS cards designed by our DT are so Inspiring!


Susan's Message
For my challenge I would like you to recycle glossy Magazines, Advertising material or you could use Designer Paper that has been hiding in your stash.  Most cards I have seen are embossed with Gold embossing powder but you could use other colours too.  


Video Tutorials: 


Using Faux Cloisonne Technique, Dies, Heat Embossing and Stamping.

I began by cutting out a flowers photo from a shiny glossy seed catalog.
Then die cut a Penny Black "Leaf Stitch Frames" border for the card front and 
for the glossy flowers and then
die cut a third time using the smaller rectangle and attached the flowers image
with scotch tape.

Next with the leftover glossy flowers I die cut the Memory Box "Effera Butterfly Wings".
Then die cut the MB "Rhone Butterfly Wings" from SU Basic White 100# CS.
I attached the wings and body with Connect Glue.
Then attached the beautiful butterfly to the Penny Black "Leaf Etched Frame".

Stamped and heat embossed the sentiment from Altenew "Leaf Clusters".
Then trimmed off the "my friend" from the sentiment 
and attached the "miss you" to the frame.

I created my card the same day I designed my Faux Cloisonne launch card.
Whoops...realized again that I had not gold heat embossed my images.

I very carefully used my Versamark Pen to trace around the edges of the flowers
panel and the butterfly and then heat embossed with Ranger Princess Gold!
It worked beautifully:-) 

We would love for you to join our Faux Cloisonne fun! 
You still have until the 24th to play along:-)

Love and Hugs...


Supplies:
Stamps: Altenew "Leaf Clusters" sentiment.
Paper: SU Basic White 100# CS.  Glossy seed catalog.
Inks: Versamark ink pen.  Versafine white ink.
Accessories: Penny Black Leaf Stitch Frames Dies. Memory Box Effera Butterfly Wings Die and 
Rhone Butterfly Wings Die.  Connect Glue. Ranger Princess Gold EB Powder.


Thursday, February 10, 2022

Happy Valentine's Day 2022

Happy Valentine's Day 2022 for Denny and my blogging friendsđź’•

You will be seeing more future cards using my new 6" x 6" Craft Consortium 
I Love the choice of colors and designs that look like alcohol ink backgrounds.
I also have the beautiful "Dusk" 6"x 6" tablet.

My 2022 Valentine!

I cut a 4 1/4" Square SU 100# Basic White card base.
Then die cut a card front using SSS Heart of Flowers Die.
Attached Pretty Paper behind silhouette die cut heart using scotch tape.
Stamped PB "Holiday Snippets" sentiment using MISTI and Archival black ink. 

Attached cardfront using Connect Glue to cardbase and added Spellbinders 
Chrystal Gems and Done!  QCAS card filled with Loveđź’•

Wishing you a lovely Valentine's Day with a loved one,  my friends.
Love and Hugs...


Supplies:
Stamps: PB Holiday Snippets.
Paper: SU Basic White 100#.  Craft Consortium "Ink Drops-Vivid"
Inks: Archival Jet Black
Accessories: SSS Heart of Flowers Die. MISTI.  Spellbinders Chrystal Mix Gems.


NBUS #35 Craft Consortium "Ink Drops-Vivid" Pretty Paper.


Tuesday, February 1, 2022

CAS Mix Up February 2022 Challenge Faux Cloisonne

CAS Mix Up has a Fabulous Challenge this month hosted by our very talented Susan.
You will be inspired by our awesome DT.  No Guest Designer this month.


Susan's Message
For my challenge I would like you to recycle glossy Magazines, Advertising material or you could use Designer Paper that has been hiding in your stash.  Most cards I have seen are embossed with Gold embossing powder but you could use other colours too.  


Video Tutorials: 

                                                                                  
My CAS Mixed Media Card using Faux Cloisonne Technique, die cuts, stamping and 
heat embossing.

OMG...I am loving the Faux Cloisonne technique...thank you Susan for the awesome challenge!
Susan's tutorials were very helpful...although I did my own twist on the technique.

I chose a plant and seeds catalog with beautiful photos on glossy paper.
I chose several photos and ended up using a photo of herbs, which I die cut with
the smaller Altenew Leaf Canopy Die and set aside.

 I also saved a photo of sunflowers,  which I cut with scissors and attached  
under a die cut Spellbinder Hemstitch Square and die cut the square with SSS
Postage Stamp Edge Frames.

Next die cut a rectangle from the Postage Stamp Edge Frames.
Die cut the square frame into the rectangle and inlayed the square die cut piece.
I love how the Sunflower photo colors showed through.

Next die cut 2 layers of the leaves using black cardstock and stacked
using Connect Glue.  Next added the glue to the top layer of the black stacked leaves.
Then carefully attached the die cut glossy leaves and let dry.

I then stamped the Altenew Leaf Canopy sentiment 
using Archival Jet Black Ink and MISTI.
Next used Connect Glue to attached leaf image and layered main image to 
SU Basic White 100# cardbase .

After creating my CAS Mix Up card
I realized I missed one very important step on my card...Oh dear!

I forgot the heat embossing with Gold!!!
The next day after putting on my "thinking cap"...I realized I could finish my card
correctly:-)

I very carefully used my Versamark Pen and drew around the leaves
and heat embossed with Ranger Princess Gold EB Powder. 
Hurray...It worked Great!  

So we can now add die cutting glossy paper and heat embossing with a Versamark Pen
and Embossing Powder as another Faux Cloisonne Technique:-)

We would love to have you join our fun at CAS Mix UP this month. 
You have until the 24th to play along.
Remember to keep your design Clean and Simple!
Love and Hugs, 

If you would like to subscribe by email,
please fill out the subscription form in the upper right sidebar.
It is also important to add sw1subscribers@gmail.com to your contact list
so Google recognizes the address and delivers the updates.


Supplies:
Stamps: Altenew Leaf Canopy (sentiment)
Paper: SU Basic White 100#.  Glossy Catalog Paper. SU Basic Black CS.
Inks: Archival Jet Black.  Versamark Pen ink.
Accessories: Altenew Canopy Die Cut.  Spellbinders Square Hemstitch Die Cut. SSS Postage
Stamp Edge Frames.  Connect Glue..my favorite glue for die cuts!