Showing posts with label TCW Joyful Sunflower. Show all posts

Friday, July 21, 2023

Group of Seven Off the Edge...Again!

Another card using the Group of Seven July "Off the Edge" design!
Click Here to see more designs by the Group of Seven Cardmakers.


Off the Edge is such an effective easy design.
I am adding my card to the Linky...you can add your cards too. 
So much fun to share...

If you search "TCW Sunflower Stencil" on my side bar you will see
many more card examples using this awesome stencil:-)  Enjoy...

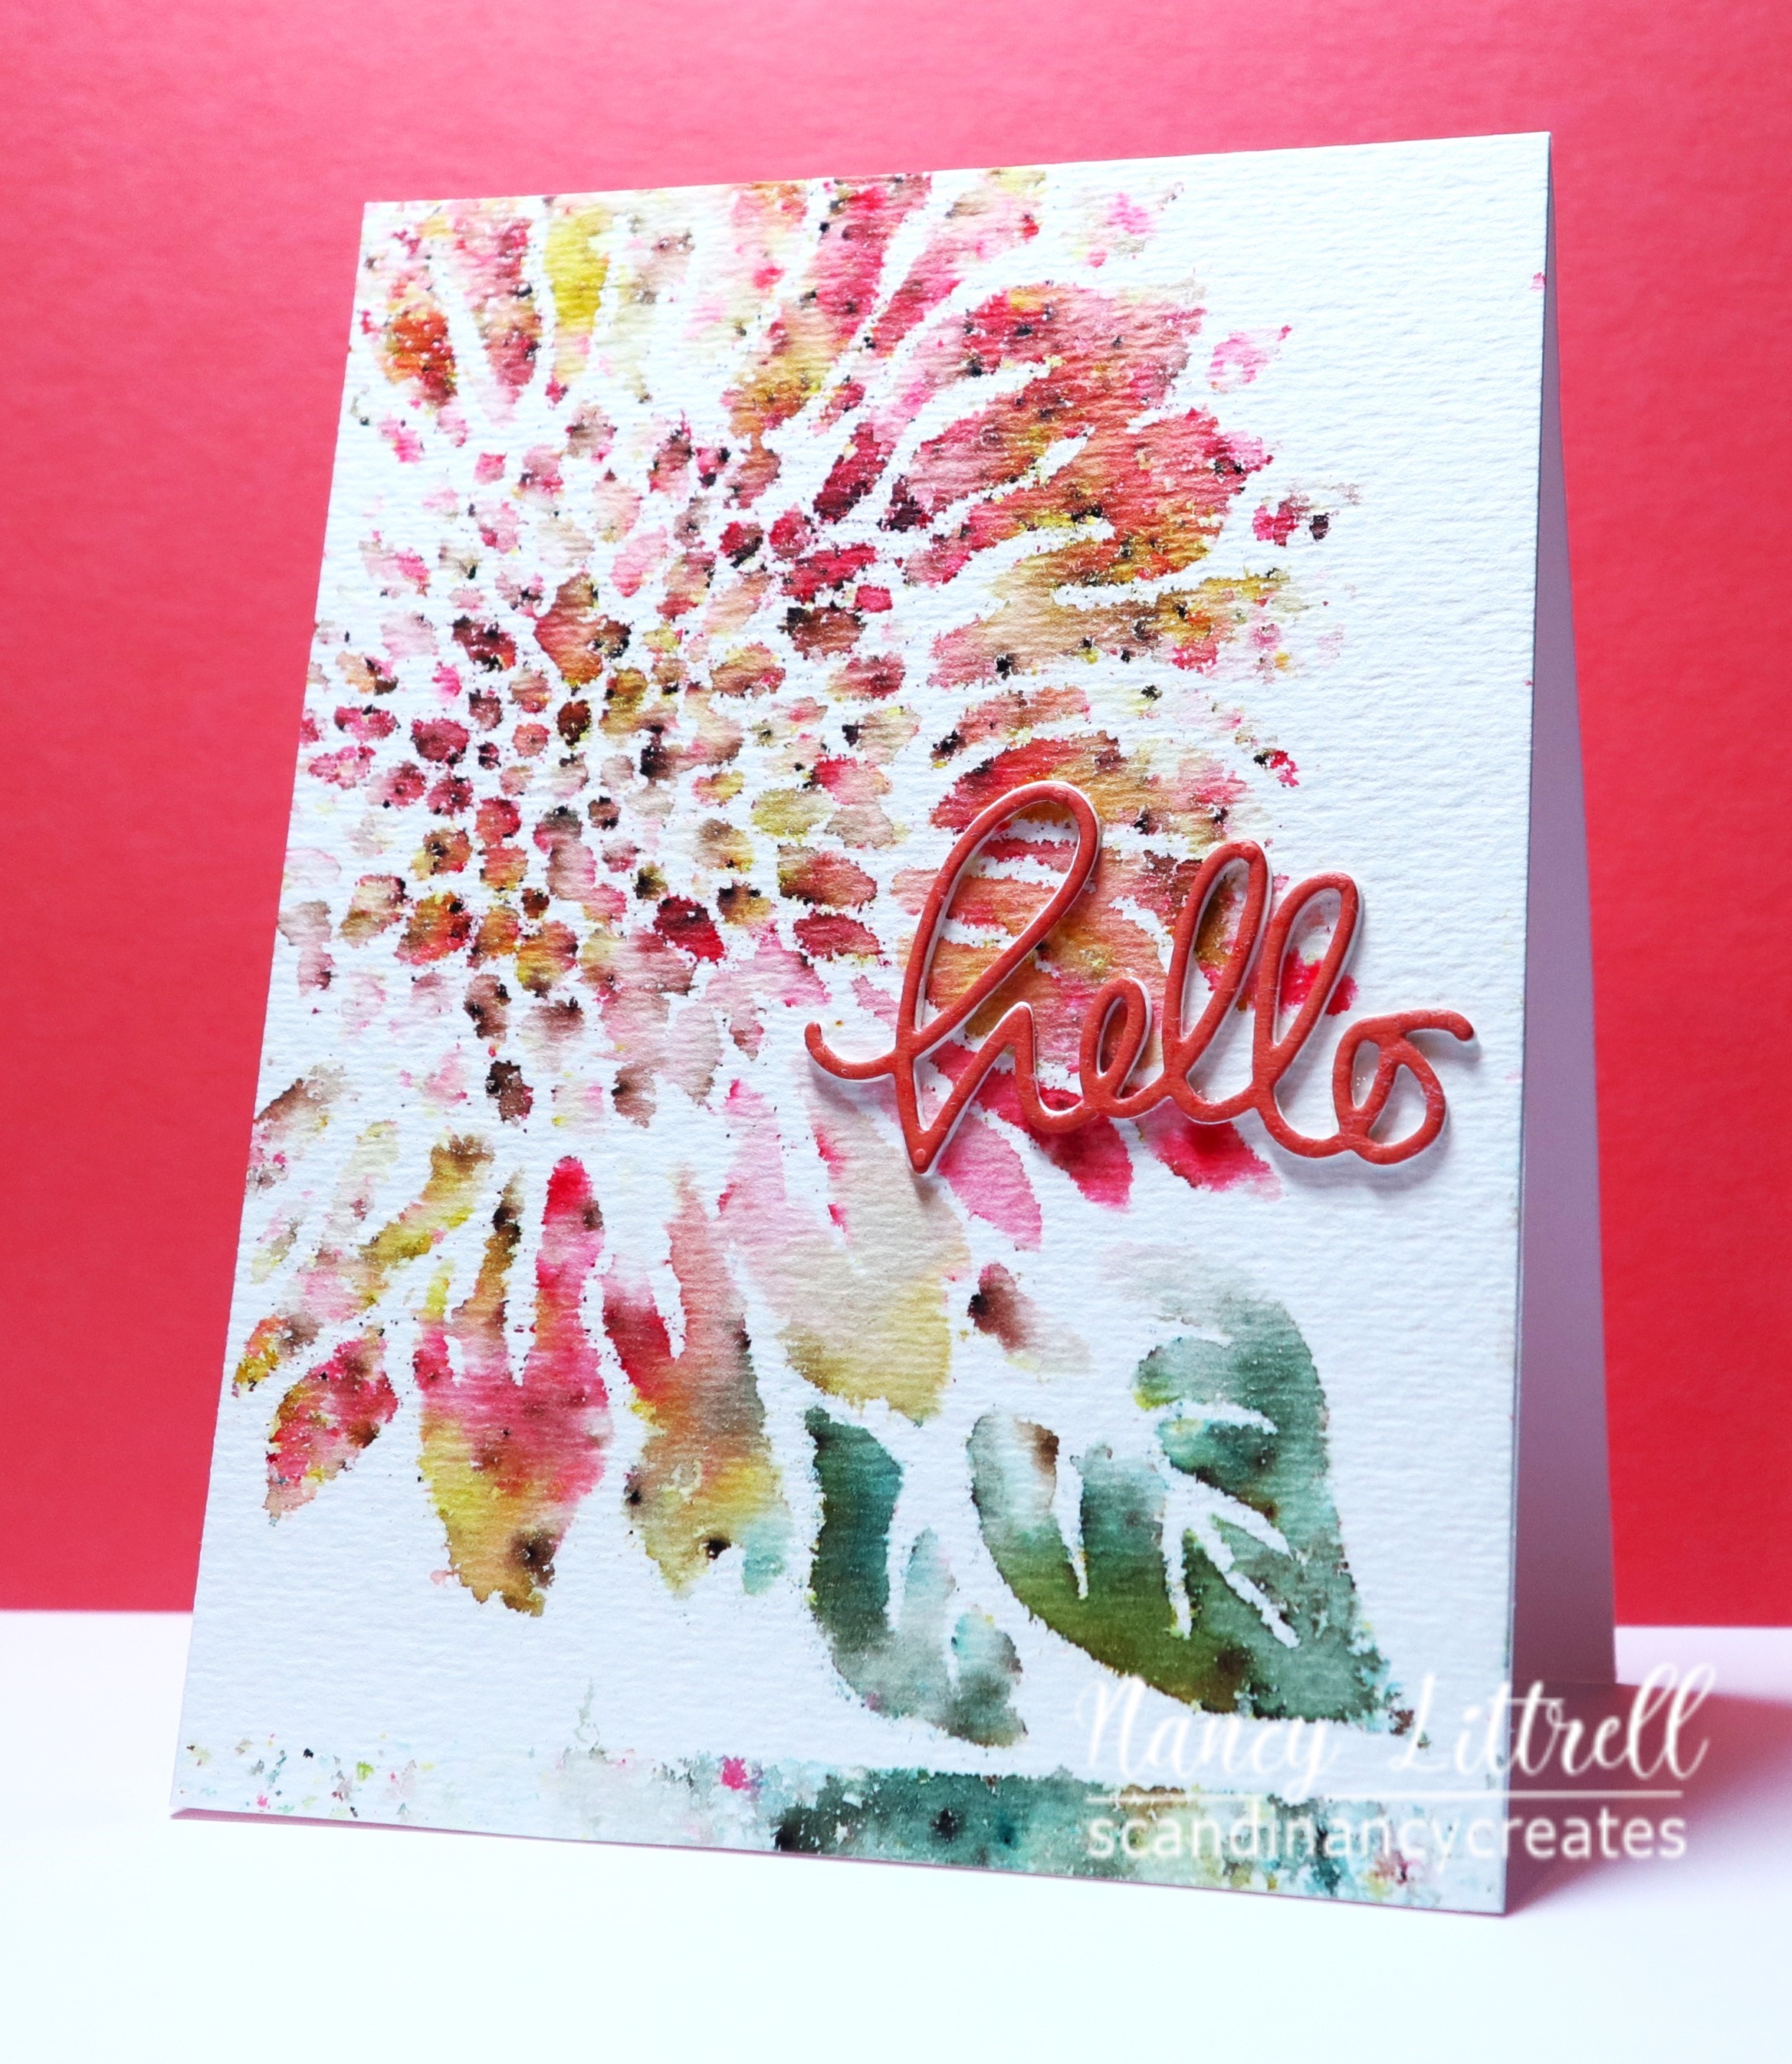
I found this awesome card front in my stash
using my Favorite "TCW Sunflower Stencil".
I used Strathmore Cold Press paper and an assortment of Brushos.

This I believe were my Brushos steps...
Secured my A2 card front with masking tape, then secured stencil.  Next 
sprinkled the Brushos thru the stencil carefully...do not use too much.
Spritzed with water using TH Spritzer and again not too much water.

Removed stencil and blotted image with paper towel
then soaked stencil in warm soapy water.

Today all I did was add the die cut SSS "Small Hello"..stacking with 3 layers
so the Hello would pop up more.  Attached with Connect Glue.
Then attached to Neenah 110# Solar White cardbase and Done.

Thank you for your visit.
The linky party ends in five days:-)

The August Group of Seven Cardmakers goes live on July 28th at 10:00 AM.
Hope to see you then...You will LOVE the new technique!

Thank you for visiting..Love and Hugs...stay cool!!


*********************

Supplies:
Stamps: None
Paper: Strathmore Cold Press,  Neenah Solar White 110# cardstock.  
Inks: Brushos Paints...colors?
Accessories: TCW Sunflower Stencil.  SSS "Small Hello" from my stash.  I added two more layers of white die cut Hello's to pop up.  Connect Glue using Fine tip bottle.

******************
Adding to the Tic Tac Toe Challenge #218...Using the bottom across: Any Shape Die, Single Layer 
and Stencil....
                                                                

Monday, October 8, 2018

CAS Watercolor October Orange, Green and Brown

Gorgeous Color Combo for the October CAS Watercolor Challenge 2nd Birthday!
Hosted by Bonnie.

Happy 2nd Birthday!

The Theme!


Time to Celebrate!

I never tire of using this beautiful "Joyful Sunflower" stencil by TCW!
I received this awesome stencil from Bonnie several years ago and I think it is
perfect for the CAS Watercolour 2nd Birthday color challenge.

I secured my stencil with masking tape over a piece of Strathmore 
 Mixed Media paper.  I find Mixed Media paper works best for blending Zigs.

I used Zigs and aqua painter to watercolor my Sunflower thru the stencil.
It is important to secure your stencil so you do not get
ink flowing under the stencil.
Do not use too much water either from the aqua painter when blending colors.

I used Zig markers: Yellow, Bright Yellow, Orange, Scarlet Red, 
Pale Green, Light Green, Light Brown and Dark Oatmeal.

I removed stencil, let dry then die cut image with
CUTplorations Crazy Double Running Stitch Rectangle Nesting Die.
Placed image in MISTI,  stamped the sentiment and done!

I hope you are enjoying an Indian Summer with a few more sunny days!

Happy 2nd Birthday again, Bonnie, Loll and all the DT girls and
followers of this fabulously Inspiring Challenge:-)

Adding to STAMPlorations Never Ending Anything Goes Challenge.


Supplies:
Stamps: STAMPlorations: Bloom Happy sentiment.
Paper: Strathmore Mixed Media.  SU Whisper White Thick CS for card base.
Inks: Archival Jet Black.  Zigs markers: Yellow, Bright Yellow, Orange, Scarlet Red, Pale Green, Light Green, Light Brown and Dark Oatmeal.
Accessories: CUTplorations: Crazy Double Running Stitch Rectangle Nesting Die.  MISTI, SU Aqua Brush, TCW "Joyful Sunflower" Stencil.

Wednesday, August 22, 2018

CAS Watercolour Bisters Sunflower

Playing again in the CAS Watercolour August Sunflower Challenge!
Who can resist beautiful Sunflowers? Not I!
You have until the 24th to play along. Marcia is hosting this month.


Bisters Sunflower Stencil Monoprint!

I just can't seem to get enough of this TCS "Joyful Sunflower" Stencil and
the Stencil Monoprint Technique. If you do a search on my blog of
this technique you will find several cards made with this stencil and cards
using this technique:-)

I have used Alcohol inks, Brushos and now Bisters on this stencil and loved them all.

I taped my stencil down over Strathmore Mixed Media and
 sprinkled with Bisters: Yellow, Mahagony, Natural, Green and Red pigment powders.

Next spritzed with water and removed stencil carefully.
Set aside positive monoprint for later use.

Turned stencil over onto another piece of MM paper and pressed gently a paper towel
over stencil to move the ink around.  Removed stencil and voila'...
a beautiful negative sunflower image.

I rolled a roll of paper towels over image to soak up the puddles and then let air dry.

Added stamped sentiment and attached to SU Whisper White card base using foam tape.

Another beautiful sunflower card done! 
Thank you Marcia for such a fun Sunflower Challenge:-)  Hugs...

Adding to CAS Mix Up August Stencil Monoprint + Stamping + Bisters Watercoloring


Supplies:
Stamps: Penny Black Happy Snippets sentiment
Paper: SU Whisper White Thick CS.  Strathmore Mixed Medial
Inks: Bisters: Yellow, Mahagony, Natural, Green and Red pigment powders. Archival Jet Black
Accessories: TCW "Joyful Sunflower" Stencil. masking tape. T.H. Spritzer. Paper towels. 
Foam Tape.

Friday, August 3, 2018

CAS Watercolour Sunflower Challenge

Congratulations Jenny (My Paper Epiphany)
for being chosen the new DT member at CAS Watercolour Challenge.
I am so pleased you will be taking my place.
You will have an awesome creative and fun time with all the girls:-)


My Brushos Watercolored Stenciled Monoprint Sunflower Card!


I found this Negative  Monoprint using Brushos in my stash.

I die cut with CUTplorations Die and then added a sentiment that I had inked
with Early Espresso and versamark
then heat embossed with clear EB powder.

Then attached main image with fun foam to SU Early Espresso card stock
 that I had die cut with the same CUTplorations Die Set,
  which brought out the brown tones in the image.

I really like the Brown "White Space" on my card.
I think it makes a wonderful Fall guy card.

Do checkout the CAS Watercolour Sunflower beauties by the DT, GD, Izzy (Izzy Scrap)
and the growing Gallery.  Inspiring videos too.

I am adding my card to the CAS Mix Up August Challenge:
Stencil Monoprint + Stamping +Your choice.
My choice was die cutting and heat embossing.


I am hosting The CAS Mix Up Challenge this month.
Would love to have you take a look.
You have until the 24th to play in both challenges.

Enjoy the rest of your Summer my friends,  Hugs..

Supplies: 
Stamps: STAMPlorations Trendy Feathers 2
Paper: Arches Hot Press. SU Early Expresso CS
Inks: Brushos: Orange, Leaf Green and Dark Brown.   SU Early Espresso and Clear Versamark.
Accessories: TCW Joyful Sunflower Stencil.  Spritzer with water.  Clear EB powder.  CUTplorations Double Running Stitch Rectangle Nesting Dies.


Saturday, August 13, 2016

Sunflower Stencil using Embossing Paste & Zigs


A very different and more traditionally colored TCW "Joyful Sunflower" Stencil Image :-)  Hope you do not mind all my cards using this awesome stencil?  It just keeps popping onto my desk :-)

My girlfriends Bonnie, Stamping with Klass and Loll, Stamping with Loll got me hooked on this beautiful and versatile stencil, especially after Bonnie gifted me my stencil.  I have since bought several for gifts :-)  Bonnie and Loll have many gorgeous samples on their blogs using this stencil.  I got the idea from Loll to use Embossing paste on my stencil and then watercolor while the paste is still wet.  I used my Zig watercolor markers to color my sunflower. Then I removed my stencil.  I am sharing a close up so you can really see the texture.

A couple of tips..use your palette knife to add your EB paste and to scrap off excess paste from stencil.  As soon as you finish watercoloring your image remove your stencil and soak in warm soapy water to remove remaining paste.

I will add a sentiment on the inside in the future when I send my card.  Here is my close up...


Card Recipe
Stamps: None
Paper: SU Whisper White Thick, Strathmore 100# Smooth Surface
Accessories: TCW "Joyful Sunflower" Stencil, Golden's Molding Paste, palette knife, Zig Markers, Craft mat
Techniques: Stenciling with Embossing Paste, Watercoloring

Enjoy and Thank you for Looking and especially Commenting.  Hugs...


Friday, August 12, 2016

Another Stenciling with Alcohol Ink Card


I played around a few days ago with Tim Holtz Alcohol Inks and TCW "Joyful Sunflower" Stencil. This is the 2nd card I made using my samples.  Here is my 1st Stenciling with Alcohol Ink card that I posted on August 9th.  I included very detailed step by step instructions on this post so I will not repeat the details on this new card.

I did exactly the same on this sunflower image just angled my sunflower so I could use an angled cut on a finished card.  These colors reminded me of Thanksgiving.  I used an old favorite SU Thanksgiving wood stamp from "Holidays and Wishes" (ret).  I loved how it turned out.

Enjoy and Thank you for Looking and especially commenting.  Hugs...


Tuesday, August 9, 2016

Stenciling with Alcohol Ink


I was so happy to receive The Crafters Workshop (TCW) "Joyful Sunflower" from my girlfriend Bonnie and knew immediately I wanted to try it with Alcohol Inks.  I was blown away by the results and ended up making 3 pieces with Yupo paper!  All using the same technique,  but different results.

You will never end up with 2 Alcohol Blended Samples alike.  The trick..let the ink create its own "flow"!  A very simple technique actually.

Step 1: I put on disposable gloves then laid a piece of scratch copy paper down onto my craft mat. Remember Alcohol inks Stain!  Placed my 4 1/4" x 5 1/2" piece of Yupo paper on top of scratch paper and covered with my stencil. I then taped down stencil using 3M post-it-note masking tape.

Step 2: I chose my Adirondack Alcohol Inks: Lemonade, Sunset Orange, Pebble, Teakwood, Citrus and Pesto.  Also Jacquard Pinata "Rich Gold" Metallic alcohol ink.

Step 3: Started with the center of flower.  Adding light (Pebble) and then dark (Teakwood) browns.  Leaving some seeds uncolored.  Then added Metallic Rich Gold on a few of seeds.

Step 4:  I colored my leaves with Citrus and then Pesto greens.  Then petals with Lemonade and tips of petals with Sunset Orange.  I did go back and add a bit more color to petals and leaves until I got the look I wanted.

My technique for adding the inks: Place tip of bottle thru stencil onto area inking and add a little bit of ink moving onto next area letting ink do its own flow.  DON'T tip bottle up or squeeze bottle or you will have ink EVERY...where!  You can always add ink again if you want more while stencil is still taped down.  The ink does flow under the stencil,  but gives an interesting background.

Step 5: Remove Stencil carefully and wash in warm soapy water...your stencil will be permanently stained and look well loved!

Step 6:  Let piece dry..can use heat tool, but not too close.  I turn over and blot on scratch paper to make sure completely dry.  Then burnish with paper towel to increase shine.

Step 7: You MUST use Archival Ink if you want to stamp a sentiment...MISTI is a must if you want good coverage or you can add sentiment by stamping on a piece of cardstock and adding to piece.

Sorry about long description..it is a really quick process once you know the steps. You get a gold star if you read every step,  I would love if you shared with me your samples and/or cards :-)

Enjoy and Happy "Alcohol Ink Blending Stenciling" my friends.  Hugs,  Nancy

Card Recipe

Stamps: STAMPloratons Bold Sentiments.."ART Is"
Paper: Yupo paper, SU Whisper White Card Base
Inks: Adirondack Alcohol inks..listed in description.  Archival Jet Black
Accessories: TCW "Joyful Sunflower" Stencil, paper towels, 3M post-it-note masking tape, disposable gloves,,,I did restamp INSTINCT on WW Cardstock in black ink to cover smudged stamped word.
Techniques: Alcohol Ink Blended Stenciling

Thank you for Looking and especially for Commenting.  Your comments are so appreciated.