Wednesday, April 24, 2019

STAMPlorations Helen G Designs New Stencils Blog Hop


You are going to love the projects that 6 of the STAMPgirls created
using the 6 brand new stencils that were designed by Helen G for STAMPplorations.

Be sure and check out the other girls awesome stencil projects.


*******


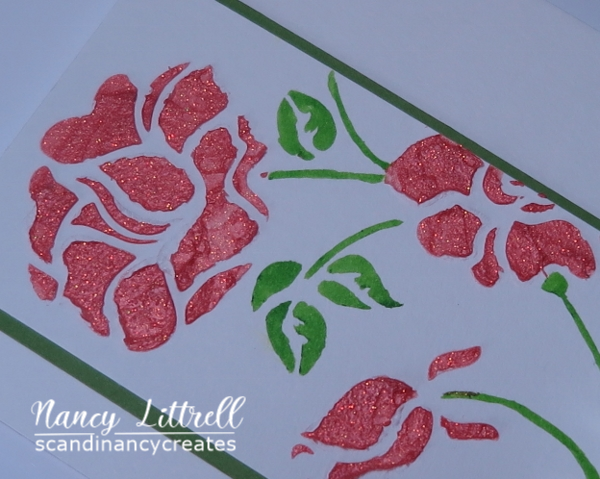
I secured the Make Marks #3 stencil on my SU Whisper White 100# CS and
sponged with Distress Oxide Inks: Broken China and Peacock Feathers.

I used a Smooshed Distress Oxide on SU Glossy CS technique for my main image.
Drying between each new DOX ink color.
I used DOX inks: Wild Honey, Fossilized Amber, Tattered Rose, Shaded Lilac,
Wilted Violet and Broken China.  I die cut the finished backgrounds into
two ATC's with CUTplorations ATC Tag Builder Dies.  One went into my stash.

When dry I Wiped off Distress Oxide chalky residue with baby wipe, 
which magically brightened the ATC card.  Let dry.

Next stamped the borders with STAMPlorations :Artsy Border Maker using MISTI.
Blotted with paper towel and heat dried to make sure Archival Jet Black ink dry.
Stamped STAMPlorations Life in Full Color sentiment on glossy paper and
popped up with white Craft Foam.

Popped up ATC with foam and attached to card base and Done!
Such a fun card to design.

*******


I used CUTplorations ATC Tag Builder again to die cut glossy cardstock.
Secured Helen G stencil over ATC and used sponge daubers to color the Make Marks #2
Helen G stencil with Distress Oxide inks: Candied Apple, Lucky Clover and
Blueprint Sketch.

I used the same smooshing technique as on my 1st and 3rd ATC cards.
Swiped ink onto Glass Mat and spritzed with water, then picked up ink
with sponge dauber.
When dry Wiped off Chalky residue with baby wipe and let dry.  
Then buffed with paper towel.

Placed ATC in MISTI and stamped Life in Full Color border stamp.
Then stamped and cut out sentiment from the same set.
Attached  sentiment with White foam to ATC .

Then used leftover inks to make splatters with paint brush.
Then popped up main ATC image with White craft foam and
attached to card base and Done!
Loved this card too:-)

*******


My 3rd card using the same ATC technique as the previous die cut ATC's.

  Stenciled using sponge dauber to add misted Broken China and 
Spiced Marmalade Distress Oxide Inks
thru the Make Marks #5 stencil.  When dry wiped with baby wipe.
Love how that brings out the color.

TIP: use clean area of baby wipe as you move around to wipe off the chalky residue.

Added glossy CS to MISTI and stamped with Archival Jet Black ink and trimmed.
Colored sentiment with Zig markers with colors to match background.

Popped up sentiment and ATC  onto glossy CUTplorations Crazy Double
Running Stitch Rectangle Nesting Dies layer.
Next attached to SU Whisper White 100# CS and Done!

Thank you Helen for designing your creative 2 in 1 background stencils:-)
I had so much fun playing and found your stencils so versatile.  Hugs....


You have until April 30th to join in the 


Use my STAMPGIRLNANCY Code for 20% more off your order at check out.
Total 45% off from the Spring Fling Section.


Prizes:
One (1) Winner of a $15 Gift Code to the STAMPlorations Store.
Two (2) Winners of their choice of 2 Helen G Designs Stencil.

Commenting Closes on May 8, with the Winners announced on May 10 in the April Winners Post.


Thursday, April 18, 2019

CAS Stencil Card Challenge Reminder

April is flying by...already time for CAS Stencil Card Challenge Reminder!
Be sure and check out the creative Embossing paste card samples by our DT and
very talented Guest Designer Bobby's (Bits & Pieces).

There are videos if you need ideas for techniques too.


Used Golden's thick gel with Pearl-Ex over Stencil.


Close up of the EB paste texture with glitter from Pearl Ex and Nuvo Glimmer paste.

I used the same technique and leftover paste products on my reminder card as I used 
in my CAS Stencil Card Challenge April launch card.

I did add True Blue Pearl-Ex to the leftover paste,  which gave a lilac color.
Placed ARTplorations Stencil Weaving over Strathmore Mixed Media  and used
palette knife to spread embossing paste over background.

Before paste dried I sprinkled a tiny bit of True Blue Pearl-Ex powder over stencil.
Removed stencil and washed in warm soapy water immediately.
Set aside stenciled background to dry.

Next die cut card front with largest SSS Postage Stamp Frame Die and die cut AliExpress
stitched partial circle window.  Attached stencil background behind window.

Found Alexandra Renke "Snowdrop" dies in my stash, stacked 2 layers and
attached with SU Fine Tip Glue Pen then stamped and heat embossed sentiment.

Popped up card front onto SU Whisper White 100# card base with White Craft Foam
and Done!  I loved the results.

You still have until the 24th to play along.
Thank you Barb for hosting this fun Stenciled Embossing paste Challenge.  Hugs..


Supplies:
Stamps: STAMPlorations Sentiment
Paper: SU Whisper White 100#,  Strathmore Mixed Media.
Inks: Versafine Onyx Black
Accessories: ARTplorations Weaving Stencil. Golden's Thick Gel EB paste, Pearl-Ex Rose Gold and True Blue, Nuvo Glimmer Paste, Palette knife, SSS Postage Stamp Frame Die, Ali-Express partial circle die, Alexandra Renke Snowdrop Dies, White Craft Foam.

Wednesday, April 10, 2019

CAS Watercolor Card Challenge: Poppy

I just had to play in the CAS Watercolor Card Challenge hosted by Loll.
All the sample cards by Loll, Bonnie and all the DT and GD were so Gorgeous!

Be sure and Check out all their beauties.  You will be inspired too!


Denny and I have been so busy with all our Spring weeding, mowing, etc.
I really enjoyed some quiet time relaxing while watercoloring the PB Poppies.
Enjoy and Happy Spring!


I stamped the single Penny Black poppies image onto Strathmore Mixed Media 
with Versafine Onyx Black ink using MISTI.

Then used my T.H. Glass Mat and swiped ink from my Distress Oxide ink pads 
directly onto mat and spritzed with water.

I used a #2 paint brush to watercolor the beautiful Penny Black Poppy image
from the Blooming Garden stamp set, which has 4 other Spring
blooming flowers in the set. I air dried between each layer of color.

I watercolored the colors going from the lightest to the darkest shades of 
Distress Inks: Scattered Straw, Spiced Marmalade, Ripe Persimmon,
Festive Berries and Barn Door on the blooms.  Then added Mowed Lawn on buds.

When poppies were dry I stamped the Penny Black Happy Snippets sentiment 
with Versafine black ink and heat embossed with SU Clear EB powder.

Next Die cut the frame with SSS Postage Stamp Edge Frames.
I am loving this new to me Frame set that has 3 rectangle dies
 and one smaller square frame.

I used the middle rectangle die for my main image.
Popped up with White Craft foam onto SU Whisper White 100# CS and Done!

Love the Crisp CAS look of the rich colored poppies...That is what Denny said :-)  

Thank you Loll for your fun challenge.  
You still have until the 24th to play along.  Hugs..


Supplies:
Stamps: Penny Black Blooming Garden and Happy Snippets (sentiment).
Paper: Strathmore Mixed Media and SU Whisper White 100#.
Inks: Versafine Black Onyx.  Distress Inks: Scattered Straw, Spiced Marmalade, Ripe Persimmon,
Festive Berries and Barndoor on the blooms.  Then added Mowed Lawn on buds.
Accessories: SSS Postage Stamp Edge Frames Dies.  MISTI.  SU Clear EB powder and heat tool.  #2 paint brush.  White Craft Foam (SSS).


Sunday, April 7, 2019

STAMPlorations Spring Fling Give Away Event - Day Seven

Day Seven of the Exciting STAMPlorations Spring Fling Give Away Event!
 I am thrilled to be playing along in this 12 Day Give Away Event with
All the STAMPgirls 
participating with projects using STAMPloration products.


Day 7 Prize


My Day 7 CAS Card.

I love gardening so I was instantly drawn to Deepti's new "Healing Herbs" and "Wooded"
stamp sets.  I was not disappointed. 
 I had fun playing with both sets for this one CAS card design.

Healing Herbs
 and 
Wooded

As you can see...I used stamps from both sets.
I stamped the herb box 1st using MISTI and Tea Dye Distress Ink
onto SU Crumb Cake CS.

Then stamped the box a 2nd time with same ink onto Crumb Cake CS and colored with 
Prismacolor pencils, blending with Gamsol using Stumps. Then fussy cut box.

Next arranged herbs and flower stamps in MISTI then inked
with Shabby Shutters Distress Ink and stamped each stamp one at a time
into stamped box and colored with Prismacolor pencils.

Then I attached fussy cut herb box over box I had stamped on card front.  
The herb box gave the garden a nice dimensional texture.

Added stamped and heat embossed sentiment using MISTI.

Framed card front with Die Cut border and done...I thought.
I traced around the blue flower petals with O3 black art pen and hand drew
purple flowers for the thyme plants. Now I liked it!

*****

I would like to invite all my friends to leave a comment on my post and the other
STAMPgirl designers' posts sharing inspiring projects on Day 7 of
the Spring Fling Give Away Event for a chance to win the prize on Day 7:-)

Day 7 Prize: - Choice of 1 in-stock 4x6 The Bee's Knees stamp set ($15 value)

You are going to be so inspired by the 12 day Give Away Event!

Hugs...

My STAMPGIRLNANCY coupon is available for 20% off orders when checking out.

Thursday, April 4, 2019

CAS Stencil Embossing Paste with Pearl Ex and Glitter Paste!

Time for the April CAS Stencil Embossing Paste/Gel/Glitter Paste Card Challenge
Hosted by our talented DT girl, Barb (Barb's Studio Creations).

There are so many gorgeous sample cards by out Design Team and 
very talented Guest Designer, Bobby (Bits & Pieces).

Also plenty of videos if you have never done this technique.
You have until the 24th to play along.  We would love to see your cards:-)


My Stenciled with colored EB paste card!

Close Up of the paste texture, shine and glitter:-)

I rarely add color to my EB paste,  so this was a really fun card to make inspired
by Barb's choice of technique.  Thank you Barb!

I cut a  2 1/2" x 6" piece of Strathmore Mixed Media, which cut off part of the roses
stenciled image.  But I wanted to keep my card CAS.

I secured my ARTplorations Roses Stencil over Strathmore Mixed Media
with masking tape.
Then mixed Golden's thick Gel with Rose Gold Pearl-Ex using a palette knife.
Then mixed in Nuvo Glimmer paste with knife, which added a pretty glitter.

Next spread colored paste over stencil with palette knife.
I loved the uneven texture, shine of the golden rose Pearl-Ex and
glitter from glimmer paste.

I left the stencil on and colored the leaves and stem with my light Green Zigs marker.

Removed and washed the stencil in warm soapy water.  Don't forget this step!
Then stamped STAMPlorations "Healing Herbs" sentiment.

Added a layer of SU Garden Green CS for a narrow frame.
Attached  panel to Stathmore Mixed Media card base and Done!
I will be coloring embossing paste more often after this fun new to me technique.

TIP: I did have leftover colored paste that I had mixed in a very small glass bowl.
Sealed with Press N Seal wrap and was very pleased that it was still moist the next day.

We would love to have you join us at CAS Stencil Card Challenge.  Hugs..

Adding to STAMPlorations Anything Goes Challenge.


Supplies:
Stamps: STAMPlorations Healing Herbs (sentiment)
Paper: Strathmore Mixed Media,  SU Garden Green CS
Inks: Zigs Light Green marker.  Versafine black ink.
Accessories: ARTplorations Roses Stencil. Golden's Thick Matte Gel (embossing paste), Rose Gold Metallic Pearl-Ex, Nuvo Glimmer Paste, Palette Knife

STAMPlorations CAS Card Challenge: Optional Color Twist: Dark Navy

Time for our STAMPlorations CAS Card Challenge Anything Goes: 
Optional Color Twist: Dark Navy.


Be sure and check out the beautiful cards by our talented Design Team!


The beautiful ARTplorations Peony Number Two-Stencil 
is the star of my STAMPlorations CAS Card.

I secured the stencil with masking tape and then used TH Blending Tool
to sponge Distress Oxide inks: Faded Jeans and Blueprint Sketch
 in a circular motion onto Neenah CS.

Removed stencil carefully and when dry stamped Blossom Dreams sentiment 
with Versafine Black ink and heat embossed with clear EB powder.

Next added a yellow candy dot and a bit of Washi Tape to balance the image.
I added a swipe of Distress Oxide to the card base to give the look of a colored border.
 Attached the image to the card base and Done.

I liked the simple design and hope you like it too.
We would love to have you play along with us at STAMPloration.

We would love to have you play along with our April CAS Card Challenge.
You have until the last day in March to play along.  Hugs..


*****

Challenge Rules and Prizes:
  • Players can link up to 3 CAS cards.
  • Players can enter a CAS card with or without the optional color twist.
  • Non-STAMPlorations products are OK
  • To qualify for the prize, players must display challenge graphic and link back to the challenge post (blogs only)
  • Prizes: $15 GC for the winner (voted by the team); $5 GC to three (3) randomly picked players

If you use my discount code STAMPGIRLNANCY when you check out at the 
STAMPlorations Store you can get a 20% discount,  which you can use
with most other discounts too:-)