Saturday, January 15, 2022

CAS Mix Up January 2022 Reminder Challenge

Time for our CAS Mix Up January 2022 Loose Watercoloring Reminder Challenge hosted
by our very creative Jenny, CAS Mix Up Girl:-)

You still have until the 24th to play along.


Jenny's Message
I often hear people say they "can't do Watercolour", but when it comes to card-making I think it can be done in a loose and sketchy way, which looks modern and artsy, but doesn't require much skill. I've provided some links to videos and picture tutorials to inspire you to give it a go!


Here is my stamped and loose watercolored card.  Enjoy!

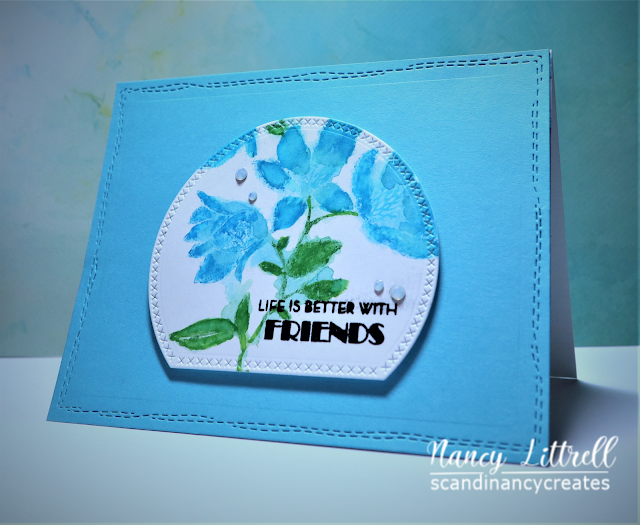
Again...I looked at the video and photo links that Jenny provided us on
Loose Watercoloring since this was a new to me technique.  Thank you,  Jenny.

I placed a piece of Strathmore Mixed Media paper in MISTI. 
Wet the Penny Black "40-680 At Grace" image with a #8 paint brush.

Closed MISTI and stamped MM paper.  Carefully blotted some of the water.
Opened MISTI then used reconstituted leftover Magicals ink from my launch card
to paint the flowers and leaves image.
 Then stamped the MM paper several more times
until I was happy with the results.

Next I die cut my favorite part of the flowers with an Ali Express (?) die 
that I received from a friend several years ago.
Then I stamped the Altenew "Leaf Canopy" sentiment with Archival Jet Black Ink.

Die Cut the SU Taken with Teal cardstock with CUTplorations Crazy Running Stitch
Rectangle Nesting Dies.  Unfortunately my camera saw my photo as a more blue 
instead of green tone.  I popped up the main image with craft foam and
added Spellbinders Crystal Mix Gems and Done!

We would love to have you join us on our 1st CAS Mix Up Challenge of 2022.
Love and Hugs..

If you would like to subscribe by email,
please fill out the subscription form in the upper right sidebar.
It is also important to add sw1subscribers@gmail.com to your contact list
so Google recognizes the address and delivers the updates.

Supplies:
Stamps: Penny Black 40-680 At Grace.  Altenew Leaf Canopy (sentiment)
Paper: SU Basic White 100# and Taken with Teal CS.  Strathmore MM.
Inks: Lindys Magicals.  I could not get a photo of the pretty shiny glitter in the paint.  Archival Jet Black.
Accessories: MISTI. Partial circle die (Ali Express?)  CUTplorations Crazy Running Stitch Rectangle Nesting Dies. Spellbinders Gems.  Craft foam.

Monday, January 10, 2022

CAS Christmas Card Challenge January Silver and Gold

The DT and Guest Designer have Gorgeous card designs.


Here is my card inspired by Hideko's CAS beauty using a textured DP
and Marcia's card using die cut Tim Holtz trees:-) 

My Close Up showing the true Silver and Gold colors.

 The shine distorted the colors. Gorgeous Silver and Gold colors IRL!

I used an old retired Stampin' Up Specialty Textured Glossy Paper with a silver leaf 
design and splatters of gold on the glossy white paper.
I die cut the paper with the dies from Sizzix Tim Holtz "Woodlands" (660978) Die set.

I die cut a 2nd time the larger tree on the left with SU Basic White 100# CS and 
attached to first layer with Connect Glue for a thicker image.

Set both trees aside.  Then cut a piece of SU cardstock from
a retired SU Christmas DSP to ground the trees.  It was glossy paper 
with gold and white stripes.

Then glued the trees to the card front with Connect Glue.
Note:  the glue smudges on the gold stripe does not show in the close up photo
 or in real life!

I used a scrap of gold foil cardstock that I had dry embossed 
with SU Subtle EB Folder for the CUTplorations "Christmas Sentiments 
Dies".   I die cut Joyful and cut off the ful and attached "Joy" with glue and Done!

I LOVED how my beautiful shiny CAS Silver and Gold card 
turned out...because of the inspiration by Hideko and Marcia:-)
Thank you girls and thank you,  Julie for hosting this wonderful challenge.!

Happy New Year and Thank you for inspiring us to start our 2022 Christmas Cards.
Love and Hugs,
Nancy

If you would like to subscribe by email,
please fill out the subscription form in the upper right sidebar.
It is also important to add sw1subscribers@gmail.com to your contact list
so Google recognizes the address and delivers the updates.


Supplies:
Stamps: None
Paper: SU Basic White 100#.  Retired SU Specialty Paper and Christmas DSP.  Tonic Gold Foil. 
Inks: None.
Accessories: Sizzix Tim Holtz Woodland Dies. SU Subtle Dry EB Folder. Connect Glue. 


Wednesday, January 5, 2022

STAMPlorations January 2022 Stencil Challenge ATG

All the STAMP Girls are ready to inspire you with our 2022 Challenges:-)
Wishing all our followers a wonderfully creative New Year!


The Rules

  • Players can link up a maximum of 3 projects -- any type of project is welcome as long as a stencil is used -- but each project must be in its own blog post.
  • Use of stencil (any brand) is a requirement.
  • Non-STAMPlorations products are OK 
  • No sneak peek project entries; full project photo must be displayed on blog post in order to qualify for the prizes.
  • To qualify for the prize, players must display challenge graphic and have a text link to the challenge post (blogs only)

Prizes:

  • $20 prize code to winner ($25 if STAMPlorations/ARTplorations stencil was used)
  • $10 prize code to 2 randomly picked entries ($15 if STAMPlorations/ARTplorations stencil was used)
******************

I created a card that I thought would be appropriate for a Winter birthday!

STAMPlorations Homespun Christmas

Close Up of sparkle and Shine!

I used a favorite ARTplorations Sanna Lippert Designs Snowflakes Stencil
for my background.  I used one of my new Ranger Detail Blending Tools 
(there are 5 in a pkg)
to apply versamark ink thru the stenciled snowflakes.  The Tool worked Great!

Next I removed stencil and heat embossed the snowflakes with 
Nuvo Shimmering Pearl EB Powder.
  Loved the beautiful shiny shimmery snowflakes.

Next stamped the STAMPlorations Homespun Christmas  log cabin image
 in Misti using Distress Oxide Antique Linen for a no line effect. 
 Then watercolored with Zigs.
Made my snow by adding Connect Glue to the snow areas and 
sprinkled with SU Dazzling Diamonds Glitter.
  Let Dry and fussy cut with papersnips.

Stamped sentiment from same set (LOVE all the sentiments in the set)!
Then fussy cut sentiment.  Die cut main image layer and card front with 

Assembled card layers and popped up main image with dimensionals and Done!

We would love to have you join us at STAMPlorations January 2022 Stencil Challenge.
You have until the end of the month to play along.

Happy Healthy Creative New Years,  dear friends.
Love and Hugs..


*********************

STAMPlorations Products.

STAMPlorations Homespun Christmas

***************************


Saturday, January 1, 2022

CAS Mix Up (WC) Loose Watercolouring Challenge

Our CAS Mix Up 2022 Challenges have begun!!
You will be inspired by our very talented Guest Designer Karen 
(Random Reflections) and our awesome
CAS Design Team Girls!


We would love to have you start your year and ours by joining in the fun:-)
You have until the 24th to play along.  

Jenny's Message
I often hear people say they "can't do Watercolour", but when it comes to card-making I think it can be done in a loose and sketchy way, which looks modern and artsy, but doesn't require much skill. I've provided some links to videos and picture tutorials to inspire you to give it a go!


Video Tutorials:

Here is my Loosely Watercolored card...Enjoy!

Here is the Close up showing the gold heat embossed shine.
But I was unable to capture the Lindy's Magicals shine.

I began my Loose Watercolouring adventure by watching ALL the videos and photo 
tutorials provided by our host Jenny.  I decided to stamp onto Strathmore
Mixed Media paper the STAMPlorations In Bloom: Darling Dog Roses image using 
Versamark and MISTI.  Then heat emboss with Ranger Princess Gold EB Powder.  
This powder has become my go to Gold EB Powder..it is true yellow gold!

Then the fun began using the wet on wet watercolor technique and a #8 and then a
#4 watercolor brushes.  I used the larger brush to wet the image with water then started
adding my reconstituted Lindy's Magicals powdered inks using the #4 brush. I spritzed a little water over a small amount of powdered Magicals onto the white section of my glass mat.  The powder is very pigmented so do not overdo the powder. I keep my powder in "small paint cup with lids" that I poked a hole into top and add a thumb tack into hole when not in use. You can find on Amazon.

Tip: Be sure and shake the containers to mix up the fine glitter each time you use them.

I used 7 different colors of Magicals.  I kept adding the Magicals watercolors and let them 
blend together using a wet #4 brush. Letting the colors dry between layers.  So much fun!

I let the image dry overnight and then I die cut the blooms with CUTplorations Basic A2
Panels Nesting Dies.  Next used same Dies to cut the Gold Foil CS and 
Strathmore MM 184# Black paper framing layers.

Stamped the Penny Black 30-574  Special Sentiments and fussy cut with papersnips
and attached to Strathmore MM 184# card base so all the whites would match:-)

I really had fun with the Loose Watercolouring technique and
I hope you will join in the fun.  I do LOVE trying New Techniques. 
  Love and Hugs...

If you would like to subscribe by email,
please fill out the subscription form in the upper right sidebar.
It is also important to add sw1subscribers@gmail.com to your contact list
so Google recognizes the address and delivers the updates.


Supplies:
Stamps: STAMPlorations In Bloom: Darling Dog Roses.  Penny Black Special Sentiments.
Paper: Strathmore Mixed Media White and Black paper.  SU Gold Foil.
Inks: Versamark.  Lindy's Magicals. 
Accessories: MISTI. Ranger Princess Gold EB Powder. CUTplorations A2 Basic Panels Nesting Dies.