Showing posts with label Magicals Watercoloring. Show all posts

Tuesday, November 28, 2023

Group of Seven Cardmaker's November Smooshing with Cling Wrap


Click on the link above for the GO7 November Blog Cling Wrap Technique
and the fabulous Cardmakers Cards and Technique descriptions and videos. 

Also we love when you share your cards on our blog Linky:-)

I used Brushos and Magicals Powders to create my Cling Wrap backgrounds.
Enjoy:-)

My Brushos Cling Wrap "Signature" Tree Christmas Card:-)

I lightly spritzed water onto an A2 size piece of Strathmore Mixed Media paper
 and sprinkled with Brushos Blue, Red and Green powders.
Then spritzed again lightly and tipped the MM paper to spread the ink.

Next placed a piece of Cling Wrap a little bit larger than the A2 paper and
tucking extra wrap under the sides.  Then used my fingers to scrunch up the wrap.
Be sure and check out the videos on our GO7 blog home page too.

Set the piece aside to dry overnight.
Removed wrap and let background completely air dry.
I got line marks, but no cells.

Then die cut with Pinkfresh Studio "Braided Oval" Die.
Used my new to me Simon Says Stamp "Place and Score Embellishmdient Wand"
to poke out the paper that were left in Many of the big and tiny die holes.
I have several similar tools,  but I am already liking this the best:-)

Then die cut the larger Braided Oval die for a white frame.
Added the SSS Clean Lines Christmas Dies star that I die cut from 
silver glitter paper from my stash.

Used Misti to stamp the  SSS Clean Line Christmas Stamps sentiments (out of stock)
 with Versafine Clair Nocturne pigment ink and heat emboss with SU Clear EB powder.
 
I arranged the star and sentiment to give a faux Christmas Tree look:-)
Attached layer to white frame with Connect Glue using Fine Tip Bottle.
Then popped up white frame with SU dimensionals to Neenah Bright White
card base and Done!  I was pleased with the result😊

************************

My Lindy's Magical's Powder Cling Wrap Christmas Card.
If only you could see the Magical Shine in the Background.
So much prettier IRL!

My 2nd card using the same Cling Wrap techniques as my 1st card,  but this time
 I used Lindy's Magicals Powders.  I used red, teal and green powders. They are more
 pastel Christmas colors,  which I never use,  but thought heck...why not!

My Magicals Smooshing Cling Wrap Technique background had even lighter markings
 than the Brushos background,  but I think it was because of using Magical's Powders.

I die cut the piece with Spellbinders Rectangle Hemstitch Die and again used
my SSS Place and Score Embellishment Wand to poke out all the holes on the border.

I used the SSS Clean Line Christmas Stamps for the stamped and 
heat embossed trees,  but stamped the trees with SSS white pigment ink
 and heat embossed with Wow white EB powder.

Next stamped and heat embossed the sentiments and attached with Connect Glue.
I added light blue and light green shiny rhinestones from my stash.
Popped up main image with SU dimensionals and Done!

**********************

My 2nd Magical's powder Peace, Love, Joy Cling Wrap Christmas Card.

I used  the same Red and Blue shades of Lindy's Magicals colors as the above card,  
but my camera saw darker shades..lol!

I used the same oval Spellbinder die as the card above to die cut the background.
Then used the same SSS Clean Line Christmas Stamps for the heat
embossed trees.

Added the light blue rhinestones and die cut glittery stars.
 then stamped the STAMPlorations "Homespun Christmas" sentiments
with black pigment ink and heat embossed with clear EB powder and
attached with Connect Glue.

Popped up main image using craft foam and Done!

************************

I am now looking forward to trying the Smooshing Cling Wrap Technique
with Alcohol Ink on Yupo paper:-)
I am determined to get some of the cool cells:-)

Be sure and check out all the GO7 Cardmakers really cool card samples.

Happy Holidays,  dear friends and Thank you for visiting:-)
Love and Hugs..💕
Supplies all listed in descriptions:-)

Again...if you play along we would LOVE to see your cards on our Blog Linky:-)


Saturday, January 15, 2022

CAS Mix Up January 2022 Reminder Challenge

Time for our CAS Mix Up January 2022 Loose Watercoloring Reminder Challenge hosted
by our very creative Jenny, CAS Mix Up Girl:-)

You still have until the 24th to play along.


Jenny's Message
I often hear people say they "can't do Watercolour", but when it comes to card-making I think it can be done in a loose and sketchy way, which looks modern and artsy, but doesn't require much skill. I've provided some links to videos and picture tutorials to inspire you to give it a go!


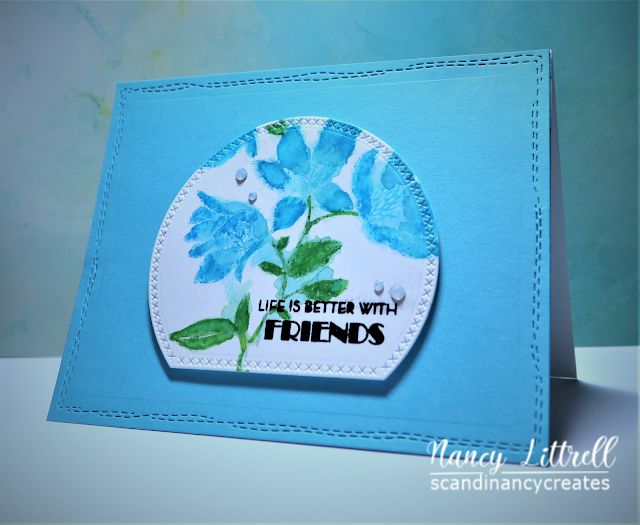
Here is my stamped and loose watercolored card.  Enjoy!

Again...I looked at the video and photo links that Jenny provided us on
Loose Watercoloring since this was a new to me technique.  Thank you,  Jenny.

I placed a piece of Strathmore Mixed Media paper in MISTI. 
Wet the Penny Black "40-680 At Grace" image with a #8 paint brush.

Closed MISTI and stamped MM paper.  Carefully blotted some of the water.
Opened MISTI then used reconstituted leftover Magicals ink from my launch card
to paint the flowers and leaves image.
 Then stamped the MM paper several more times
until I was happy with the results.

Next I die cut my favorite part of the flowers with an Ali Express (?) die 
that I received from a friend several years ago.
Then I stamped the Altenew "Leaf Canopy" sentiment with Archival Jet Black Ink.

Die Cut the SU Taken with Teal cardstock with CUTplorations Crazy Running Stitch
Rectangle Nesting Dies.  Unfortunately my camera saw my photo as a more blue 
instead of green tone.  I popped up the main image with craft foam and
added Spellbinders Crystal Mix Gems and Done!

We would love to have you join us on our 1st CAS Mix Up Challenge of 2022.
Love and Hugs..

If you would like to subscribe by email,
please fill out the subscription form in the upper right sidebar.
It is also important to add sw1subscribers@gmail.com to your contact list
so Google recognizes the address and delivers the updates.

Supplies:
Stamps: Penny Black 40-680 At Grace.  Altenew Leaf Canopy (sentiment)
Paper: SU Basic White 100# and Taken with Teal CS.  Strathmore MM.
Inks: Lindys Magicals.  I could not get a photo of the pretty shiny glitter in the paint.  Archival Jet Black.
Accessories: MISTI. Partial circle die (Ali Express?)  CUTplorations Crazy Running Stitch Rectangle Nesting Dies. Spellbinders Gems.  Craft foam.

Sunday, June 6, 2021

STAMPlorations Preview of 8th Birthday Bundle #1


Be sure and check out Shery's Preview Post on STAMPlorations using 8th Birthday Bundle #1.


Shery asked if any of the STAMPgirls could share projects using the new 8th Birthday Bundle #1.

I was happy to share  two cards that I made using 3 of the new Birthday Bundle #1 products on the 1st card and 2 new Bundle products on the 2nd card. 

Blossom Sprays #4  4x6 stamp
Radiate Happy 3x5 stamp set.
Design Blox Template #5 stencil

I masked the Design Blox Template #5 stencil over Mixed Media paper 
using 3M masking tape.
Then watercolored with Magicals powders,  which I reconstituted with a wet paint brush.
Added a bit of water with the brush to a stencil opening and then painted  with the wet brush dipped into the Magicals paint.  I did one opening at a time and made sure none of the colors were next to each other.  Removed the stencil carefully after letting the images dry. Loved the shine from the Magicals.

A few of the images paint seeped under the stencil so I just added a bit more paint to get cleaner lines.
Next time when watercoloring I will spray the back of the stencil with light tacky Pixie Spray.

Next placed background in MISTI and stamped the Blossom Sprays #4 and Radiate Happy
sentiment using Versafine Ink and Heat Embossed with Clear EB Powder.

Trimmed stenciled background and attached to A2 Basic Black Cardstock, which made the 
background Pop!
Attached to White 100# cardstock and Done!  Loved the results😊

******************

My 2nd card
Radiate Happy 3x5 stamp set
Art Border Die #1

I used a Brushos background from my stash for my die cut Art Border #1.
 
Then used CUTplorations Basic A2 Panels Nesting Dies to cut the middle panel and the frame.
If you look closely you can see the beveled edges,  which is a nice finishing touch.

Stamped the sentiment from the Radiate Happy stamp set.
Then attached all the pieces using Connect Glue to the Basic White A2 100# card base and Done!

BTW,  the Art Border #1 is exactly 5 1/2" long.  Perfect for an A2,  5 1/2' x 4 1/4" card base.
Of course the Art Border can be easily trimmed too.

I will also be adding 2 more cards for our Day 1,  8th Birthday Celebration!
Really, really fun products for creating projects😃

Shery will soon be sharing more Previews of her new Birthday Bundles with more samples of
projects by a few of the STAMPgirls.  Stay Tuned!

Love and Hugs..