Group of Seven Cardmakers Blog Creative Heat Embossed Backgrounds!
After seeing all the beautiful cards by the seven creative cardmakers using the
Heat Embossed Backgrounds Techniques I knew I had to play😊
I loved how my card turned out and hope you do too!
I used Strathmore Mixed Media paper for my background.
Scrunched up a piece of cling wrap and dabbed onto Versamark Ink pad and
then dabbed ink onto MM paper.
Then used "Ranger Distress EB Glaze" Broken China and Cracked Pistachio and
heat embossed. I used my new to me SSS Hot Hands Red tool to hold
my paper securely with out burning my fingers:-) (cool tool)
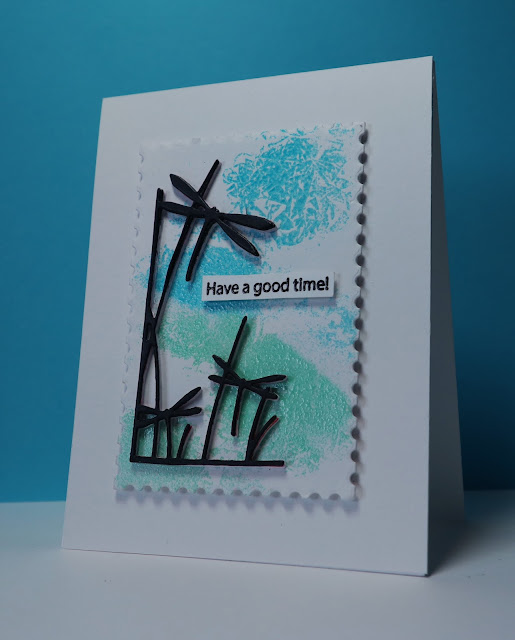
I then die cut the heat embossed background with
SSS "Postage Stamp Edge Frames Die".
I attached 5 layers of Memory Box "Dragonfly Stems Left Corner" die
using A Must Have Gina K Designs "Fine Tip Bottle" (3 in a set).
Why 5 layers? I tried 2 white then 1 die cut PP then 1 Alcohol Ink layer then
the 5th Strathmore MM Black dragonfly corner before I was satisfied...LOL!
Next I stamped and heat embossed the SSS "Messages for Everybody" sentiment.
Popped up the sentiment and main image with craft foam.
Attached to MM paper with glue and attached to SU Basic White CS
and Done!
I was very happy with the easy Heat Embossed Background Technique😊
I liked how the black dragonflies and sentiment popped too.
Thank you Lolly for creating the blog and for all seven of you
very creative experienced cardmaker friends!!
I am looking forward to your March background techniques too😊
Stamps: SSS Messages for Everyone.
Paper: Strathmore MM and Black MM. SU Basic White
Inks: Versamark
Accessories: Distress EB Glaze Broken China and Cracked Pistachio. SSS Postage Stamp Edge Frames. MB Dragonfly Stems Left Corner. Gina K Fine Tip Bottles (3 in pkg). SSS Hot Hands Red. Craft foam. Sizzix Fine Tip Curved Tweezers (Amazon)...another must have tool for attaching Dies, especially layering dies:-)


I BOW to you if you stacked that die 5 times! I'm lucky to get two of anything stacked correctly. Your background turned out beautifully, Nancy.
ReplyDeleteI LOVE the background on your beautiful card Nancy! The colours of the embossing powders are so pretty and the black die-cut adds so much fabulous contrast. Thanks for trying out the technique from Group of Seven!! xx
ReplyDeleteYour creative embossed background turned out beautifully, Nancy! Love those colors together and the stacked dragonflies look so classy with it! Trying different papers worked great to get that stacked look! I'm so glad you were inspired to try this technique, my friend.
ReplyDeleteBeautiful embossed background Nancy and love the black dragonfly corner die cut- it's so pretty ♥
ReplyDeleteThe Embossing Glaze worked beautifully for this! Lovely colours to go with the black dragonfly. Great dimension from all your indecision as to what colour to make the dragonfly!!
ReplyDeleteHee, hee...I thought so too, Susan:-) Loving the new to me heat EB background technique:-) TFS your beauty too..Hugs..Nancy
DeleteLovely CAS card Nancy, it's fabulous to have Group of Seven to inspire us
ReplyDeleteI love that you tried this and made this fantastic card. Great dimension and lovely combination of colors. I had to go look up the Hot Hands tool and it is a hoot and must have!
ReplyDeleteThose colors make a wonderful background for the dragonfly silhouette, Nancy. Great technique. Great card!
ReplyDeleteThis is wonderful, love your background embossing and the wonderful black dimension on your die cuts. It has come together perfectly. I haven't tried that technique yet, but I hope to soon xx
ReplyDeleteNancy, your background looks super and such pretty colors! I'm laughing with you about all the layers, tee hee! Can't go wrong with the contrast of black. This is one of my favorite most beautiful dies and I love seeing it on your card today. In fact, it's just plain good to see you on the blog today!
ReplyDeleteFive layers was a record, but I was determined to get it right:-) I get excited everytime I see you have a new post on your blog too:-) We have so much fun. Love and Hugs...
DeleteWhat a pretty heat-embossed background card, Nancy! The black dragonfly silhouette beautifully pops against the refreshing EB Graze colors in the background. Good for you to keep layering the die-cut silhouette until you are satisfied. Don't you love when you finally get a "This is it!" moment? :-)
ReplyDeleteYou placed the sentiment in the perfect spot too. Love this card, my friend! Hugs.. Hideko
TFS your thoughtful comment, my friend. "This is it?" moment!..are so much fun!
DeleteYou definitely concord this technique Nancy! I love your background, the colors are so beautiful. I am glad you went with the 5 layers in black, it just pops with the background colors and looks so elegant! I also love the postage shape mat too, such a beautiful card! Hugs, Brenda
ReplyDeleteTFS Brenda...actually only the last (5th layer) did I use black MM paper:-) Persistence finally paid off! Hugs...
DeleteThis looks beautiful Nancy. The colours of the embossing glaze in the background are so pretty, and I love the contrast of the black die cut xx
ReplyDeleteLovely card Nancy. Love your background and I have to agree with everyone about your patience of stacking 5 die cuts. It looks great though. Thanks for your sweet comment on my card too.
ReplyDeleteThis is brilliant, Nancy, especially to someone like me who loves dragonflies! The whole design is very striking and I love the background you created with your pouncing. Plus, great idea to use the glaze e/p! I bought those a few years ago and have used one of them once, so it's cool to see that they work fabulously for this technique! Thank you and thank you for adding your card to the gallery of Group of Seven! Love, Dolly
ReplyDeleteI was so inspired by all your beautiful background samples and finished cards too, Dolly. Thank you so much for adding Linky to the blog so we can see more beauties of this fun and easy technique. Love and Hugs dear friend. Happy Valentine's Day too:-)
Delete