Pages

Wednesday, March 24, 2021

STAMPlorations Christmas in the Air Featuring CITA Kit #1

for links and photos of Shery's New Christmas in the Air Kit #1.


I am featuring STAMPlorations projects I created using a few of the 
Monika and I will be featuring the Kit #1 and future CITA Kits 
the next 6 months.  We will alternate our months.
 We are happy to be back and creating with Shery's awesome new Kit😊


I was thrilled when I received the CITA Kit #1 from Shery😀 There are 7 different products in the kit to make your Christmas card designs fun and easy.
You can add your own embellishments, inks, etc to make your projects your own personalized designs.  I created all CAS designs😊


 Two cards using the kit products Christmas Backgrounds ATC's #1-Ephemera.
There are 18 gorgeous ATC's in the kit.

Added a red cardstock layer for frame, red stickles to berries, Wink of Stella to bows and light colored berries and added Merry Everything Clear Stickers sentiment.
Then attached ATC to a light green cardstock and Done!

********************
Sponged the edge with Distress Oxide ink.  Added Black Posca Pen acrylic tiny splatters to ATC and then metallic gold paint to center of flower.  Attached Merry Everything Clear Stickers sentiment.  Popped up ATC on craft foam and attached to white 100# cardstock and Done!  I LOVE all 18 ATC Christmas designs.

*****************

  Holiday Trees stencil.  I stamped the
Joy sentiment from the Christmas Joy stamp set.  
There are 2 stencil images on the Holiday Trees stencil and I chose the trees to stencil.  Secured stencil to Very Vanilla 100# cardstock with masking tape. Then used make up brushes to blend Distress Oxide inks.  Added metallic gold paint to stars and removed stencil.  Stamped sentiment from the Christmas Joy set and
die cut frame using Crazy Double Running Stitch Rectangle Die and Done!

**********************

Christmas tag using the Christmas Joy stamp set and Christmas Joy Laser  Cut Shapes from Kit.
I die cut the tag using the 2nd largest Stitched Tags Nesting Dies.  Smooshed with DOX inks.  I Colored with Zigs one Ephemera Christmas Joy Shapes that are laser cut on 120# CS by Shery.  Popped up with craft foam and added to tag.  Stamped sentiment.  Love all the sentiments in the Christmas Joy set.  Went along stitched border with black 03 Art pen and colored red border with Zigs.  Added ribbon and Done!

I had so much fun playing with just a few of the products from the New Christmas in the Air Kit #1.  I am looking forward to using more of STAMPlorations versatile Christmas in the Air Kit #1 for my next Christmas in the Air post in May😊

****************

 Christmas in the Air Kit #1, a specially curated kit consisting of 7 brand new Christmas-themed products -- a $46 value (if bought separately). As a bundle, it's 46% off + free shipping anywhere in the US ($7 shipping to Canada; $12 shipping to all other countries).


Saturday, March 20, 2021

CAS Christmas Card Challenge Kraft, Red & White

I am playing in the CAS Christmas Card Challenge using Kraft, Red and White colors and hosted by the very talented Loll.
Be sure and check out the beautiful creative cards by the DT and GD.

The team is celebrating the CAS Christmas Challenge's 3rd Birthday too😊

And there are prizes if you follow the rules😀

I do love Kraft, Red and White colors for Christmas.  Enjoy!
I cut a piece of Strathmore Mixed Media Tan paper 3 1/2" x 8 1/2" then  stamped the Colorado Craft Co. "Big and Bold Slimline Poinsettias" with Versafine Black ink using MISTI.  Heat embossed images with SU Clear EB powder.  

I did stamp the images off the edge and did not color for a more CAS design.  Stamped the greetings from the same set with Versa Magic Cloud White ink and heat embossed with Wow White EB powder.

Next sponged edge with DOX Candied Apple using i-Crafter i-Brush.  Layered main image over SU Whisper White 100# cardstock and attached to "4 x 9" Slimline card base.  Added Nuvo Crystal Drops White Blizzard to the center of each flower for a pretty glittery shine and Done!

Sharing photo of the the shine from the heat embossing and Crystal Drops.

Thank you Lolly for hosting such a fun CAS Christmas Challenge and enjoy celebrating your challenge's 3rd birthday.  The cards by the DT and GD are so inspiring.  Love and Hugs..

Supplies:
Stamps: Colorado Craft Co (3C) Big and Bold Slimline  Poinsettias.
Paper: SU Real Red,  Whisper White Thick 100#.  Strathmore Mixed Media Tan.
Inks: Versafine black.  Versa Magic White.  DOX Candied Apple.
Accessories: MISTI. SU Clear EB powder. i-Crafter i-Blending Brush. Nuvo Crystal Drops White Blizzard.


Monday, March 15, 2021

CAS March Mix Up Reminder

We are having so much fun Celebrating CAS Mix Ups 5th Birthday😊 There are awesome CAS cards using a wonderful technique by our talented Bonnie (Stamping with Klass)


We would love to have you join us at CAS Mix Up Print Making with Die-cuts.
You still have until the 24th to play along❤


CAS Print Making, Die-cuts, Zigs watercoloring, stamping.

Having fun with this new to me Print Making with Die cuts technique😊
I used the same technique for my launch card, but made a very different design.

I die cut the SSS "Stacked Hearts" die using SU Whisper White CS.
Then watercolored with Zigs, several of the hearts without punching out any of the hearts.  Then sprayed the hearts generously with water and flipped over onto the cut card front placing a paper towel over die cut hearts and pressed down with my hand to transfer the ink to make the print.

Next placed a 2nd die cut hearts image over the hearts background and removed a few of the inlaid hearts so more of the print would show up.  I used Gina K Connect Glue to add a bit of glue to the inlaid hearts that I had removed and replaced like a puzzle.  I added more glue to the heart outlines so all the hearts were secure.
Worked Great!

Added a layer of SU Melon Mambo paper for a narrow frame.  The card is actually more hot pink than what my camera saw.
Added an Altenew "Leafy Canopy" sentiment stamped with Archival black ink
and Done!

I sent this card to a friend for Valentine's Day😊

We would love to have you join us at CAS Mix Up this month.  Love and Hugs..


Supplies:
Stamps: Altenew "Leaf Canopy" sentiment.
Paper: SU Whisper White and Melon Mambo.
Inks: Zigs.  Archival Jet Black
Accessories: SSS "Stacked Hearts".  Gina K Connect Glue. Glass mat.


STAMPlorations March Stencil Extra

Be sure and check out the creative projects by our talented Design Team.

We would love if you played along with us.  As always there are prizes!
You still have until the end of the month to play along.


STAMPlorations Dee's Healing Herbs
Shaker Blends Color Confetti

I used the same background Gesso Emboss Resist technique as on my STAMPlorations March launch card.  I again followed Eileen Godwin's
video technique.

I used Strathmore Mixed Media paper,  sprayed Monika's Rectangle Flexi-Template with Pixie Spray and secured to MM paper.  Placed Sanna "Fairy Tale Forest" Stencil over Template and Attached stencil with 3M masking paper.

Added a thin layer of Gesso  thru stencil with a sponge dauber and let dry. Then removed stencil.
Used make up brushes to add light shades of Distress Oxide Inks: Worn Lipstick, Squeeze Lemonade, Antique Linen and Broken China in a circular motion. Let dry.

Removed stencil and used a damp paper towel to remove ink from gesso covered stencil images and let dry.  Next removed masking tape and template.

Then used Staedler black pen and ruler to draw black line around image for frame.  Stamped Dee's "Healing Herbs" silhouette images and sentiment with Archival Jet Black ink.  Next I die cut the frame using CUTplorations Crazy Running Stitch Rectangle Nesting Die.

Popped up Main image with craft white foam and added to SU Whisper White card base.  One last step..Shaker Blends "Color Confetti" sequins and Done!

I decided after finishing my 2 cards using the new Gesso technique that I liked the 1st card the best using i-Brushes and a sweeping motion.  Although on the 2nd card the Distress Oxide inks came off the Gesso better than the Distress Inks.
 
A fun technique that I am sure I will use again in the future:-)
Enjoy and you still have until the end of the month to play along with our STAMPlorations Stencil Challenge.
Love and Hugs...

******************

STAMPlorations Products


STAMPlorations Dee's Healing Herbs


Shaker Blends Color Confetti


The Rules:
  • Players can link up a maximum of 3 projects -- any type of project is welcome as long as a stencil is used -- but each project must be in its own blog post.
  • Use of stencil (any brand) is a requirement.
  • Non-STAMPlorations products are OK 
  • No sneak peek project entries; full project photo must be displayed on blog post in order to qualify for the prizes.
  • To qualify for the prize, players must display challenge graphic and have a text link to the challenge post (blogs only)

Prizes: $20 prize code to winner / $7 prize code to 3 randomly picked entries

*******************

Use my STAMPGIRLNANCY 20% off Code


Friday, March 12, 2021

STAMPlorations Day 4 Extra Day Dee's Life is Sweeter

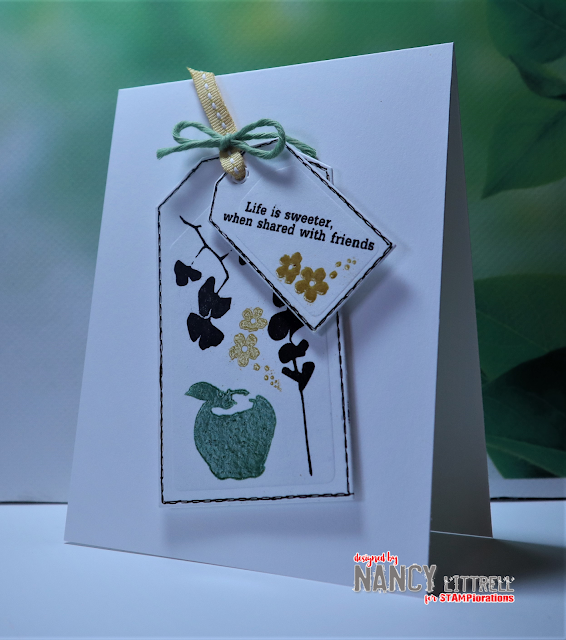
STAMPlorations Day 4 Extra Day Blog Hop.  I am  sharing a second card featuring Dee's Designs New Release "Life is Sweeter" stamp set😊
I am loving Dee's new set.


                                   Life is Sweeter,  when shared with friends.
L

I die cut Strathmore Mixed Media paper with CUTplorations Stitched Tags Nesting Dies.  Then the fun began...Using MISTI I stamped the apple with Versamark and heat embossed with Ranger Distress Embossing Glaze mixing Fossilized Amber and Cracked Pistachio embossing powder for a pretty apple green shade.

Stamped the leaves and sentiment with Archival Jet Black ink.  Then stamped the sweet tiny blossoms with Versamark and heat embossed with Fossilized Amber EB Glaze.  I used a .04mm art pen to trace the stitching on both tags.

Attached both tags together with ribbon and twine and added mini dimensionals behind the small tag and craft white foam behind the larger tag to make the tags pop. Attached to SU Whisper White 100# card base and Done!

 A very different style from my Day 2 card that shows the versatility of this new Life is Sweeter set by our very talented STAMPlorations Dee's Artsy Impressions Designer.  We would love to have you comment on all our STAMPGirls New Release projects.

**********************

Commenting is from March 8 to 17.
Winners will be randomly drawn from all comments left on the STAMP blog and the Designers' Blogs, with winners announced on March 19.

Prizes:
-$25 prize code to ONW (1) commenter randomly drawn from comments left on all the blogs.
-Stamp Set of choice from the new release to ONE (1) commenter randomly drawn from comments left on all the blogs.

**************************

If you plan to order you can use my 20% off code STAMPGIRLNANCY 
  on most orders!

Wednesday, March 10, 2021

Twofer Challenge #36 My Choice: Leaves

Time for Darnell's aka Dolly's March Twofer Challenge #36!

Dolly has chosen a new Your Choice Challenge this month.

The same rules this month,  but you get to choose your own prompt.
I chose Leaves!


 Be sure and go to the  March Twofer Card Challenge for all the details.

I am honored to be Dolly's Guest Designer for March,  because I was the Conventional Winner of her January Twofer #34 Challenge.
What a Thrill!!!!

*****************************

My Twofer Leaves Cards, Enjoy...

 My 1st card for my Twofer Leaves Challenge.
I used the same Altenew "Leaf Canopy Die" for both cards.

I die cut Strathmore Mixed Media paper using Penny Black "Leaf Stitched Frames" die.  Then masked the frame with 3M masking tape and blended Distress Oxide Cracked Pistachio ink using make up brush.

Used MISTI and stamped the Altenew "Leaf Canopy" leaves with Versafine black ink and heat embossed with SU Clear EB Powder.

Next die cut the leaves and covered with Clear Versamark then sprinkled with Ranger Distress Embossing Glazes Fossilized Amber and Cracked Pistachio and heat embossed with heat tool.

Used Connect glue to attach die cut leaves.  Stamped the sentiment from the same set using MISTI and Archival jet black ink.

Then masked the frame and sponged background with using make up brush Distress Oxide "Salty Ocean".  Removed masking and attached to SU Basic Black CS to make images pop.  Attached card front to SU Whisper White cardbase
and Done!  Loved the shine on the heat embossed leaves.

***************************

My 2nd Card using the same die cut leaves,  but different techniques.

I began by die cutting my leaves with Strathmore Mixed Media paper then sprayed liberally with water and sprinkled on Brushos crystals: yellow and green. Sprayed again with water and then blotted slightly with paper towel. 

Then turned leaves over and blotted onto Strathmore MM paper several times to make a printed paper background,  which gives a cool artsy impression.  You can see a few partial leaves looking images😊 Set leaves aside to dry.
Then stamped outline with Archival Jet Black.

Next I die cut the layer with Memory Box Stitched Rectangle and stamped the sentiment from the Altenew Leaf Canopy set.  I added a SU Basic Black CS layer then die cut it with the next larger MB Stitched Rectangle.
Added both layers to SU Whisper White 100# cardbase.
.
Then die cut the leaves with SU Basic Black cardstock and attached dried leaves and off set them to give a black shadow effect.  Attached leaves with dimensional and Done!  Loved how this more Clean and Simple card turned out.

Hope you can join Dolly at this month's Twofer Challenge too.
Love and Hugs..

I am adding my 2nd card to this months CAS (W) Mix Up Challenge: Print making with Die Cut.


Supplies:
Card #1
Stamps: Altenew "Leaf Canopy" sentiment.
Paper: Strathmore MM.  SU Whisper White 100# and Basic Black cardstock.
Inks: Versafine Black and Versamark Clear. Archival Jet Black. DOX Salty Ocean.
Accessories: Altenew "Leaf Canopy Die". Ranger Distress EB Glaze: Fossilized Amber and Cracked Pistachio. Gina K Connect Glue. 3M masking tape. Penny Black "Leaf Stitched Frames die". Make up Brush. Heat tool.

Card #2
Stamps: Altenew Leaf Canopy.
Paper: Strathmore MM.  SU Whisper White 100# and Basic Black cardstock.
Inks: Archival Jet Black. Brushos: yellow and green.  
Accessories: Altenew "Leaf Canopy Die".  Memory Box Stitched Rectangle Dies. T.H. Distress Sprayer.  SU  dimensionals, Connect Glue


Tuesday, March 9, 2021

STAMPlorations Dee's New Release Life is Sweeter Day 2

Time for STAMPlorations Day 2 New Release Mini Blog Hop Featuring Dee's "Life is Sweeter" new stamp set!


You're the friend everyone wishes they had...
Distress Oxide Inks blended onto Fluid 100 140# Hot Press W/C paper with make up brush.  Then die cut 4" x 4' background with CUTplorations Circles All Over Textures Cover Plate.

 Placed WC paper in MISTI.  Individually Water Colored fruit images from Dee's Life is Sweeter new stamp set with Zigs,  spritzed with water and then stamped on WC paper.  Moved the ink with aqua brush and set aside each piece of fruit to dry.  Then Fussy cut fruit.

Next Sponged edges with DOX and blended more of the ink on the bottom of the main image to ground the fruit.  Splattered water onto background for more texture.

Shaped fruit with stylus and attached to background with mini dimensionals.
Then stamped the leaves and sweet sentiment.

Attached main image to 5" x 5" SU Whisper White 100# card base and Done!
Thank you Dee...I Loved playing with your new stamp set😊


****************


Commenting is from March 8 to 17.
Winners will be randomly drawn from all comments left on the STAMP blog and the Designers' Blogs, with winners announced on March 19.

Prizes:
-$25 prize code to ONW (1) commenter randomly drawn from comments left on all the blogs.
-Stamp Set of choice from the new release to ONE (1) commenter randomly drawn from comments left on all the blogs.

**********************
If you plan to order you can use my 20% off code STAMPGIRLNANCY 
  on most orders!


Monday, March 1, 2021

CAS (W) Print Making with Die-cuts

Not only is it our March CAS (W) Print Making with Die-cuts hosted by the amazingly talented, Bonnie (Stamping with Klass), but we are celebrating 


Loll (Stamping with Loll) deserves many Thank You's for her 5 years of dedication keeping us Inspired with her monthly challenges using Clean and Simple Mixed Media products and following prompts.  Many thanks to Bonnie for being her partner in crafting for the 1st 4 years also.  One challenge ended up being 4 Challenges and now down to 2 Challenges a month.But the CAS Mix Up was the first!  That is a Huge number of very inspiring challenges and fabulous techniques.

Thank you also to all the amazing Design Team Girls over the years.  There has been and is so much talent on all the Design Teams.

Time now to play with a new Watercolor Technique hosted by Bonnie😊

My 1st time to try Print Making with Die-cuts.  I really enjoyed the technique.  Remember to keep your card CAS and use Watercoloring.

Print Making, Die Cuts, Watercoloring with Zigs, Stamping.

Wishing you 5+ more years of Awesome CAS Mix Up Challenges, Lolly:-)

I began with a scrap piece of Strathmore Mixed Media paper and die cut my new SSS "Daisy Square Die S669" with my Big Shot.
I used a toothpick (high tech) to poke out the white background and frame.

Placed the die cut daisy on my glass mat and watercolored with Zigs and paint brush.  Next watercolored the frame with black Zig and paint brush.
Let them dry and replaced die cut daisy and frame in white background, like a puzzle.  Secured on back with scotch tape. 
Set aside main image.

I cut an A2 size piece of SU Whisper White CS with Reverse Confetti "Lacy Scallop Frame" Die.

Next Die cut another Daisy Square out of Mixed Media paper and watercolored with Zigs and paint brush. 
Kept pieces together and secured with scotch tape on the back.  Then sprayed liberally with water.  Flipped over onto card front and laid paper towel over Daisy square and pressed down, which left a watercolored print. Stamped the print 3 more times without reinking,  which left the cool background print.

Attached card front to SU Whisper White CS then popped up Main Daisy Image with white craft foam and attached to card front.
I turned and turned the card before deciding on the horizontal card, which I thought was the best balance for the print background.

Very pleased with the results,  Bonnie.  TFS and hosting your fun technique😊
You still have until the 24th to play along.
There are prizes celebrating CAS Mix Up's  5th Birthday from Lolly.

Love and Hugs...


Sharing with NBUS Challenge too. 1st time to use my new SSS Daisy Square Die. 


Supplies:
Stamps: PB Happy Snippets sentiment
Paper: SU  Whisper White 100#.  Strathmore Mixed Media
Inks: Zigs watercolors.  Archival Jet Black Ink.
Accessories: SSS Daisy Square Die.  Reverse Confetti Lacy Scallop Frame Die. Glass Mat. toothpick.  white craft foam. scotch tape.


STAMPlorations March Stencil Challenge

Time for our March STAMPlorations Stencil Challenge: Anything Goes.

We would love to have you join us with your Stencil project!

ARTplorations Sanna designed  Flowers1 Stencil
ARTplorations Flourishes Stencil
Monika's Flexi-Template
STAMPlorations It's a Girl Thing: Kindness (sentiment)
I used a new to me technique for my background by following Eileen Godwin's Video for the stenciled with Gesso EB Resist Technique.

I sprayed the back of Monika's Rectangle Flexi-Template with Pixie Spray and centered it over a Strathmore Mixed Media A2 cardfront.  Then placed sprayed ARTplorations "Flourish" Stencil with Pixie Spray and placed over Template and attached 3M masking tape for the wide frame.

I put a dab of Gesso on glass mat and spread thinly with a paint brush.
I used a small makeup sponge to carefully pick up Gesso from mat and apply thru stencil.  Removed stencil and let Gesso dry.

Used i-Crafter i-Brushes with a sweeping motion and light touch to add Distress Inks: Scattered Straw, Barn Door,  and Broken China.  Then replaced stencil and using a damp paper towel carefully removed ink from the stenciled images. Removed stencil and let dry.

Next placed part of Sanna Flowers1 stencil over background and outlined the flowers with Staedler Black permanent ink.  Removed stencil and filled in flowers with the same pen.  Voila'...I got a Silhouette image😊
Stamped the sentiment using STAMPlorations "It's a Girl Thing:Kindness" and Archival Jet Black Ink and MISTI and Done!
I was very pleased with the results  and hope you like it too.

Be sure and check out our Design Team Projects too.
Love and Hugs..

STAMPlorations Products


ARTplorations Sanna designed  Flowers1 Stencil

ARTplorations Flourishes Stencil

Monika's Flexi-Template


STAMPlorations It's a Girl Thing: Kindness  
Unable to find photo in STAMPlorations Store

************************

The Rules:
  • Players can link up a maximum of 3 projects -- any type of project is welcome as long as a stencil is used -- but each project must be in its own blog post.
  • Use of stencil (any brand) is a requirement.
  • Non-STAMPlorations products are OK 
  • No sneak peek project entries; full project photo must be displayed on blog post in order to qualify for the prizes.
  • To qualify for the prize, players must display challenge graphic and have a text link to the challenge post (blogs only)

Prizes: $20 prize code to winner / $7 prize code to 3 randomly picked entries

*******************

Use my STAMPGIRLNANCY 20% off Code