Pages

Monday, June 28, 2021

STAMPlorations 2021 8th Birthday Celebration Day 1

Time to Celebrate STAMPlorations 8th Birthday!  Day 1.  Be sure and check out the STAMPlorations Blog with all the Details and Fabulous projects by the STAMPgirls!


My Day 1 Birthday cards are using the Birthday Bundle #1.

Here is the link to Two more Card samples I created for the Pre-Order Sale on June 6 
using Birthday Bundle #1 .


I am Loving the new products and am sharing Two more cards for the Day 1, 8th Birthday Celebration.

****************

 ARTplorations Design Blox #5 stencil.
STAMPlorations Dee's Blossom Sprays #4
STAMPlorations Radiate Happy
***********
Plus Shaker Blends flat sequins Color Confetti.

This was the very 1st card I created using the Birthday Bundle #1...I was hooked!!!

I used the Rectangle Flexi-Templates over mixed media paper and secured with 3M masking tape.  That gave me the perfect white border.  Then secured the  ARTplorations Design Blox #5 Stencil using the tape.  Next I used i-Crafters i-Brushes to blend the Distress Inks: Squeezed Lemonade, Ripe Persimmon, Festive Berries and Barn Door.  I removed the stencil and template and went..."Wow"!

Placed card front in MISTI and stamped Dee's Blossom Sprays #4 and STAMPlorations Radiate Happy sentiment using Archival Jet Black Ink.  Then removed card front from MISTI. 

Attached Shaker Blends flat sequins Color Confetti using Connect Glue.  Then attached card front to SU Basic White 100# card base and Done!  I LOVED the results.  

************************

My 2nd card for Day 1

STAMPlorations Dee's Blossom Sprays #4
CUTplorations Art Border Die #1
***********
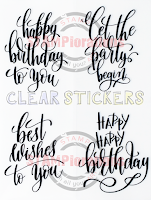
Plus Clear Stickers Shine Bright.

I kept my 2nd card more CAS.  I placed the Strathmore mixed media A2 card front in MISTI and stamped the STAMPlorations Dee's Blossom Sprays #4 with Versafine black ink and heat embossed with SU clear embossing powder.  

Removed card front and watercolored with Zigs using wet #4 paint brush to move the ink.  So relaxing and fun.  Such a beautiful bouquet.

Added Posca Acrylic black ink pen splatters and let dry.  Then added the Shine Bright Clear Sticker sentiment to mixed media paper and trimmed and attached to card front.

Next die cut  CUTplorations Art Border Die #1 using mixed media paper.  The die,  cuts beautifully even thru the heavier mixed media paper!  I used my Spellbinders Tool 'n One brush end to remove all the tiny pieces from the die...worked quick and easy!   Then used a toothpick to remove the few leftover pieces.  

 Next cut another piece of MM paper for under the die cut border to pop it up and also cover up the image stems.  I tried it with and without and liked it better without the stems showing.

Attached to SU 100# cardstock base and Done!
This was my 4th card using this Awesome Birthday Bundle #1!!!

I can now see Birthday Bundles #2 and Birthday Bundles #3 in my future💖

Be sure and join 1 or all of the 3 ways of fun to earn prizes.

Love and Hugs..


Wednesday, June 16, 2021

STAMPlorations Floral Silhouettes ATC's

I am sharing 3 favorite cards using the New STAMPlorations Floral Silhouettes ATC's.
I actually ended up making 6 cards for my stash!

Shery has been on a creative roll with all her New Paper Goods.
Be sure and check out her STAMPlorations Blog,  which has all the Info on the

Floral Silhouettes ATC's 6 designs/3 of each!  Yes, total of 18!

Here are my 3 cards...using STAMPlorations Ephemera Floral Silhouettes ATC's with different colored SU cardstock backgrounds, which I die cut with Circles All Over Cover Plate,  then outlined the ATC's with 05 Art Pen, added black ink splatters,  then popped up ATC's with craft foam and attached to black cardstock that I tilted.  My last step was adding the STAMPlorations Clear Sticker sentiments, 
Enjoy...
********************

Card One...Happy Happy Birthday!

Card Two...Good Things Take Time!

Card Three...Best Wishes To You!

Fun cards to create using more of Shery's awesome Ephemera ATC's and add to my stash!  

Love and Hugs..

Besides the ATC's above,  I am adding my other STAMPloration Products.


********************************


Tuesday, June 15, 2021

CAS (W) Mix Up June Reminder Flight

Our CAS (W) Mix Up Reminder Flight Cards for more Inspiration Hosted by Viv.
Be sure to check out the beautiful and clever CAS cards by our DT!
You still have until the 24th to play along.  We Love it when you join us😀


My card using Watercoloring, Stamping, Heat Embossing and Die Cut.

I love this beautiful Penny Black Nature Allure stamp set, which is a Christmas set, but I paired it with  STAMPlorations Trendy Butterflies 2 stamp set sentiment for CAS (W) Mix Up Flight Challenge.

The bird on the pine branch looks like a baby bird to me getting brave enough to fly😀

I stamped the bird image with Versafine Black ink onto Strathmore Mixed Media paper, then heat embossed with SU Clear EB Powder.  Then the fun watercoloring with Zigs.  Next die cut the frame with Spellbinder Rectangle Hemstitch Die then stamped and added the stamped sentiment.

Then attached card front to SU Garden Green cardstock,  added Wink of Stella to the entire image and Done!  I was pleased with the results.  Hope you like it too.

We would love to have you join us if you have not already.  Love and Hugs..


Supplies: 
Stamps: Penny Black Nature's Allure, STAMPlorations Trendy Butterflies 2.
Paper: Strathmore Mixed Media.  SU Garden Green.
Inks: Versafine Black ink.  Zigs.  Archival Jet Black.
Accessories: Spellbinders Hemstitch Die. MISTI. Heat Tool. Wink of Stella.


STAMPlorations June Stencil Reminder

Time for our June Stencil Extra Challenge projects at STAMPlorations!


This is our Last Stencil Challenge...Until September when we will be back after our Summer break!
We would love to have you join the fun.  Anything Goes as long as you use one or more stencils!

Here is my card using
ARTplorations by Helen G Rubber Bands Stencil.
Craft Supplies Clear Stickers Happy Happy.
STAMPlorations Leafy by Dee's Artsy Impressions.

I began by sponging the SU Basic White 100# cardstock with Distress Oxide Inks using i-Crafter i-Brushes.  I used Crack Pistachio, Peacock Feathers, Salty Ocean and Squeezed Lemonade.

Then attached with 3M masking tape the ARTplorations Helen G's Rubber Bands Stencil to the sponged cardstock.  Then blended DOX Cracked Pistachio and Peacock Feathers thru the stencil.

Removed Stencil.  Placed sponged card front in Misti and stamped the leaves from the Leafy  stamp set
with Versafine black ink and heat embossed with SU Clear Embossing Powder.

Trimmed card front and added the Happy Happy Clear Sticker sentiment over 100# white cardstock and trimmed and attached to Black Basic cardstock for a frame.  Added a black narrow border for fun and attached card front to SU 100# card base and Done!

Enjoy and hope you join us for our last Stencil Challenge until September.
Wishing you a safe and wonderful Summer.

Love and Hugs..

STAMPloration Products


Clear Stickers Happy Happy

 Leafy by Dee's Artsy Impressions

*********************

Save 20% off code STAMPGIRLNANCY when you order😊


Monday, June 14, 2021

STAMPlorations A2 Hey Hello projects

I have been having so much fun altering Shery's fun and colorful A2 Quick Card Fronts.
There are 4 color combos on the 16 A2 card fronts.  I used 2 of the color combos for my cards.
The card fronts are printed on 120#...Really thick and versatile!


My 1st card using a beautiful color combo from the New Paper Goods, 
Quick Card Fronts Heh Hello A2 Card Fronts!
First I outlined some of the sentiments with 05 art pen.
I loved how the green was very close to the Distress ink,  Speckled Egg,  which gave me the idea to die cut one of the CUTplorations For the Birds Dies out of SU Lost Lagoon cardstock.  I stacked the birds using Connect Glue and weighted down with a large acrylic block until dry. 

Next inked the stacked birds with Versa Magic and heat embossed with Speckled Egg Distress Embossing Glaze,  which made the birds a darker green.  I heat embossed the birds twice.  Then attached birds with Connect Glue and weight down with acrylic block.

Next attached the birds to the SU Very Vanilla 100# card base and Done!  Loved the results and the color combo for this A2 Heh Hello Card Front!  

Here is a close up of the heat embossed birds.

*****************

My 2nd card using the entire Hello You A2 card front.  The bottom portion of this card front design is the same Hey Awesome as my 3rd card.
First I outlined the Hello You with 05 art pen.  Next used CUTplorations  Perched Bird Die to die cut the bird from the card front.  Then die cut 2 more birds from black cardstock and used Connect Glue to stack the 3 birds and inlaid the birds using scotch tape on the back to secure.

Next traced around the bird with black art pen.  This is called a Camouflage Technique,  which is a cool effect. Then added a black cardstock layer for a contrasting frame.  Attached A2 card front to SU Very Vanilla 100# card base and Done!  I loved the results and so Quick.

**************

My 3rd "Heh Hello" Quick A2 Card Front cut in half.
I cut the A2 card in half and then outlined the Hey Awesome with an 05 Art pen. Stamped the tiny flowers from STAMPlorations Life is Sweeter designed by Dee.  Die cut the SU Real Red cardstock with Crazy Double Running Stitch Rectangle Nesting Dies and attached the image.  Then used the same die to cut an A2 SU Very Vanilla 100# CS  and popped up red layer with craft foam.

Attached layers to SU Very Vanilla 100# card base and Done!
Fun Quick A2 Card and I still have the other half for a future card:-)

Enjoy and Happy Crafting,  dear friends.  Love and Hugs..


STAMPlorations Products.

  
                                                             For the Birds Die  
                                             
                                                       
                                                               Perched Bird Die   


Life is Sweeter I stamped the sweet little flowers from the set onto the HEY.

**********************


Sunday, June 6, 2021

STAMPlorations Preview of 8th Birthday Bundle #1


Be sure and check out Shery's Preview Post on STAMPlorations using 8th Birthday Bundle #1.


Shery asked if any of the STAMPgirls could share projects using the new 8th Birthday Bundle #1.

I was happy to share  two cards that I made using 3 of the new Birthday Bundle #1 products on the 1st card and 2 new Bundle products on the 2nd card. 

Blossom Sprays #4  4x6 stamp
Radiate Happy 3x5 stamp set.
Design Blox Template #5 stencil

I masked the Design Blox Template #5 stencil over Mixed Media paper 
using 3M masking tape.
Then watercolored with Magicals powders,  which I reconstituted with a wet paint brush.
Added a bit of water with the brush to a stencil opening and then painted  with the wet brush dipped into the Magicals paint.  I did one opening at a time and made sure none of the colors were next to each other.  Removed the stencil carefully after letting the images dry. Loved the shine from the Magicals.

A few of the images paint seeped under the stencil so I just added a bit more paint to get cleaner lines.
Next time when watercoloring I will spray the back of the stencil with light tacky Pixie Spray.

Next placed background in MISTI and stamped the Blossom Sprays #4 and Radiate Happy
sentiment using Versafine Ink and Heat Embossed with Clear EB Powder.

Trimmed stenciled background and attached to A2 Basic Black Cardstock, which made the 
background Pop!
Attached to White 100# cardstock and Done!  Loved the results😊

******************

My 2nd card
Radiate Happy 3x5 stamp set
Art Border Die #1

I used a Brushos background from my stash for my die cut Art Border #1.
 
Then used CUTplorations Basic A2 Panels Nesting Dies to cut the middle panel and the frame.
If you look closely you can see the beveled edges,  which is a nice finishing touch.

Stamped the sentiment from the Radiate Happy stamp set.
Then attached all the pieces using Connect Glue to the Basic White A2 100# card base and Done!

BTW,  the Art Border #1 is exactly 5 1/2" long.  Perfect for an A2,  5 1/2' x 4 1/4" card base.
Of course the Art Border can be easily trimmed too.

I will also be adding 2 more cards for our Day 1,  8th Birthday Celebration!
Really, really fun products for creating projects😃

Shery will soon be sharing more Previews of her new Birthday Bundles with more samples of
projects by a few of the STAMPgirls.  Stay Tuned!

Love and Hugs..


Saturday, June 5, 2021

CAS Christmas Card Challenge: Snowman

I am joining in the fun at CAS Christmas Card Challenge: Snowman,  hosted by the clever and creative CAS designer,  Hideko.  You will be inspired by the wonderful Guest Designer, Steph (My Paper Corner) and the Design Team.  Be sure and check out their fun snowmen!


I used  STAMPlorations Shirley Bee's "Layered Snowman" stamp set. Such a fun and versatile set.

 I stamped the Layered Snowman body and then stamped his head using Archival Jet Black ink.  Next added the stamped face at an angle and buttons then fussy cut his stamped top hat that I had colored with Zigs.
Next Attached the snowman to Strathmore Mixed Media A2 size paper  and added his fussy cut top hat at an angle...because he does have a bit of an attitude...I think!
Then I stamped his arms...he is waiting impatiently for more snow to fall!!
Wouldn't you have an attitude...if you were a snowman or snowlady?!?

Next stamped the sentiment from the same set and heat embossed.
Then added some snow to ground him,  which made my snowman a bit happier.
Used Connect Glue and Dazzling Diamonds Glitter for the very sparkly snow.

Then die cut the border with Reverse Confetti "Lacey Scallop Frame" Confetti Cuts.
Layered over SU Real Red Cardstock and attached the card front to the SU Basic White 100# card base and Done!

Such a fun challenge, Hideko😀 You still have until the 24th to play along.


If you would like to subscribe by email,
please fill out the contact form in the upper right sidebar.
It is also important to add swl1subscribers@gmail.com to your contact list so
Google recognizes the address and delivers the updates.

I so appreciate all my friends,  who have email subscribed to my blog and your thoughtful and sweet comments.

Love and Hugs...


Supplies:
Stamps: STAMPlorations Shirley Bee's Layered Snowman.
Paper: SU Basic White 100# CS and Real Red CS.  Strathmore Mixed Media paper.
Inks: Zigs.  Archival Jet Black.  Versafine Black.
Accessories: Reverse Confetti Lacy Scallop Frames Confetti Cuts ( could not find link in store).  Zigs watercolor markers. SU papersnips and clear EB Powder. Connect Glue Gina K. 


Tuesday, June 1, 2021

CAS Mix Up (W) Flight

Time for our June CAS Mix Up Watercolor Flight Challenge hosted by the talented Viv
Our Guest Designer is the creative Joyce (Cards-by-the-Sea).
Be sure and check out our Design Team girls and Guest Designer CAS creative cards😊


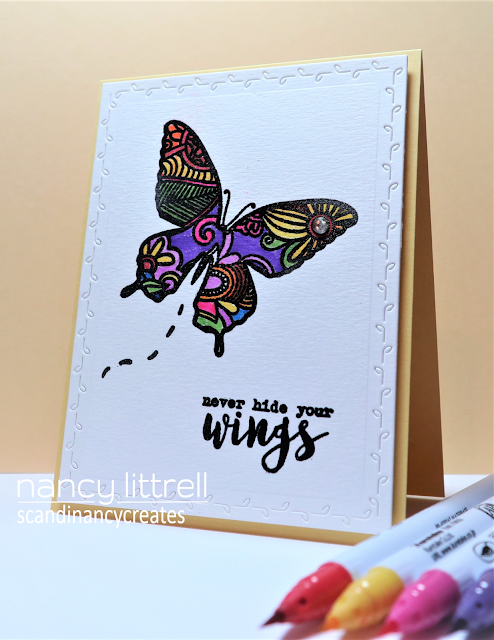
Watercolored with Zigs, Stamping, Heat Embossing and Die Cutting.

Summer will be official on June 21st.  It is time for many beautiful butterflies and rainbow colors😀
When I saw Viv's CAS Flight Challenge, I immediately thought of butterflies.

I stamped my STAMPlorations Trendy Butterflies 2 with Versafine black ink onto Canson Cold Press paper and heat embossed with SU Clear Embossing Powder.  Then the fun of watercoloring the butterfly with Zigs with at least 7 colors.

Then stamped the flight trail using the STAMPlorations Brave One stamp set. 
Then stamped the sentiment from the Trendy Butterflies set.

Die cut the frame using Penny Black Leaf Stitched Frames Die.
Popped up card front with white craft foam and attached to SU So Saffron CS and Rhinestone and Done!

Hope you get to join us at Viv's fun challenge.  You have until the 24th to play along!
Have a wonderful creative and safe Summer.  Love and Hugs..

If you would like to subscribe by email,
please fill out the contact form in the upper right sidebar.
It is also important to add swl1subscribers@gmail.com to your contact list so
Google recognizes the address and delivers the updates.

Supplies:
Stamps: STAMPlorations Trendy Butterflies 2 and Brave One.  
Paper: Canson Cold Press WC paper,  SU So Saffron Cardstock.
Inks: Zigs,  Versafine Black.
Accessories: Penny Black Leaf Stitched Frames die.  SU Clear EB Powder, Rhinestone.  Heat Tool. MISTI. White craft foam.