Pages

Monday, February 20, 2023

I am here for you!

I am joining a few challenges using a never before used 
Simon Says Stamp "Layered Chickadee Die".

I die cut my cute chickadee bird out of The Essential Craft Papers by
Craft Consortium "Ink Drops-Ocean" 6" x 6" paper pad.

After die cutting the bird pieces I used Connect Glue with Fine Tip Bottle to add
the 4 bird pieces and then die cut the bird with Basic Black CS to add more
dimension.  So fun and so cute:-)

I set the bird aside and then die cut the backgrounds using 
SSS Postage Stamp Edge Frames,
and Spellbinders Hemstitch Squares using same craft paper.
Then die cut Postage Stamp Edge Frames that I cut out of white 100#
 Basic White CS and added to back of frames.  

 I attached the bird and then created a 2nd square in different color tones from
the same craft paper.  I added the die cut bird and attached the squares to
SU Basic White CS.  Then added the stamped SSS "Messages for Everyday"
sentiment using Archival Jet Black ink and Done!

I am loving the sweet bird and will be using more often:-)

Enjoy and Happy Stamping

Supplies:
Stamps: SSS Messages for Everyday sentiment.
Paper: Craft Consortium Craft Papers "Ink Drops-Oceans".  SU Basic White 100# and Basic Black.
Inks: Archival Jet Black sentiment.
Accessories: SSS "Layered Chickadee" die.  SSS Postage Stamp Edge Frames dies.  Spellbinders "Hemstitch Squares" dies. Connect Glue. Fine Tip Bottle for glue.

************************

I am sending my card over to these challenges:

NBUS Never Before Used Stuff Challenge #47  SSS Layered Chickadee Die.

Double D Challenge Birds  
                                                       

Allsorts Challenge 

Week 716 🦋Anything Goes with Option of Wings!


Wednesday, February 15, 2023

2023 Valentine for Denny

2023 Valentine for Denny made with Love💖

I  used a Spellbinder Square Hemstitch Die to cut the alcohol ink on Yupo
paper background that I found in my stash.
Then die cut the SSS Stacked Hearts from Yupo so the whites would match.

I attached the pretty background to Yupo using double stick tape.
Then the challenge, attaching the die cut hearts over the background using 
Gina K Connect Glue.  The hearts were not sticking!  I finally realized I needed
to weigh down the die cut Stacked Hearts,  which I did with my large SU 
acrylic block for several minutes.  Worked great:-)

My loving sentiment, etc is on the inside of the card😍

I added a Yupo layer over SU Basic White card base so all my white layers
matched perfectly!  

I  received a beautiful potted orchid from Denny that we get to enjoy for a couple
of months as it is FULL of many buds and a few blooms😄

Hope you all had a wonderful Valentine's Day too💘

Love and Hugs..


Supplies:
Stamps: None
Paper: Yupo
Inks: Ranger Alcohol Inks..red and pink tones.
Accessories: SSS Stacked Hearts Die.  Gina K Connect Glue.  Fine Tip Bottle.  SU Clear Large Acrylic Block., Spellbinder Curved Tweezers.


Friday, February 3, 2023

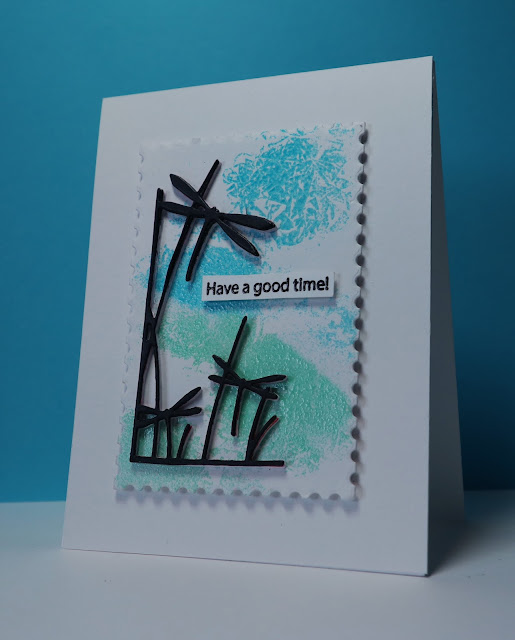
Using Group of Seven Cardmakers Heat Embossed Background Technique

Group of Seven Cardmakers Blog Creative Heat Embossed Backgrounds!


After seeing all the beautiful cards by the seven creative cardmakers using the
Heat Embossed Backgrounds Techniques I knew I had to play😊

I loved how my card turned out and hope you do too!

I used Strathmore Mixed Media paper for my background.
Scrunched up a piece of cling wrap and dabbed onto Versamark Ink pad and
then dabbed ink onto MM paper.

Then used "Ranger Distress EB Glaze" Broken China and Cracked Pistachio and
heat embossed.  I used my new to me SSS Hot Hands Red tool to hold
my paper securely with out burning my fingers:-)  (cool tool)

 I then die cut the heat embossed background with 
SSS "Postage Stamp Edge Frames Die".
I attached 5 layers of Memory Box "Dragonfly Stems Left Corner" die
using A Must Have Gina K Designs "Fine Tip Bottle" (3 in a set).
Why 5 layers?  I tried 2 white then 1 die cut PP then 1 Alcohol Ink layer then
the 5th Strathmore MM Black dragonfly corner before I was satisfied...LOL!

Next I stamped and heat embossed the SSS "Messages for Everybody" sentiment.
Popped up the sentiment and main image with craft foam.
Attached to MM paper with glue and attached to SU Basic White CS
and Done!

I was very happy with the easy Heat Embossed Background Technique😊
I liked how the black dragonflies and sentiment popped too.

Thank you Lolly for creating the blog and for all seven of you
very creative experienced cardmaker friends!!
I am looking forward to your March background techniques too😊


Supplies:
Stamps:  SSS Messages for Everyone.
Paper: Strathmore MM and Black MM.  SU Basic White
Inks: Versamark
Accessories: Distress EB Glaze Broken China and Cracked Pistachio.  SSS Postage Stamp Edge Frames.  MB Dragonfly Stems Left Corner.  Gina K Fine Tip Bottles (3 in pkg).  SSS Hot Hands Red. Craft foam. Sizzix Fine Tip Curved Tweezers (Amazon)...another must have tool for attaching Dies,  especially layering dies:-)